I know how frustrating it can be when your outdoor furniture looks grimy just as the entertaining season arrives. There’s nothing worse than inviting guests over only to realize your patio chairs are covered in dust and debris.
Plastic furniture remains one of the most practical choices for outdoor spaces. It’s affordable, lightweight, and stackable for easy storage. However, it requires proper care to maintain its appearance and longevity.
In this guide, I’ll walk you through the complete process of cleaning plastic patio furniture effectively, providing specific methods for each type of furniture.
From tackling stubborn dirt trapped in table grooves to protecting your investment with proper storage techniques, you’ll learn everything needed to keep your outdoor furniture looking fresh and welcoming for guests all season long.
Why Plastic Furniture Needs Special Care?
Plastic outdoor furniture faces unique challenges, making regular maintenance essential. Unlike other materials, plastic is particularly vulnerable to UV degradation, which causes brittleness and discoloration over time. The lightweight nature that makes plastic furniture so convenient also means it’s more susceptible to collecting dust and debris.
Stacked chairs create perfect hiding spots for insects and spiders, while textured surfaces trap dirt in grooves and patterns. Without proper cleaning, these issues compound quickly, leading to permanent staining and structural weakness.
Key challenges plastic furniture faces:
- UV rays cause brittleness and color fading
- Lightweight design attracts more dust and debris
- Textured surfaces trap dirt in hard-to-reach places
- Stacked furniture becomes a bug hiding spot
- Problems compound quickly without regular care
- Permanent staining develops from neglect
Understanding these specific vulnerabilities helps you approach cleaning with the right techniques and timing. The good news is that plastic furniture responds well to gentle, consistent care.
Regular maintenance not only preserves the appearance but also significantly extends the lifespan, making your investment worthwhile for years of outdoor enjoyment. Small efforts now prevent expensive replacements later.
Complete Cleaning Method
All plastic furniture follows the same basic cleaning principles: gentle assessment, thorough rinsing, mild cleaning solutions, soft scrubbing techniques, and proper protection.
The key differences lie in the specific approaches needed for each furniture type’s unique challenges.
Materials and Tools Used:
Having the right supplies makes plastic furniture cleaning efficient and prevents damage during the process.
| Category | Item | Purpose |
|---|---|---|
| Cleaning Supplies | All-purpose cleaner | General dirt and grime removal |
| Water | Diluting cleaners and rinsing | |
| Soft cloth or soft-bristled brush | Gentle scrubbing without scratching | |
| High-pressure cleaner (optional) | Heavy-duty cleaning for stubborn dirt | |
| Small detail brush | Cleaning grooves and tight spaces | |
| Microfiber cloths | Lint-free drying and polishing | |
| Protection | All-weather furniture covers | UV protection and dust prevention |
| Undercover storage area | Long-term furniture protection | |
| Equipment | Garden hose | Initial rinsing and final cleanup |
| Soft brush | Detailed cleaning of grooves and patterns | |
| High-pressure cleaner (for stubborn areas) | Effective for pattern grooves and heavy dirt |
1. Stackable Plastic Chairs
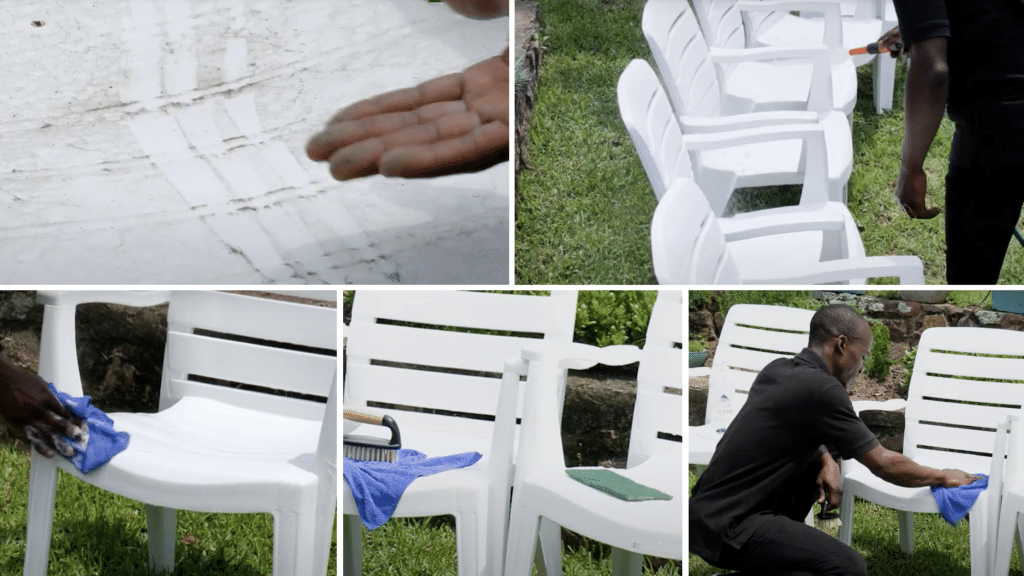
Step 1: Preparation and Assessment.
Stackable chairs are notorious dust traps when left stacked without covers. Separate all stacked chairs to access every surface properly.
Check underneath each chair for spider webs, gecko hiding spots, and wasp nests that commonly accumulate in these protected spaces. Remove any visible nests or creatures safely before beginning.
Step 2: Initial Cleaning
Start with a thorough hosing to remove loose dust and debris. Mix a mild solution of all-purpose cleaner and This gentle approach prevents plastic brittleness while effectively removing grime.
Step 3: Detailed Scrubbing
Apply your cleaning solution using only soft cloths or soft-bristled brushes. Work systematically from top to bottom, paying attention to chair legs and connection points where chairs nest together.
For stubborn dirt, scrub with a soft brush in alternating directions to ensure thorough cleaning without creating scratches that will trap future dust.
Step 4: Final Steps
Rinse thoroughly with clean water, ensuring all soap residue is removed. Allow chairs to dry completely before restacking to prevent moisture from being trapped between pieces, which can lead to mold and mildew growth.
Small Plastic Tables with Stamped Patterns
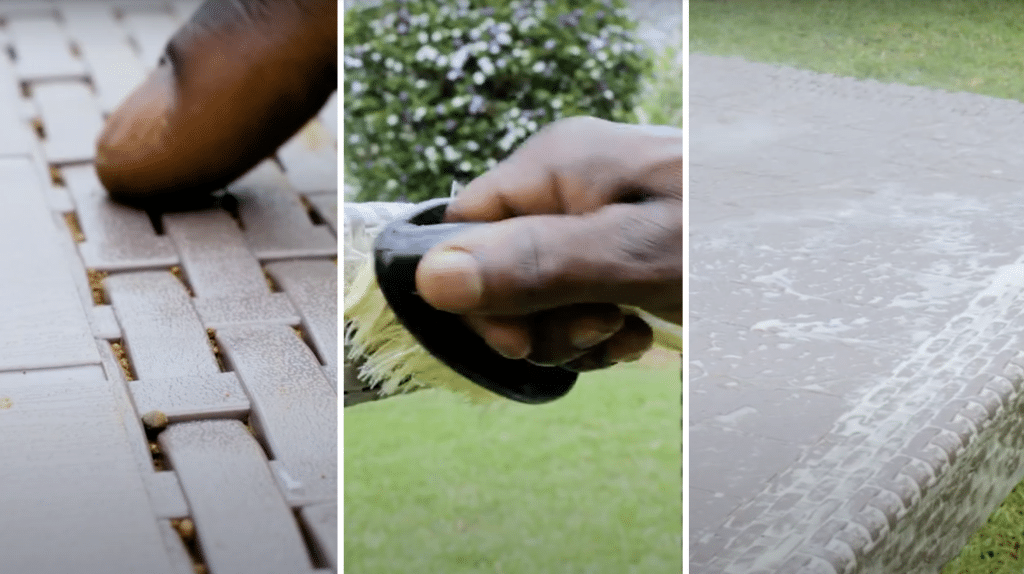
Step 1: Pattern Assessment
Tables with stamped patterns present unique challenges as dust and dirt become trapped in small grooves and decorative indentations molded into the plastic surface. Examine the pattern depth and dirt accumulation before starting.
Step 2: Initial Cleaning
Begin with thorough hosing, ensuring water reaches into all pattern grooves. Mix your mild all-purpose cleaner solution for safe, effective cleaning.
Step 3: Specialized Groove Cleaning
Use a smaller soft-bristled brush to reach into pattern grooves. Work the brush in alternating directions to dislodge trapped debris from the deepest parts of the stamped design.
For heavily soiled pattern areas, a high-pressure cleaner proves particularly effective at blasting dirt from intricate grooves that manual scrubbing might miss.
Step 4: Final Steps
Rinse thoroughly, paying special attention to ensure all cleaner is removed from grooves. Allow to air dry completely before covering or storing.
Complete Patio Sets

Step 1: Comprehensive Inspection
Before cleaning a complete patio set, conduct a thorough inspection of the space underneath tables and chairs. This area creates perfect hiding spots for spiders, geckos, and wasps that may have built nests in the protected environment.
Step 2: Coordinated Cleaning Process
Clean the entire set using the same systematic approach: initial hosing, application of a mild cleaner, soft brush scrubbing in alternating directions, and thorough rinsing.
The benefit of cleaning sets together is the efficiency of solution preparation and the consistent results achieved across all pieces.
Step 3: Protection and Storage
Once the entire set is completely clean and dry, cover it with matching all-weather furniture covers designed for your specific furniture configuration. These covers protect against UV rays and keep furniture cleaner for longer periods.
Video Tutorial
I want to acknowledge BuildersSA for the insightful video, which served as a key reference in compiling this guide.
Common Problems and Solutions
Address specific issues that affect the appearance and longevity of plastic furniture with targeted cleaning techniques.
1. Dealing with Discoloration
Plastic furniture often develops unsightly discoloration from prolonged sun exposure or environmental factors. For yellowed or faded surfaces, create a paste using baking soda and water.
Apply this mixture to discolored areas and let it sit for 15-20 minutes before scrubbing gently with a soft brush. For stubborn stains, try a solution of equal parts white vinegar and water.
The acidic properties help break down discoloration while being gentle on plastic surfaces.
2. Tackling Oxidation Issues
Oxidation appears as a chalky, white film on plastic surfaces, making furniture look dull and worn. This occurs when plastic degrades from UV exposure.
To address oxidation, use a mild abrasive like toothpaste (non-gel variety) on a damp cloth. Rub in circular motions over oxidized areas, then rinse thoroughly.
For severe oxidation, an automotive plastic restorer can help rejuvenate the surface and restore its original appearance.
Repair and Maintenance Solutions for Plastic Furniture
Beyond basic cleaning, plastic furniture occasionally requires repairs and targeted maintenance to address wear and tear. This section covers repairing common damage and implementing preventive measures to extend the lifespan of your furniture.
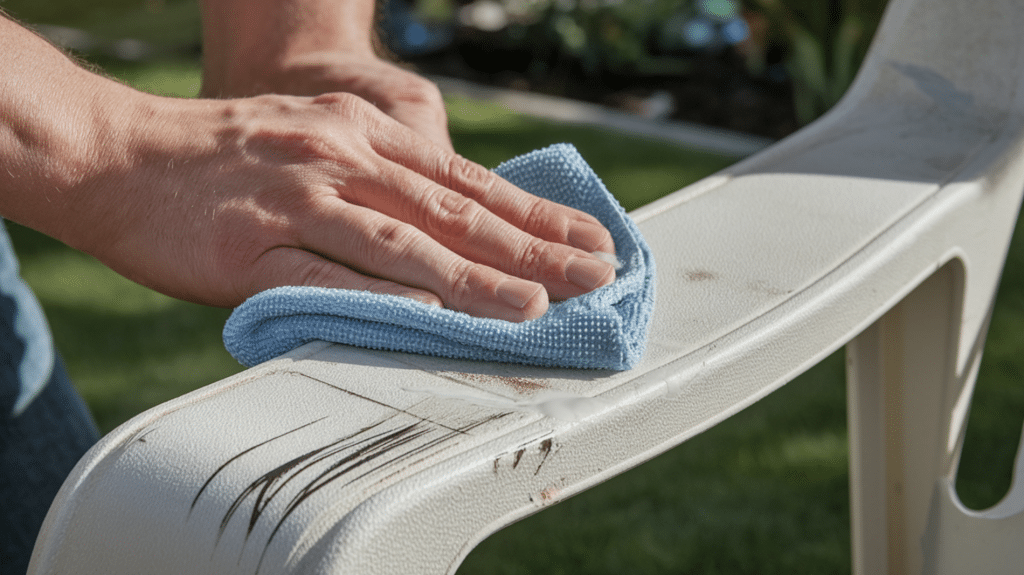
1. Repairing Minor Damage
Small scratches and scuff marks are common on plastic furniture. For surface scratches, use a plastic polish or car wax applied with a microfiber cloth.
Work the product into the scratch using circular motions. Deeper scratches may require fine-grit sandpaper (220-grit) followed by plastic polish. Always test repair methods on an inconspicuous area first.
2. Removing Stubborn Stains
Different stains require targeted approaches:
- Mildew and mold: Mix one part bleach with ten parts water. Apply, let sit for 10 minutes, then scrub and rinse thoroughly.
- Rust stains: Use lemon juice or white vinegar applied directly to the stain. Let it sit for several minutes before scrubbing.
- Food and drink stains: A paste of baking soda and dish soap works effectively for most organic food and drink stains.
3. Preventing Future Damage
Understanding the root causes helps prevent recurring issues. UV rays are the primary culprit behind discoloration and brittleness.
Even when using furniture covers, choose covers with UV protection ratings. Rotate furniture periodically to ensure even wear patterns. During extreme weather conditions, move furniture to completely sheltered areas rather than relying solely on covers.
Long-Term Care and Replacement
Maximizing your plastic furniture investment requires strategic seasonal care and knowing when replacement becomes necessary.
1. Seasonal Maintenance Schedule
Different seasons require varying levels of attention for your plastic furniture. During spring, perform a thorough deep clean to remove winter buildup and inspect for any damage that may have occurred during storage.
Summer maintenance focuses on weekly rinses and monthly deep cleaning due to increased usage and exposure. Fall preparation involves applying protective treatments and ensuring proper coverage before winter storage.
Winter care means checking covers periodically and removing any snow accumulation that could cause stress on the furniture structure.
2. When to Replace Your Plastic Furniture
Even with excellent care, plastic furniture has a finite lifespan.
Signs that indicate replacement time include visible cracks that compromise structural integrity, extreme brittleness where pieces break under normal use, and permanent discoloration that affects appearance despite cleaning efforts.
Additionally, if joints become loose and wobbly or if the furniture no longer stacks properly due to warping, it’s time to invest in new pieces.
Quality plastic furniture typically lasts 5-8 years with proper maintenance, making it a cost-effective choice for outdoor living spaces.
Additional Care Tips
- Avoid leaving plastic furniture in direct sunlight when not in use, as plastic is not UV stable and becomes brittle over time.
- Stacked chairs without covers become real dust traps – always use furniture covers.
- Most cleaning jobs require hosing off and cleaning with a mild all-purpose cleaner solution.
- Always use soft cloths or soft-bristled brushes; never use scourers, as they scratch plastic and create dust-collecting grooves.
- Even with covers, store furniture undercover when not in use for maximum protection
- Regular maintenance cleaning prevents heavy dirt buildup and extends furniture’s lifespan.
Conclusion
Maintaining clean plastic patio furniture doesn’t have to be overwhelming. With the right approach and basic supplies, you can restore your outdoor pieces to their original condition.
Remember that prevention is key. Regular hosing and gentle cleaning will help prevent stubborn buildup later. Investing in quality furniture covers pays off by extending your furniture’s lifespan and reducing the frequency of cleaning.
Your plastic furniture can serve you well for years when properly maintained. By following these systematic cleaning steps and protective measures, you can ensure that your outdoor space remains inviting and comfortable.
The combination of gentle cleaning techniques and smart storage solutions will keep your patio furniture looking presentable throughout every season, making your outdoor entertaining experiences more enjoyable for everyone involved.