I found something game-changing last year—you can totally spray paint glass! That boring vase gathering dust on your shelf could be your next masterpiece.
Glass is the unsung hero of DIY makeovers. With just a can of spray paint and a little patience, I’ve converted everything from wine bottles to mason jars.
The satisfaction of watching a dollar-store find turn into something that looks high-end is honestly addictive.
Think about all those glass items you’ve been holding onto “just in case.” Your aunt’s weird vase, empty pasta sauce jars, that plain candle holder.
They’re practically begging for a makeover! When I’m feeling that creative itch on a Sunday afternoon, I grab my spray paint and turn ordinary glass into something worth showing off. It’s cheaper than therapy and way easier than learning to knit.
Stuff You Actually Need (Don’t Overthink This)
Grab these before you start channeling your inner spray-paint Picasso:
- Spray paint made for glass or multi-surface
- A bottle of rubbing alcohol (not for drinking!)
- Painter’s tape (because precision = power)
- Gloves, mask, and maybe an old hoodie
- Drop cloth or box to spray inside
- Optional: a glass primer if you’re feeling fancy
Mini Pro Tip: Metallic and frosted finishes are the Beyoncé of spray paints—always show-stoppers.
They’re forgiving (hide smudges and uneven spots), catch the light beautifully, and somehow look more expensive than they actually are.
The Chaos-Free Step-by-Step (You Got This)
Step 1: Clean Like You’re Hosting Your Mother-in-Law

Wash with dish soap
Scrub every surface the paint will touch. Any missed spot is where your paint will decide to rebel.
Wipe with rubbing alcohol to ditch every last fingerprint
This removes residual oils that soap might miss. Squeaky-clean glass = paint that actually sticks around for the long haul.
Step 2: Tape It Like a Pro

Want a clear stripe or color block? Use painter’s tape like it’s washi tape for grown-ups.
Press down firmly along all edges to prevent bleeding. For curved designs, you can get flexible painter’s tape that bends with your glass contours. Remove the tape while the paint is still slightly tacky for the cleanest lines.
Step 3: Create a Spray Station
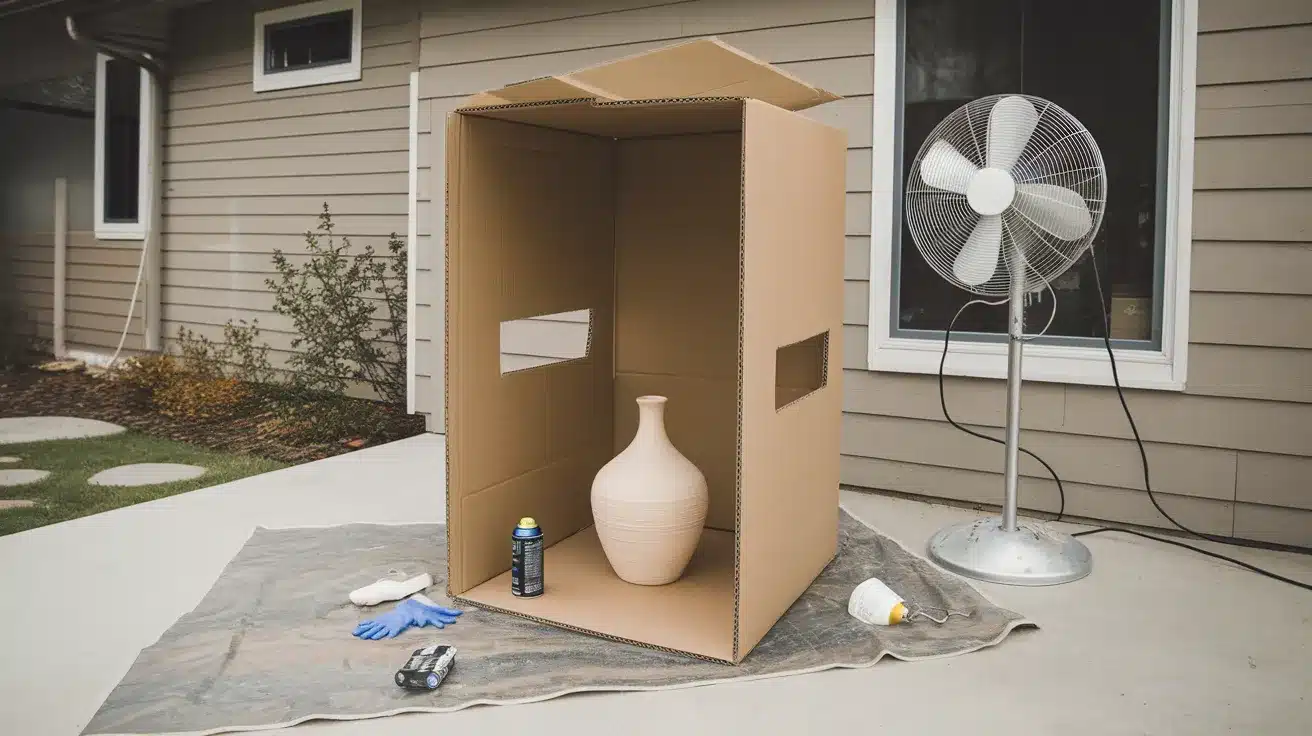
Garage, backyard, giant cardboard box—just don’t do this in your kitchen.
Ideally, choose a well-ventilated area where a light breeze won’t carry paint onto your neighbor’s white picket fence. If outdoors isn’t an option, remake a cardboard box into a spray booth by cutting out one side and spraying into it.
Step 4: Spray Like a Confident DIY Queen/King
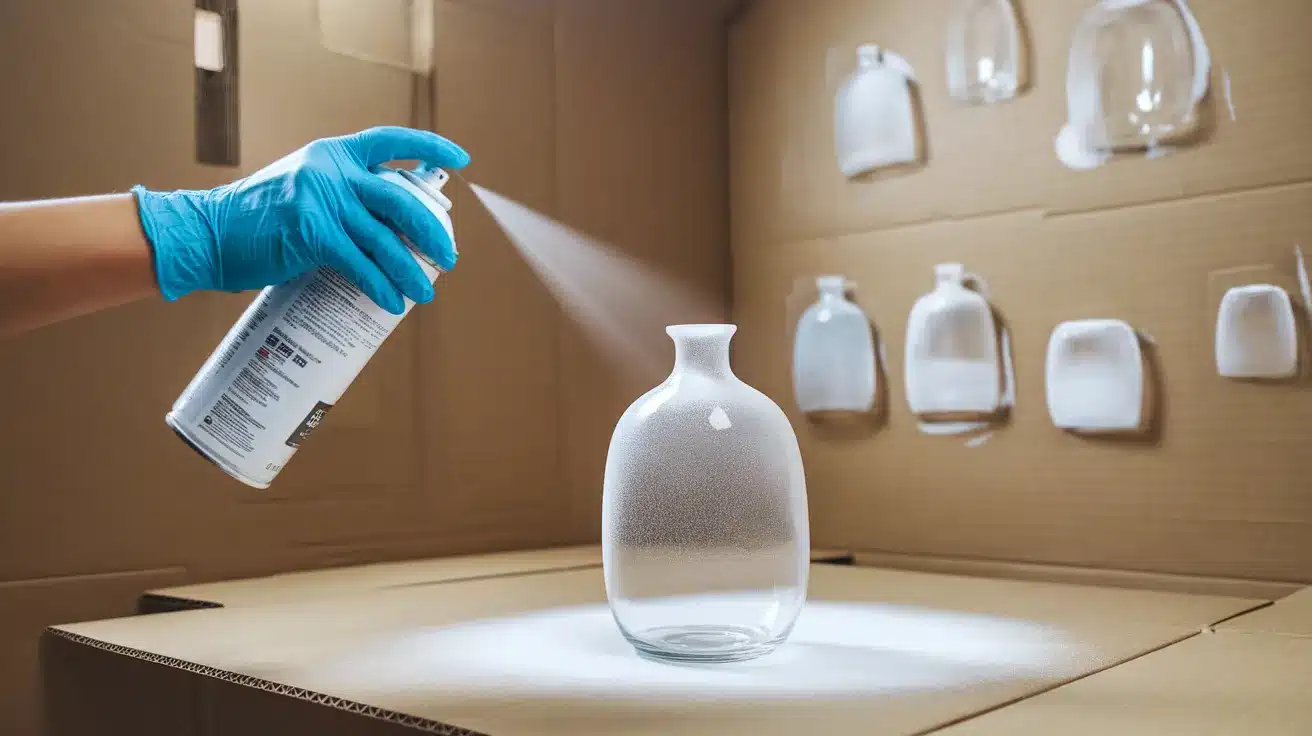
Light, even coats
The cardinal rule of spray painting anything: Multiple light coats always beat one heavy coat. Always. Your first coat might look spotty and sad—this is normal. Keep going.
Hold that can 8–10 inches away like it owes you money
Too close = drips and puddles. Too far = weird texture that looks like orange peel. The sweet spot is about the length of a school ruler.
No drippy disasters, okay?
Keep the can moving in a sweeping motion. Start spraying slightly off the glass and end slightly off the other side. This prevents the dreaded paint buildup that leads to drips.
Step 5: Chill While It Dries

Dry to touch: 1 hour
This is when you can carefully handle it without leaving fingerprints, but don’t get cocky yet.
Fully cured: 24–48 hours.
This is when the paint has chemically bonded with the surface and reached maximum durability. Worth the wait.
Patience, grasshopper.
Rushing this step is how perfectly good projects get ruined. Use this time to scroll through social media and plan your next DIY takeover.
Rookie Mistakes You Wanna Avoid
Think of these as your DIY red flags:
- Blasting on one heavy coat like it’s hairspray in the ’90s: Heavy coats lead to drips, uneven coverage, and that “I let my toddler do this” look. Hug the multiple-thin-coats philosophy.
- Painting on dirty, greasy glass—ew: Skipping proper cleaning is setting yourself up for heartbreak when the paint peels off later. Those invisible oils from your fingers are paint’s worst enemy.
- Skipping drying time because you’re too excited: I get it—watching paint dry isn’t exactly Netflix-binge exciting. But handling it too soon or applying a second coat before the first is dry leads to tacky messes and fingerprints.
- Forgetting to rotate the piece: Remember to hit it from all angles, including underneath rims and inside areas visible from certain angles. Nothing says “amateur hour” like missed spots.
- Using indoor-only paint on a porch vase (goodbye, dream): If your creation will live outdoors, make sure your paint is rated for exterior use. Otherwise, the first rainstorm will turn your masterpiece into a sad, peeling mess.
Don’t Stop There—Here Are Some Wild Ideas

Because plain painted glass is fine, but you’re not basic, are you?
1. Frosted Lantern Jars: Add fairy lights = instant Pinterest goals
Spray the inside of a jar with frosted glass paint, drop in a string of fairy lights, and boom—magical ambient lighting that looks like it cost way more than it did.
2. Stencil Designs: Think mandalas, stars, or cheeky quotes
Adhesive stencils + spray paint = custom designs without needing an art degree. Perfect for personalizing gifts or adding that special touch to your home decor.
3. Ombre Bottles: Fade one color into another like a gradient goddess
Start with the darkest color at the bottom, gradually working lighter as you move up. Softly overlap each section for that seamless fade. Perfect for flower vases or bathroom containers.
4. Galaxy Jars: Speckle white paint over black for a mini universe
Start with a black base, then lightly mist with dark blue, purple, and a touch of white. Use an old toothbrush to flick tiny white “stars” across your cosmic creation.
5. Gold-Dipped Candle Holders: Luxe on a budget
Tape off the top portion and spray the bottom with metallic gold. The half-and-half look is both modern and sleek—perfect for holiday tablescapes or wedding centerpieces.
Final Words
I’ve converted dozens of glass pieces over the years, and the joy never fades. There’s something magical about taking a $1 thrift store find and turning it into something that looks custom-made. My painted Mason jar organizers fooled my sister-in-law into thinking I’d spent a fortune on them.
The key is preparation—clean thoroughly, use thin coats, and exercise patience. When mistakes happen (and they will), I remind myself that it’s paint on glass. Most errors can be fixed with a little rubbing alcohol or by starting over entirely.
My favorite part? The moment someone notices a painted piece and asks where I bought it. The look on their face when I say, “I made it,” makes every minute spent on these projects absolutely worthwhile.
Frequently Asked Questions
What Spray Paint Will Stick to Glass?
Spray paints specifically labeled for glass or multi-surface use work best. Brands like Krylon, Rust-Oleum, and Valspar make formulas designed to adhere to smooth, non-porous surfaces.
How do You Keep Spray Paint from Chipping Off Glass?
Clean glass thoroughly with alcohol before painting, apply thin layers, use a primer designed for glass, and seal with clear topcoat. Allow proper curing time between each step.
Why Does Spray Paint Crack on Glass?
Spray paint cracks when applied too thickly, when layers don’t dry completely between coats, or when the glass surface wasn’t properly cleaned of oils and residue beforehand.