I remember staring at my outdated ceramic tiles every morning, feeling frustrated by their dingy appearance that never seemed clean, no matter how much I scrubbed. Sound familiar?
Like many homeowners, I was caught between wanting beautiful floors and facing the reality of expensive renovations. That’s when I found tile painting – a game-changing solution that changed my space without breaking the bank.
After successfully completing my own project and helping friends tackle theirs, I’ve learned what works and what doesn’t. The results can be absolutely stunning when done right, but the devil is definitely in the details.
Let me share everything I’ve learned about painting ceramic tiles, from preparation secrets to long-term maintenance tips that actually work.
Is Painting Ceramic Floor Tiles Actually Possible?
Yes, you absolutely can paint ceramic floor tiles, but success depends heavily on proper preparation and product selection. This alternative to replacing tile floors works exceptionally well when done correctly, offering a budget-friendly solution that can completely transform your space.
When tile floor painting makes sense:
- Budget-friendly makeovers on a tight timeline
- Low to medium-traffic areas like bathrooms and laundry rooms
- Temporary refreshes before major renovations
- Rental properties where permanent changes aren’t feasible
When to reconsider:
- High-moisture areas with poor ventilation
- Heavy-traffic zones like main hallways
- Expecting zero-maintenance, permanent results
The key is managing expectations. While painted tiles won’t last forever, they can provide several years of beautiful results when properly executed.
Weighing the Pros and Cons
Before plunging into your DIY floor makeover, consider both sides of the equation.
The advantages are compelling:
- Completely customizable colors, patterns, and designs
- Minimal mess compared to tile removal
- Great for small spaces or temporary upgrades
- A fraction of the cost of retiling
The challenges to consider:
- Time-intensive prep work is absolutely critical
- May require periodic touch-ups in high-traffic areas
- Can chip or peel if not properly sealed or cured
- Durability concerns in heavy-use zones
Success stories often involve bathroom tile floor painting projects where homeowners report beautiful results lasting over a year.
However, challenges typically arise when preparation steps are rushed or when inappropriate products are used.
Essential Tools and Materials You’ll Need
Gathering the right supplies upfront makes the difference between professional-looking results and a disappointing outcome.
| Category | Supplies |
|---|---|
| Cleaning Supplies | Rust-Oleum Crud Cutter cleaner and degreaser Scrubber for stubborn areas Fresh water for rinsing Vacuum cleaner for debris removal |
| Paint System | Rust-Oleum Home two-step tile paint system Base coat paint (various colors) Clear top coat (matte finish) |
| Application Tools | Paint brushes (for cutting in) 3/8 inch roller (base coat) 1/4 inch roller (top coat) Tack cloth (for dust removal between coats) |
| Optional Supplies | Putty knife and pry bar (for removing baseboards) New baseboards and trim 18-gauge pin nailer (for installation) Caulk (for finishing) |
Step-by-Step Tile Floor Painting Process
The Rust-Oleum Home system makes this process surprisingly straightforward. Each step builds on the previous one, so resist the urge to rush.
Step 1: Baseboard Removal (Optional)
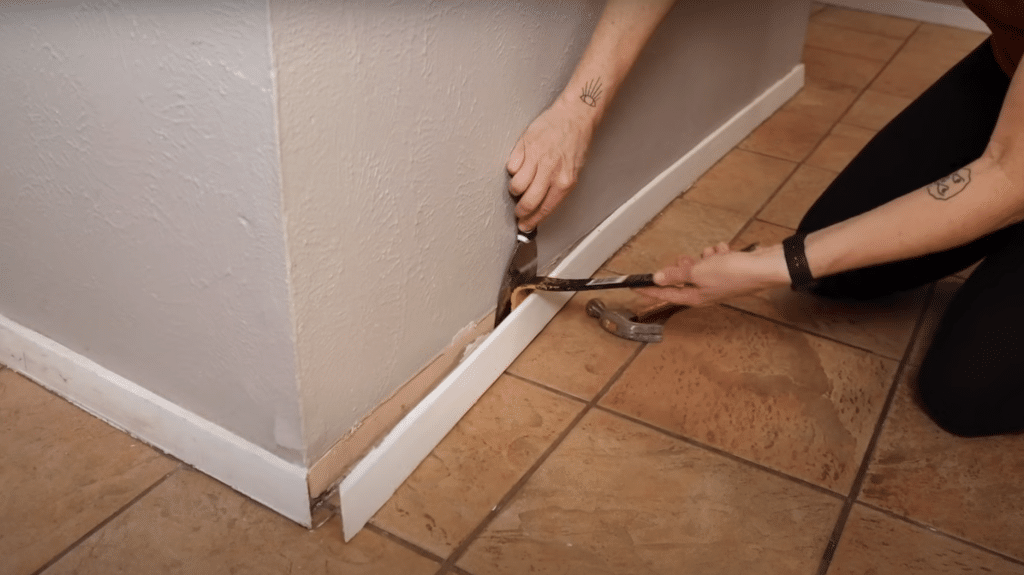
Remove old baseboards if they need replacement. Use a putty knife between the wall and a pry bar to prevent drywall damage while prying baseboards loose.
Work around the entire room systematically and remove any caulk left on the floor after removal.
Step 2: Initial Floor Cleaning
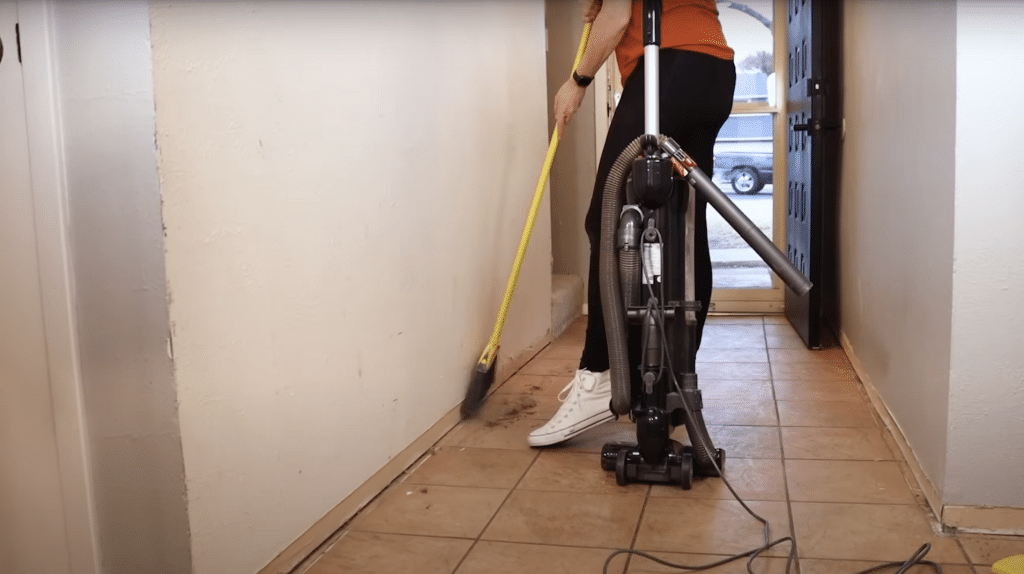
Start by vacuuming to remove any dirt and debris from the tile surface and grout lines.
This preliminary cleaning step removes loose material before applying cleaning products, ensuring dirt doesn’t mix with the cleaner during the deep cleaning process.
Step 3: Deep Cleaning with Crud Cutter
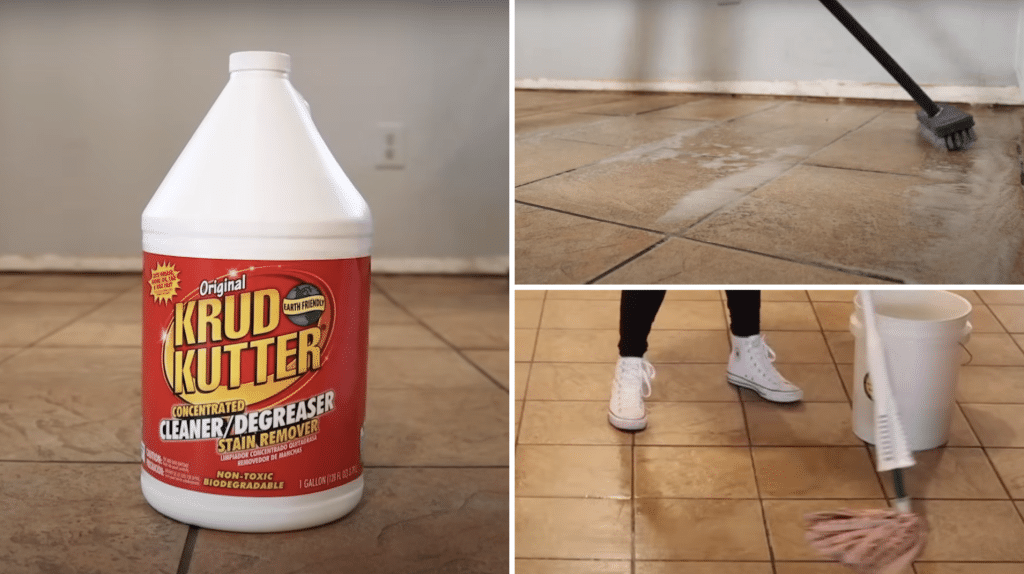
Apply Rust-Oleum Crud Cutter cleaner and degreaser to achieve a deep clean that regular cleaners cannot accomplish.
Use a scrubber to work the product into the tile surface, focusing on heavily soiled areas. Work in sections, scrubbing thoroughly with Crud Cutter, then use fresh water to mop it clean.
Step 4: Base Coat Application – Cutting In
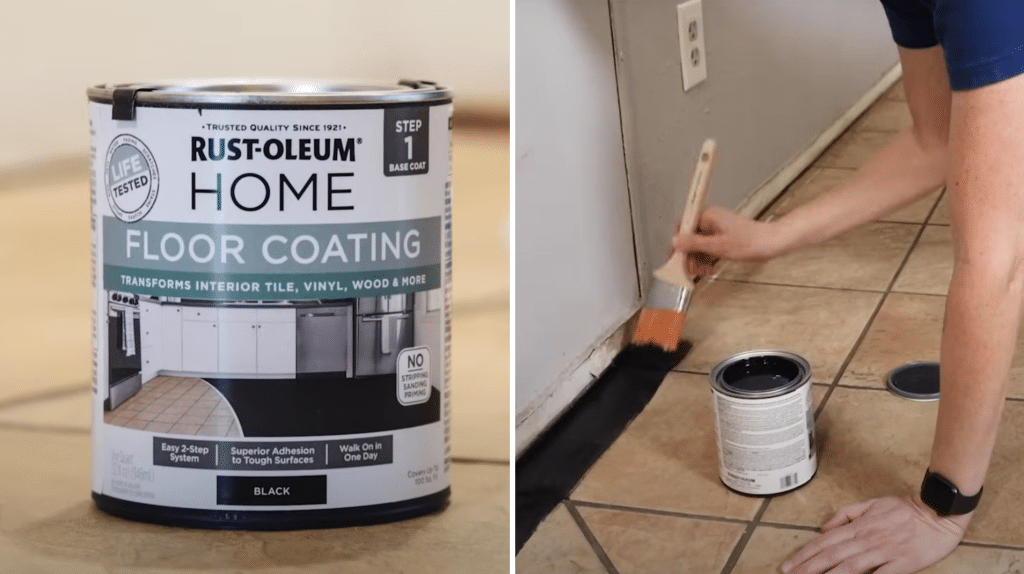
Begin painting with the base coat color using a paintbrush to cut in the perimeter, carefully painting edges and corners where rollers cannot reach effectively.
No sanding or priming is needed before application, making this step straightforward and efficient for immediate painting.
Step 5: Base Coat Application – Rolling
Use a 3/8 inch roller to paint the rest of the base coat across the main floor area.
Work in sections, keeping a wet edge to ensure a uniform finish, starting from the back so you can paint yourself out. Work in socks while painting to prevent dirt from getting on your feet.
The floor can be gently walked on in just 6 hours, making this process significantly faster than traditional painting methods.
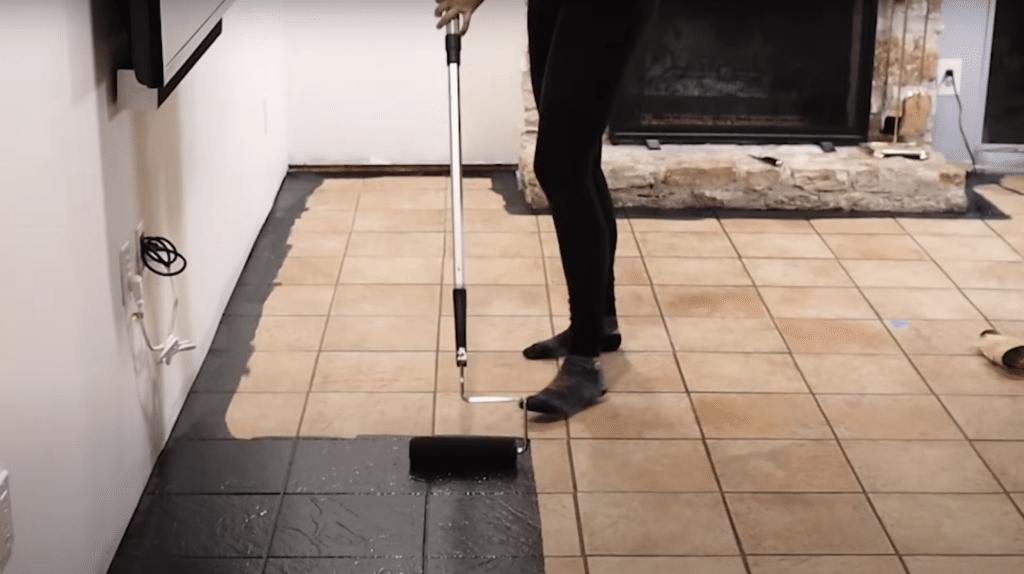
Step 6: Clear Top Coat Application
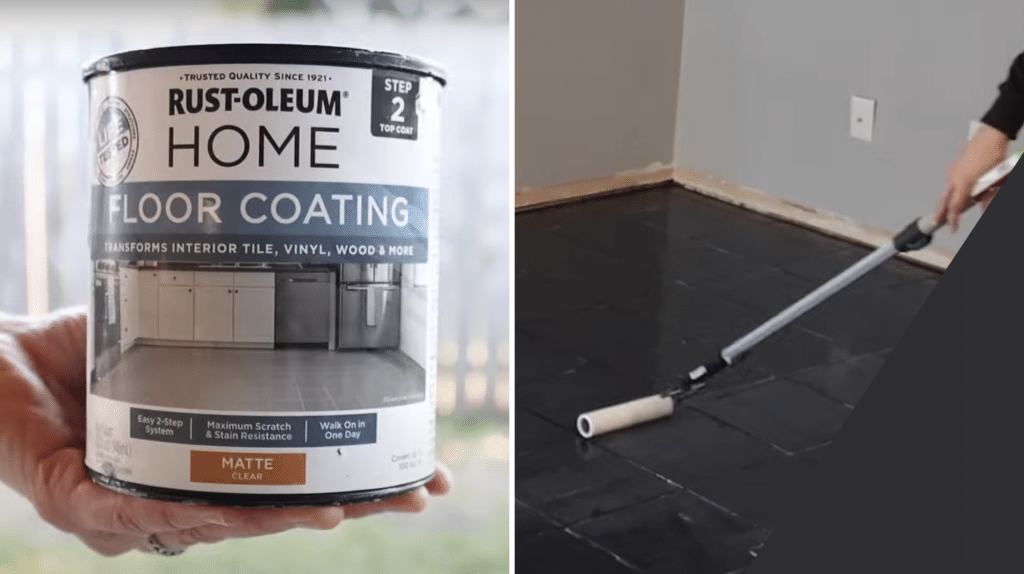
Apply the clear top coat using a 1/4 inch roller for optimal coverage.
Start in the farthest corner and roll on the top coat, working in sections while keeping a wet edge. The top coat goes on with a milky tint but dries totally clear.
Only one coat of top coat is required, and it needs 24 hours to dry before you can gently walk on it.
Step 7: New Baseboards Installation (Optional)
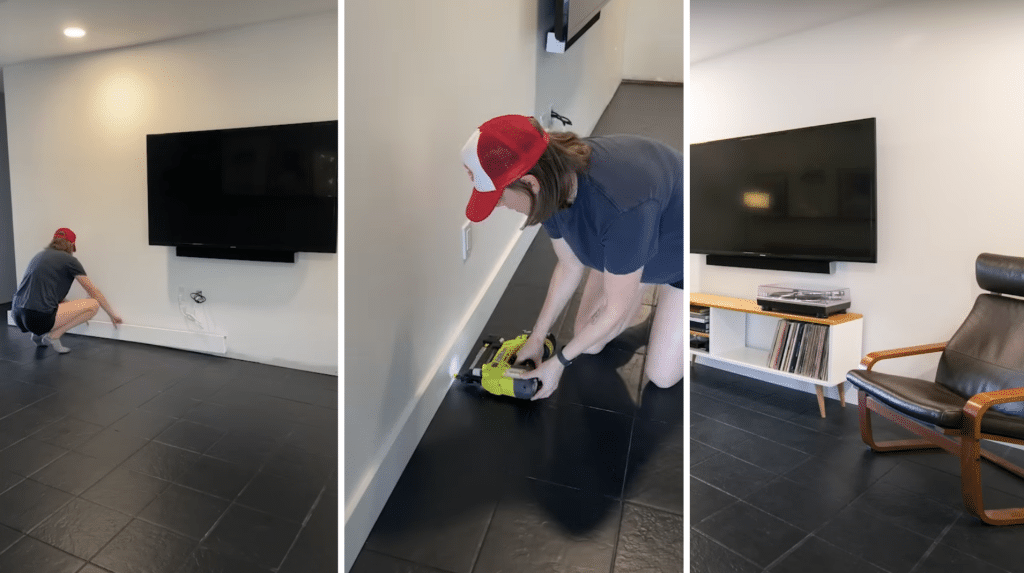
Cut new modern baseboards to the appropriate length and attach them securely with an 18-gauge pin nailer.
Apply caulk along the trim edges for a clean, finished look that completes the floor transformation and provides a professional appearance.
Video Tutorial
I’d like to acknowledge Maker Gray for the insightful video, which served as a key reference in compiling this guide.
Drying Times and Traffic Restrictions
Understanding proper curing schedules prevents premature damage to your freshly painted surfaces.
| Traffic Type | Wait Time | Notes |
|---|---|---|
| Light foot traffic | 24 hours | Socks only, no shoes |
| Normal household use | 72 hours | Avoid dragging furniture |
| Full cure | 7 days minimum | Complete chemical bonding |
During the curing period, avoid mopping or scrubbing the surface. Light sweeping is acceptable if necessary.
Maintenance Tips for Long-Lasting Results
Proper care can significantly extend the life of painted tile floors. Use gentle, non-abrasive cleaners and avoid dragging heavy furniture across the surface.
Maintenance best practices:
- Regular sweeping prevents scratches from tracked debris
- Gentle mopping with pH-neutral cleaners
- Immediate cleanup of spills to prevent staining
- Furniture pads to prevent scratching during rearrangement
Be prepared for occasional touch-ups, especially in high-traffic areas. Keep leftover paint for these inevitable repairs.
Common Challenges and Solutions
Even with careful preparation, issues can arise. Paint chipping typically indicates inadequate surface preparation or the use of inappropriate products for the application.
Grout discoloration in wet areas suggests insufficient sealing or using products not designed for moisture exposure. When this occurs, focus on improving ventilation and consider reapplying the topcoat more frequently.
Do’s for success:
- Never skip sanding, even for low-traffic areas
- Always use bonding primer and proper floor-grade paints
- Allow full cure time before judging final results
- For renters, consider peel-and-stick tiles vs painted tiles as reversible alternatives
Making the Investment Decision
Painting ceramic tile represents a practical middle ground between living with outdated floors and undertaking expensive renovations. While it won’t last forever, the modification can be dramatic and satisfying.
The best way to paint tile floors involves patient preparation, quality products, and realistic expectations. When executed properly, this temporary tile floor solution can provide years of enjoyment while you save for permanent upgrades.
Consider your specific situation: traffic patterns, moisture exposure, and long-term plans all factor into whether this DIY floor makeover makes sense for your space.
For many homeowners, the dramatic visual improvement justifies the effort involved, especially when using proven systems like the Rust-Oleum HOME floor coating system.
Remember, every successful tile painting project starts with thorough preparation and ends with proper sealing. Follow these tile painting tips and tricks, and you’ll be amazed at the transformation possible with some paint and patience.
Final Thoughts
Remaking tired ceramic floors doesn’t require a construction crew or months of disruption. With the right approach, quality materials, and realistic timeline expectations, painting tiles delivers impressive results that can last for years.
The process demands patience and attention to detail, but the payoff is substantial. I’ve seen countless spaces completely reinvented through this cost-effective method.
Yes, it requires effort upfront. However, the satisfaction of achieving professional-looking floors at a fraction of replacement costs makes every hour of preparation worthwhile.
Your floors can look amazing again – the power is literally in your hands.