Have you ever bitten into a pizza with that perfect crispy crust and smoky flavor that your kitchen oven can’t match?
I sure have, and it changed my pizza game forever! Making your wood-fired pizza oven might sound tough, but trust me—it’s doable with patience and the right instructions.
A DIY wood-fired pizza oven brings three major wins:
- That mouth-watering authentic taste
- Serious money saved compared to store-bought models
- A backyard feature that will make you the neighborhood’s favorite host.
Yes, this project takes some work and time, but don’t worry! I’ll walk you through each step. With basic tools and materials, you’ll soon be cooking pizzas that would make any Italian chef nod in approval.
Tools and Materials Required
Before heading to the store, make a complete list of everything you’ll need:
| Materials | Tools |
|---|---|
| 50-100 fire bricks | Wheelbarrow for mixing |
| 5-8 bags of refractory mortar | Trowel and level |
| Concrete mix for foundation | Angle grinder with masonry blade |
| Rebar grid (½ inch thickness) | Gloves and safety glasses |
| Insulation wool or vermiculite | Measuring tape and square |
| Metal flue pipe | Hammer and chisel |
Steps to Build a Diy Pizza Oven
Building your pizza oven might seem like a big task, but with some basic materials and patience, you can make a durable oven that will last for years.
The process takes time, but each step is simple enough for most DIY fans to handle.
Step 1: Laying the Foundation for Stability
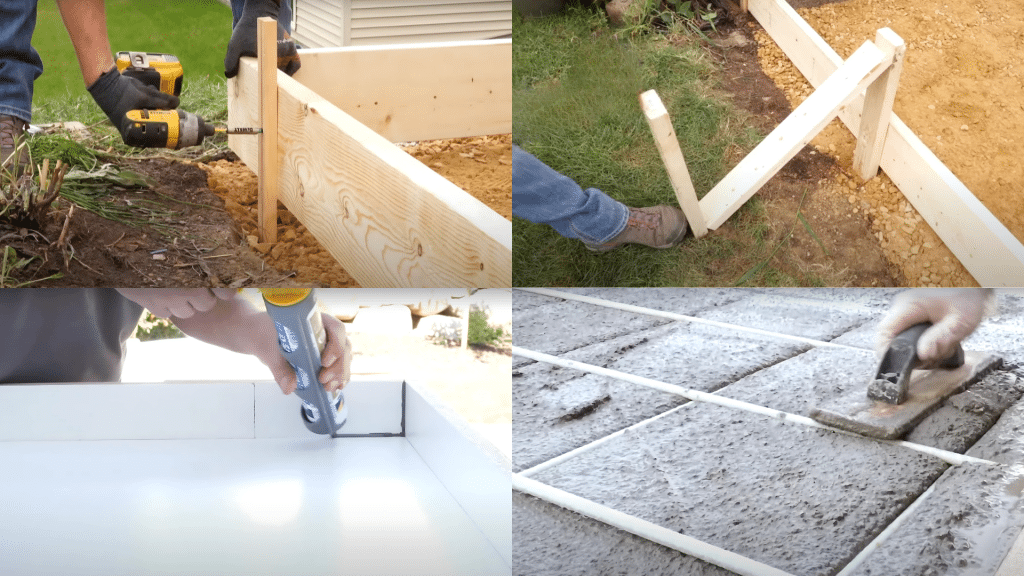
Create a frame with 2×10 lumber, add gravel for drainage, and pour concrete below the frame top. Let it cure for 24 hours.
For the capstone, use melamine-coated boards and fiberglass rebar to form a grid.
Pour concrete, remove air bubbles, smooth with a trowel, and allow several days to cure before moving forward.
Step 2: Building the Oven Base
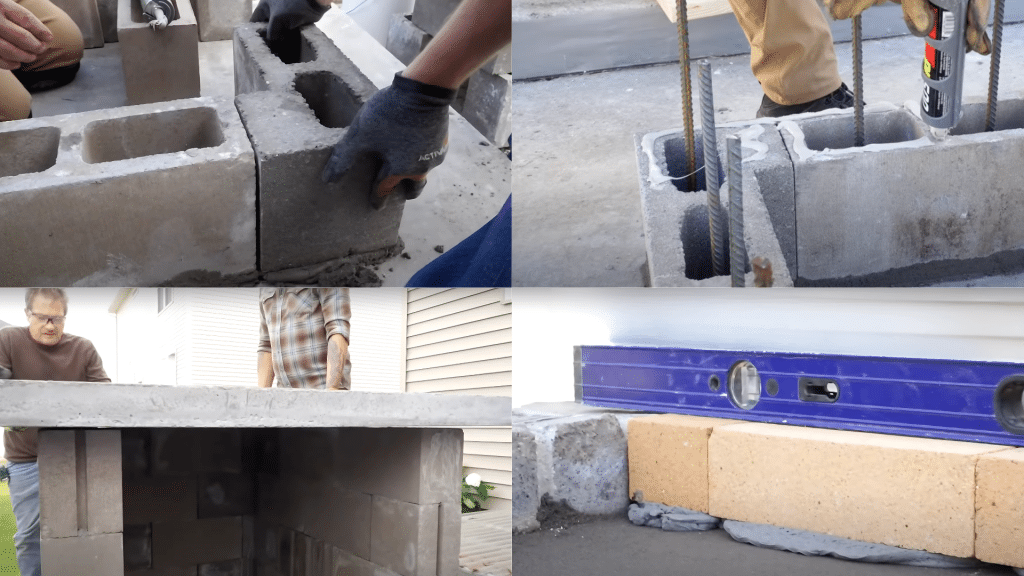
Use landscape adhesive instead of mortar for quick and easy concrete block assembly.
Lay out the first course, ensuring corners are square and blocks are level.
Stack the second course with offset joints for stability and check for plumb.
Before the adhesive sets, drill through block cores, insert rebar, and fill with concrete.
Once the capstone is cured, apply adhesive, lift it with friends, and place it carefully without sliding.
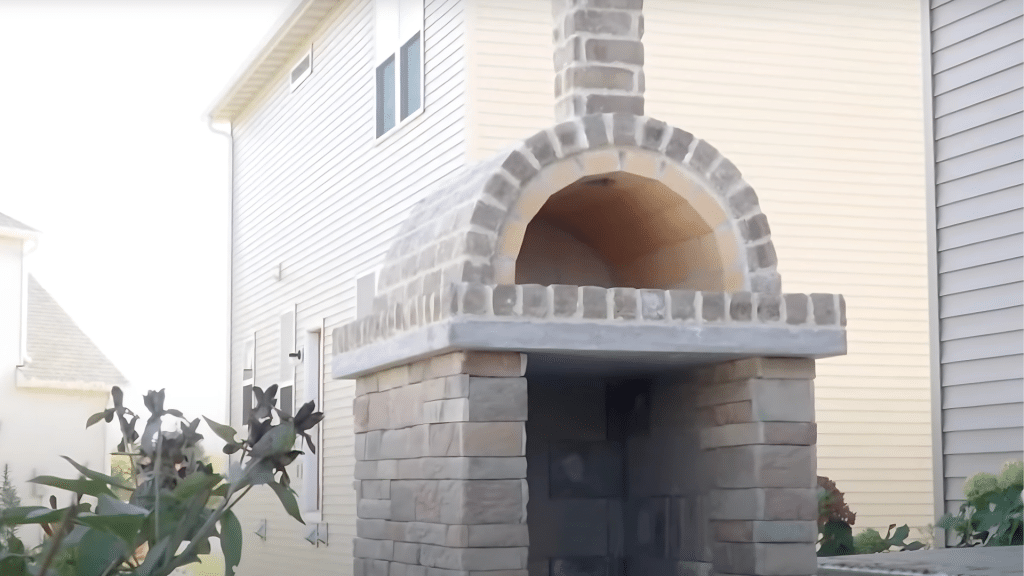
Step 3: Constructing the Pizza Oven Chamber
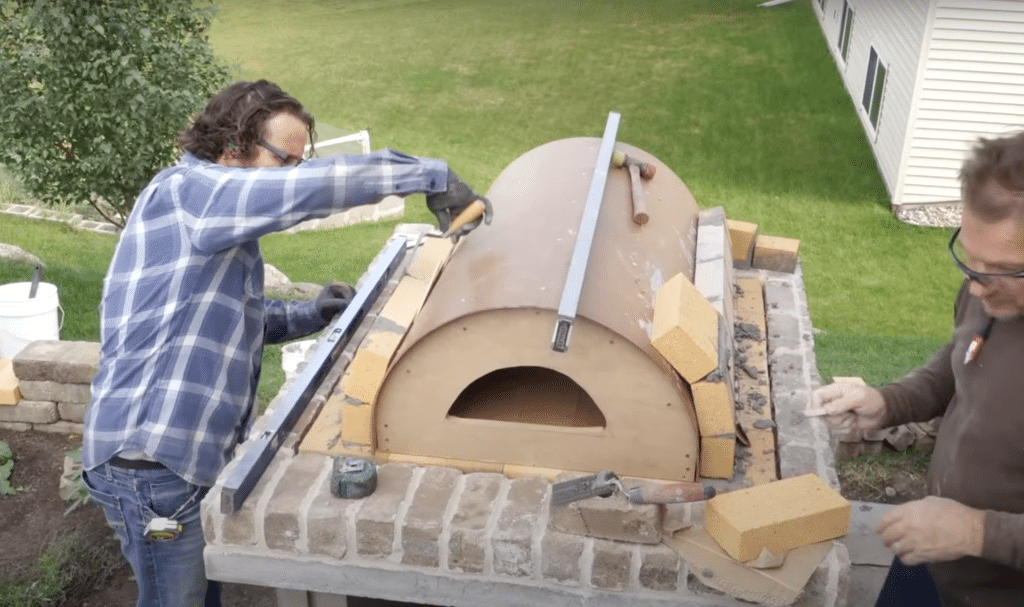
Fire bricks are essential for heat retention, ensuring consistent cooking.
Spread floor mortar evenly on the capstone and place bricks in a running bond pattern with 1/8-inch gaps.
Start with the perimeter, then fill the cooking surface for an even bake.
Create an arch form using plywood or MDF, reinforced with 2×4 braces and tempered hardboard.
Lay arch bricks from both sides, using refractory mortar, adjusting as angles shift for a strong, heat-resistant dome.
Step 4: Adding the Outer Brick Veneer & Finishing Touches
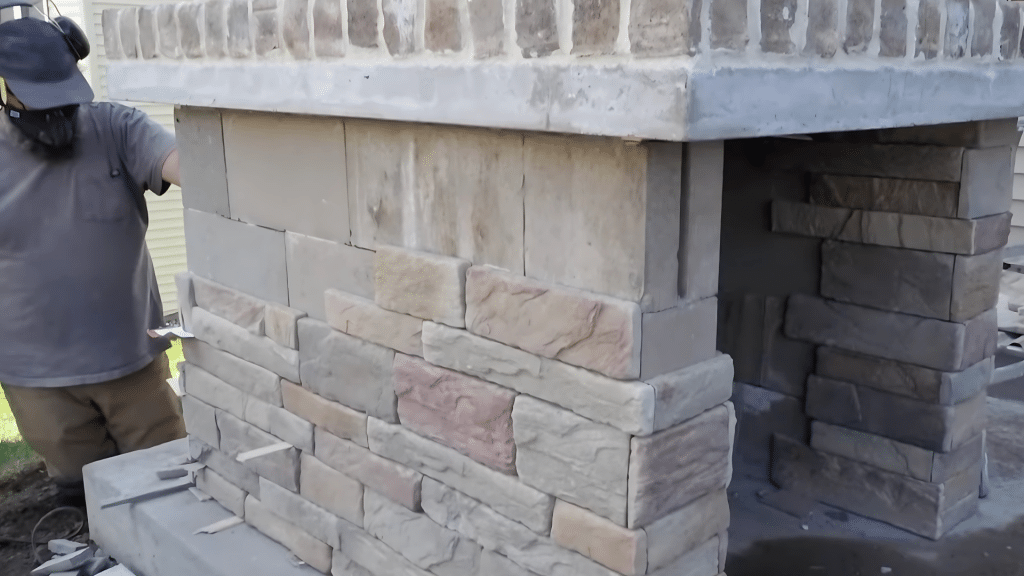
Apply a parge coat over the oven dome for a smooth base before adding brick veneer.
Use a grout bag for precise mortar application, starting at the bottom and working upward.
Stagger brick corners to prevent cracks and ensure durability.
Mark and cut space for the flue at the highest point, sealing it with refractory mortar for proper smoke ventilation.
Allow 3-5 days for full drying before firing up your oven for long-lasting performance.
Step 5: Curing the Oven & Getting Ready to Bake!
Take time during your pizza oven—it’s a slow process for lasting results.
Start with small fires at 200°F for two hours, cooling completely before repeating.
Increase the temperature by 50°F daily, reaching 700°F by the end of the week to prevent cracks.
Protect your oven with a weather-resistant coating and a chimney cap for better airflow.
Enhance your space with a stone prep counter, built-in seating, and soft lighting for unforgettable pizza nights.
Video Tutorial
For a more detailed video, you can watch How to Build a DIY Wood-Fired Pizza Oven by Family Handyman
Choosing the Perfect Location for Your DIY Pizza Oven
To make your delicious pizza, finding the perfect spot for your pizza oven is crucial for safety and convenience; look at the key factors for the same:
- Find flat, stable ground that can support the oven’s weight
- Ensure good airflow for smoke to exit properly
- Position close to where you’ll eat for easy food transfer
- Keep at least 10 feet away from your house, trees, or wooden structures
- Check local building codes before starting
Maintenance & Long-Term Care
Looking after your homemade pizza oven doesn’t have to be complicated. Here are the key maintenance tasks to keep it working well for years:
- Cool completely before cleaning with a soft brush (no metal tools)
- Wait for the cool oven before removing stuck food with wooden tools
- Wipe with a damp cloth after scraping (never use water in a hot oven)
- Small cracks are normal; repair larger ones with refractory mortar
- Cover with a waterproof tarp extending over the chimney when not in use
- Build a roof for snow protection in cold climates
- Apply water-repellent sealer before winter
- Run a final drying fire before seasonal storage
8 Common Mistakes to Avoid
Building a wood-fired pizza oven is an exciting project, but small mistakes can lead to structural issues, inefficient cooking, or even safety hazards.
Avoid these common pitfalls to ensure your oven performs beautifully for years.
- Skipping the Curing Process: Firing up too soon can cause cracks due to trapped moisture.
- Using Regular Bricks Instead of Fire Bricks: Fire bricks retain heat better and withstand high temperatures.
- Forgetting to Check Leveling: An uneven base can cause instability and uneven cooking surfaces.
- Improper Flue Placement: A misplaced chimney can lead to poor airflow and smoky cooking sessions.
- Applying Mortar Too Thickly: Thick joints can cause weakness and cracking in the oven structure.
- Using Too Much or Too Little Adhesive: Incorrect use of landscape adhesive affects structural stability.
- Neglecting Weather Protection: Rain and frost can damage the oven without a proper sealant or cover.
- Rushing the Construction: Cutting corners leads to structural weaknesses and poor heat retention.
The Bottom Line
You’ve turned simple materials into a backyard masterpiece that will bring delicious memories for years.
Nothing beats a perfect crust with just the right char marks, which only come from a wood-fired oven. The effort pays off with every bite.
Each time friends gather as you slide the fresh-topped dough into your oven, you’ll feel genuine satisfaction.
No one ever says no to homemade pizza night!
We want to see your creation. Share photos of your finished oven or your first pizza success.
Building brings joy, but eating brings even more!