Retaining walls on steep slopes often fail due to poor planning and wrong techniques.
I notice many homeowners struggle with walls that lean, crack, or completely collapse after just one season. Fixing these issues costs thousands in repairs and can even damage nearby structures.
Want to build a wall that stands firm for years? The solution lies in correct base preparation, proper drainage systems, and using the right materials for your specific slope.
In this blog, I’ll walk you through the exact steps to build a strong retaining wall on a slope. You’ll learn what materials work best, how to set a solid foundation, and the common mistakes that cause most walls to fail.
Why Is Building a Retaining Wall on a Slope So Challenging?
Slopes create many problems that flat land doesn’t have. The steeper your slope, the more force pushes outward against your wall. This makes both the planning and building steps much harder than level-ground projects.
Water flows differently on hills, too. Rain rushes down instead of soaking in, which can wash out your wall base or create pressure behind it. Without proper planning, you might build a wall that looks good at first but fails within months.
Key challenges include:
- Gravity constantly pulls both the wall and the hill downward
- Water runs faster on slopes, increasing erosion risk
- Uneven ground makes keeping the wall level more difficult
- The steeper the slope, the more pressure pushes against the wall
- Wall stability depends on correctly judging soil strength and water flow
Planning and Preparation
A. Assessing the Slope and Site
The first step in building a lasting retaining wall is a good look at your slope. The angle of your hill affects how much pressure will push against your wall. Steep hills need stronger, more sturdy walls.
Soil type matters too. Clay soils hold water and put more pressure on walls than sandy soils. Test your soil by grabbing a handful – if it sticks together when wet, you have clay-rich soil that needs extra drainage.
Check the water flow during rain. Watch where water runs down the slope. Your wall design must work with, not against, these natural water paths.
Look for things that might get in your way:
- Tree roots that need removal
- Old concrete pieces or rocks
- Underground pipes or wires (call your utility company first!)
B. Designing the Wall
The height of your wall depends on your needs. Walls over four feet tall often need permits and maybe an engineer’s review. Check with local building codes.
Pick the right wall type for your slope:
- Gravity walls – These rely on their own weight to hold back soil. Best for walls under 3 feet.
- Reinforced walls – Use geo-grid mesh layers to hold soil in place. Good for taller walls.
- Cantilevered walls – Have a concrete base that extends under the soil. Used for very high walls.
Set up a straight line at the top of your slope as a guide. This benchmark helps you keep your wall straight on uneven ground. Use stakes and string to mark this line.
Retaining Wall on a Steep Slope: Step-By-Step Guide
Building a retaining wall on a slope requires careful attention to each construction phase. Following these steps in order ensures your wall will stand strong against the pressures of both soil and water.
Materials and Tools Checklist:
| Materials | Purpose |
|---|---|
| Retaining wall blocks | Main building material (concrete, stone, or timber) |
| Modified stone base | Creates a stable foundation (¾” crushed stone) |
| Clean stone | For drainage behind the wall (no small particles) |
| Geo-grid reinforcement | Mesh that strengthens tall walls |
| Perforated pipe | Collects and directs water away from the wall |
| Filter fabric | Prevents soil washing into the drainage system |
| Tools | Purpose |
|---|---|
| Compactor | Firms up base materials |
| Level | Ensures blocks are even |
| Plate tamper | Compact the soil and base |
| Shovel | For digging and moving material |
| Saw | Cuts blocks when needed |
| Wheelbarrow | Moves materials around the site |
| Rake | Spreads base materials evenly |
| Safety gear | Gloves, glasses, sturdy boots |
Step 1: Excavation and Base Preparation
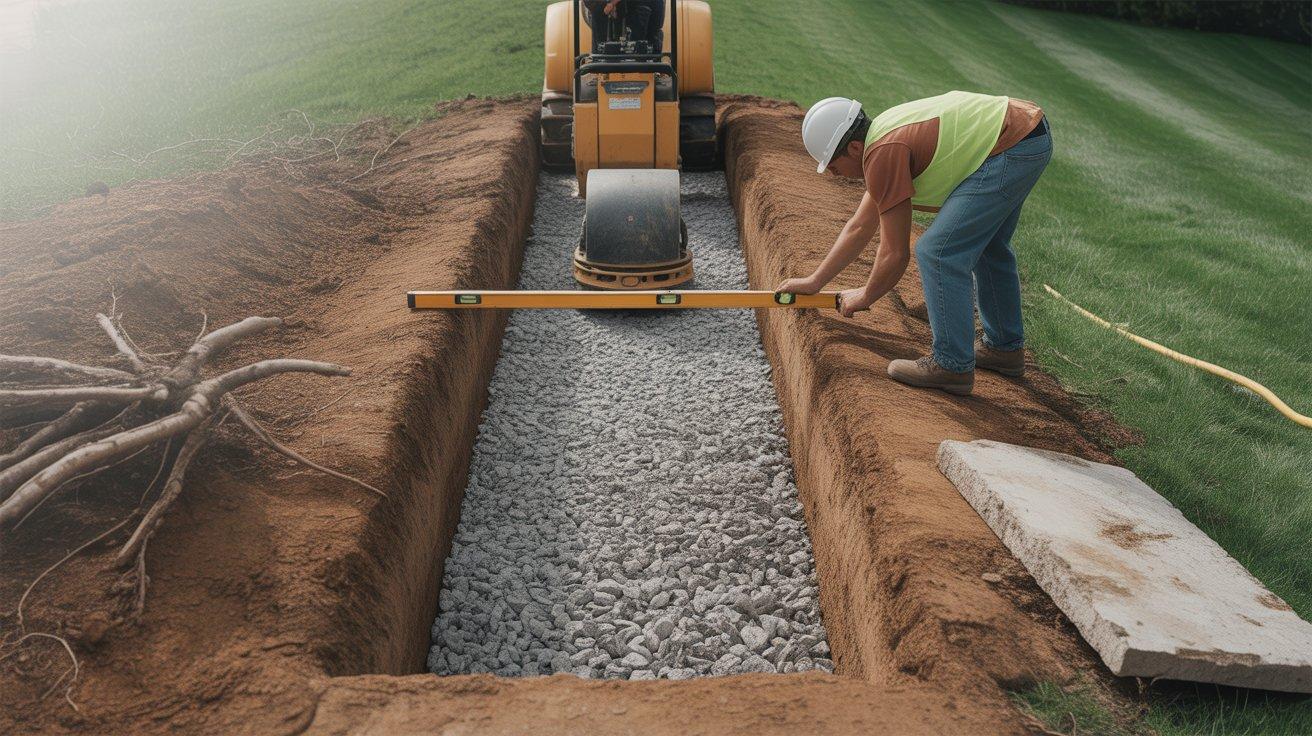
The first step is creating a solid foundation. Dig a trench that’s at least twice the width of your blocks, usually 24 inches wide.
The depth depends on your wall height – aim for about 6 inches for each foot of wall height, plus 6 extra inches for your base material.
Clean the trench completely, removing any obstacles that could affect stability. Then add your base material and make sure it’s properly compacted and level before moving forward.
- Remove all roots, old concrete, and loose stones from the trench
- Add 6 inches of modified stone base material and compact until firm
- Test the base with a level every few feet
Before adding your base layer, make sure the trench is entirely free of debris, including any leftover slabs or uneven patches—here’s a quick guide on how to clean concrete effectively if you encounter tough spots.
Step 2: Establishing the Base Course
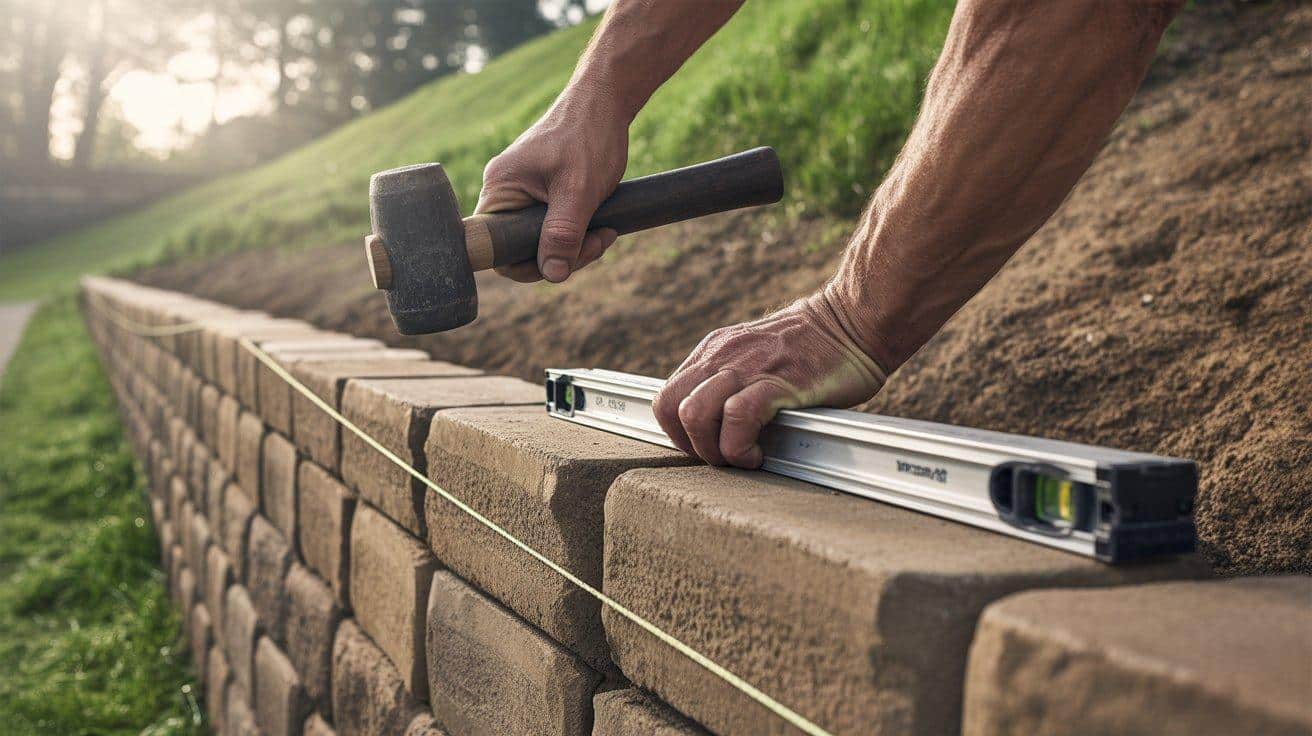
Your first row of blocks sets the pattern for your entire wall, so take extra time here to get it right. Place blocks side by side on your prepared base, checking each one with a level in all directions.
Make small adjustments by tapping with a rubber mallet. Always align the back of the blocks with your benchmark string to maintain a straight line across your slope.
For stability, make sure this first row is buried completely—on steeper slopes, you might need to bury two rows.
- Use a level to check each block from front to back and side to side
- Tap blocks with a rubber mallet to adjust their position
- Ensure the first row is completely buried (or the first two rows for steeper slopes)
Step 3: Drainage System Installation
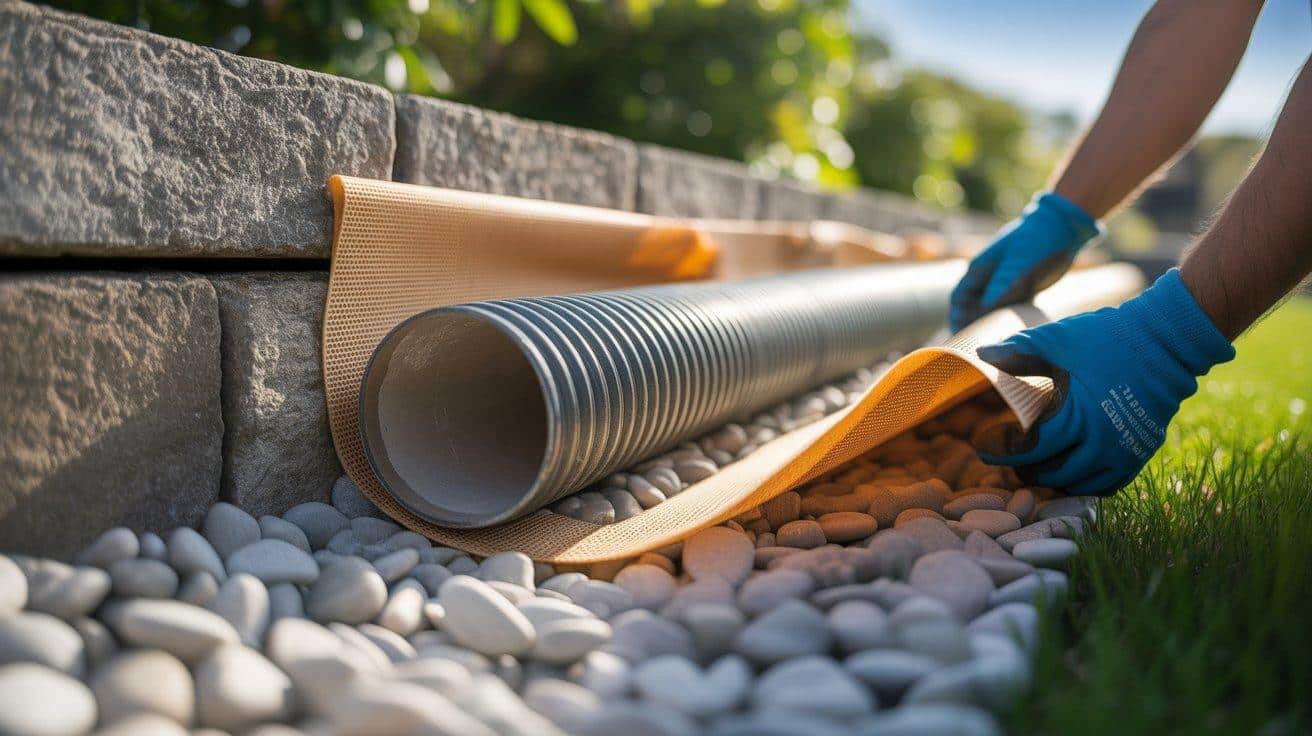
Drainage prevents most wall failures and should be installed after your second row of blocks. Lay perforated pipe behind this row, sloping it slightly so water runs toward the sides and out through drain outlets placed every 50 feet.
This drainage area must be filled with clean stone that allows water to flow freely. To prevent soil from clogging your system, wrap the entire drainage area with filter fabric before adding backfill soil.
- Slope the pipe for water drainage (¼ inch drop per 10 feet)
- Cover pipe with clean ¾” stone (at least 12 inches wide)
- Wrap filter fabric around the drainage stone
Step 4: Building Up the Wall with Reinforcement
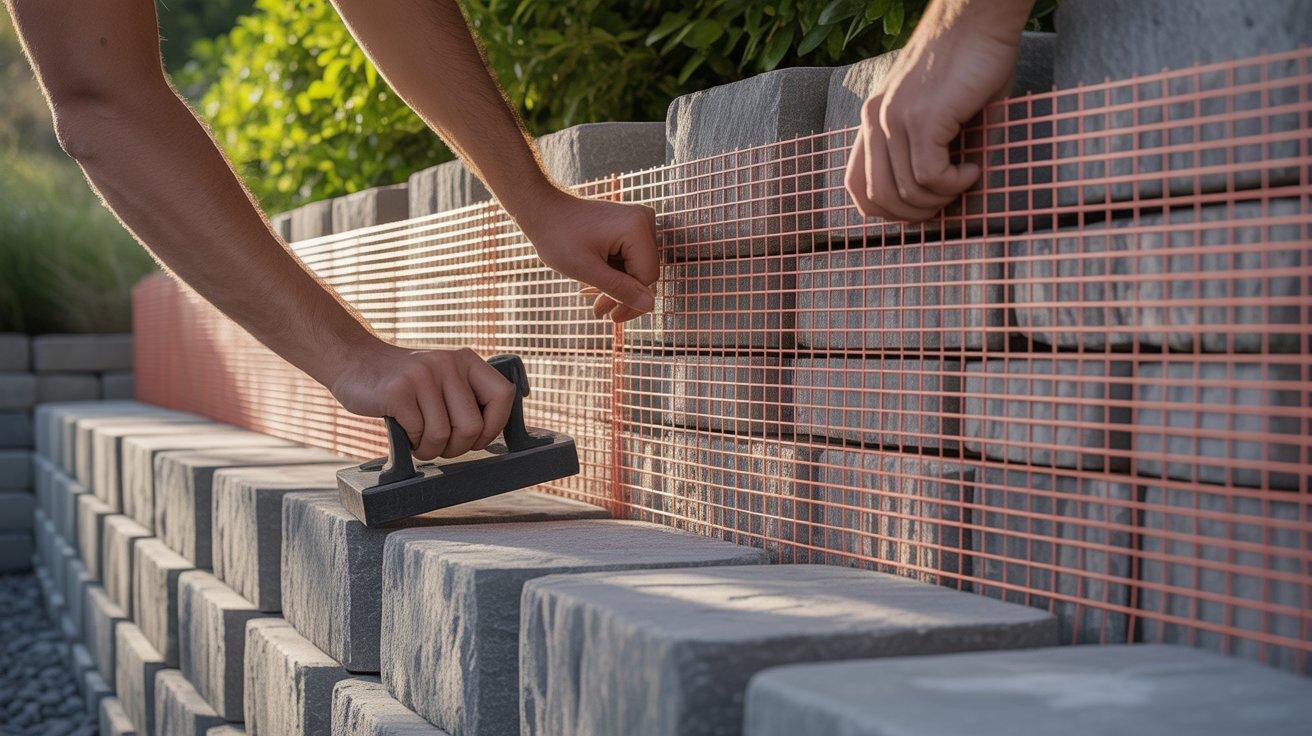
As you continue building upward, maintain your block pattern so that joints don’t line up between rows. This creates a stronger wall structure.
Check for level frequently, as small errors get worse with height. After every two rows, add your drainage stone behind the wall and compact it gently.
For walls over 3 feet tall, include geo-grid mesh layers that extend from the wall back into the hill, creating a reinforced soil mass that works together with your wall.
- Check the level on each row and block
- Add clean stone behind the wall after every two rows
- For geo-grid: lay flat on blocks, place the next row to anchor front edge, pull tight
- Add soil in 3-inch layers and compact each layer
Step 5: Erosion Control and Slope Stabilization
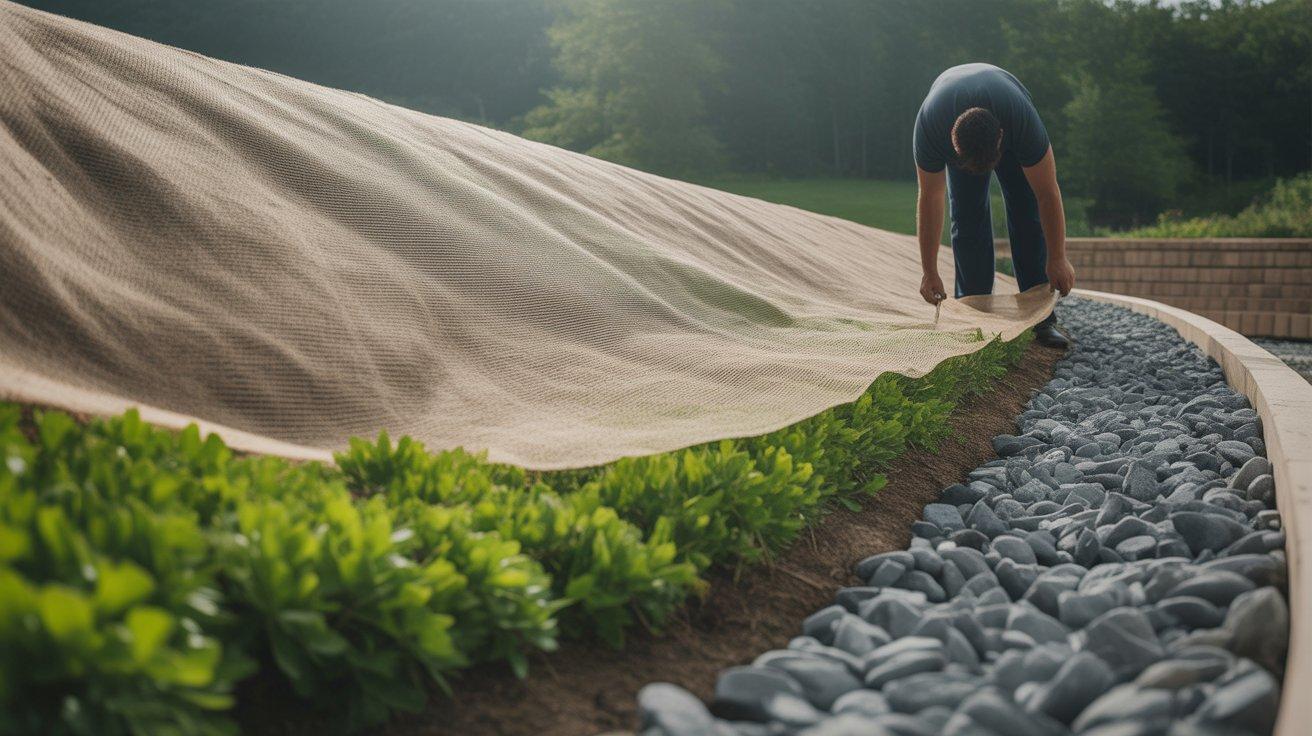
The area above and around your wall needs protection to ensure long-term stability. Grade the soil so water flows away from your wall rather than toward it.
In areas with stronger water flow, add riprap (loose stone) to prevent erosion. Until plants grow, protect bare soil with erosion control fabric.
Choose plants with strong root systems that will help hold soil in place without damaging your wall.
- Grade the soil to slope away from the wall top
- Add riprap where water flow is strongest
- Plant ground cover with strong roots
- Leave a small gap between the wall top and the slope beginning
Finishing Touches
A. Cap Installation and Aesthetics
The final top layer adds style and protects your wall. Apply concrete adhesive to secure capstones to the top row, ensuring they extend slightly over the front edge to direct water away.
Check that all caps sit level and firmly in place. This affects both appearance and function.
For lighting, cut small grooves in blocks before setting them. Fill gaps between capstones with polymeric sand to prevent weeds and insects.
B. Landscaping and Usability
When adding plants, place filter fabric first to separate drainage stone from topsoil. This prevents soil from washing into your drainage system.
Add 4-6 inches of good topsoil and choose plants with non-aggressive roots. Small shrubs that need little water work best near walls.
Use flat areas for small patios with matching pavers. Built-in steps using the same blocks provide access between levels. Create planting beds for added visual interest.
Video Tutorial
I’d like to give credit to Sean Markee – SRM Contracting for their informative video, which served as a reference for this guide.
Common Mistakes to Avoid
- Rushing through base preparation leads to settling and leaning later. The base is your wall’s foundation and affects everything above it.
- Poor drainage causes most wall failures. Using regular soil instead of clean stone behind the wall traps water and creates damaging pressure.
- Not burying the first row deeply enough causes walls to slide forward. For slopes, you might need to bury two rows for stability.
- Building tall walls without proper reinforcement ignores physics. Improper compaction creates voids and weakness as materials settle.
- Ignoring water flow from areas above the wall can undermine even well-built structures.
Maintenance Tips
- Inspect and clean drainage exits each spring. Look for bulging or leaning sections that might indicate problems.
- Check blocks for cracks or looseness, especially after winter. Keep the area around your wall clear of debris that blocks drainage.
- Remove trees or large shrubs growing too close to the wall. Their roots can damage the structure over time.
- Check for soil erosion near the top and bottom of your wall after heavy rains.
- Touch up any damaged areas promptly to prevent bigger problems from developing.
Conclusion
Building a retaining wall on a steep slope needs care and proper technique. The key steps include thorough site assessment, strong base preparation, proper drainage systems, and correct block placement.
What makes walls fail? Most often, it’s skipped steps and poor drainage. Take time with each phase, from planning through final touches.
Your hard work pays off with a wall that adds value to your property while solving slope issues. With the tips in this blog, you can build a wall that stands strong for many years.
Have you built a retaining wall before? What challenges did you face? Let us know in the comments.
Frequently Asked Questions
Do I Need a Permit to Build a Retaining Wall on My Property?
Most areas require permits for walls over 4 feet tall. Check with your local building department before starting any work.
How Long Should I Wait Before Planting Near My New Retaining Wall?
Wait at least 2-3 weeks for the wall to settle. This gives time for initial settling and ensures your plantings won’t be disturbed.
Can I Build a Curved Retaining Wall on A Steep Slope?
Yes, curved walls can work on slopes. They actually offer more strength against pressure but require more careful planning and cutting.