Get ready to make science come alive with these 12 object lessons!
As a seasoned educator with years of experience, I’ve witnessed firsthand how these lessons engage students, making complex concepts easier to grasp and remember.
From exploring the wonders of air pressure to understanding the intricacies of the water cycle, these hands-on activities will transform your classroom into a hub of scientific discovery.
Each lesson is designed to be simple yet effective, using everyday materials you likely already have on hand.
So, let’s dive in and explore the exciting world of science together!
Best Objects for Teaching Science
Capturing students’ attention and igniting their desire to explore scientific concepts is key to effective science education.
Educators can engage students’ curiosity and create a foundation for deeper learning by using simple, surprising demonstrations.
Let’s explore three fascinating object lessons that will leave your students eager to discover more.
1. Holy Pokes

Introduce your students to the wonders of surface tension with this unexpected experiment.
Activity
- Fill a resealable plastic bag with water and seal it tightly.
- Carefully pierce the bag with sharpened pencils, pushing them through both sides.
- Observe that the bag remains leak-free despite the punctures.
Scientific Explanation
- The bag’s polymer structure and the water’s surface tension create a seal around the pencils, preventing leaks.
- This demonstration showcases materials’ unique properties and molecular interactions’ power.
Classroom Application
- Use this experiment as a starting point to discuss the molecular theory of matter and explore how the properties of materials can lead to surprising outcomes.
- Please encourage students to think about other examples where surface tension plays a role in their daily lives.
Step-by-Step Experiment
- Step 1: Fill a resealable plastic bag with water, about 3/4 full, and seal it tightly.
- Step 2: Sharpen 4-5 pencils and set them aside.
- Step 3: Hold the bag over a sink or tray to prevent leaks.
- Step 4: Carefully pierce the bag with one pencil, pushing it through both sides. Leave the pencil in place.
- Step 5: Repeat the process with the remaining pencils, spacing them evenly across the bag.
- Step 6: Observe the bag for any leaks. The water should remain contained within the bag.
- Step 7: Discuss the results with your students, encourage them to ask questions, and share their thoughts on why the bag didn’t leak.
2. Bubble Logic
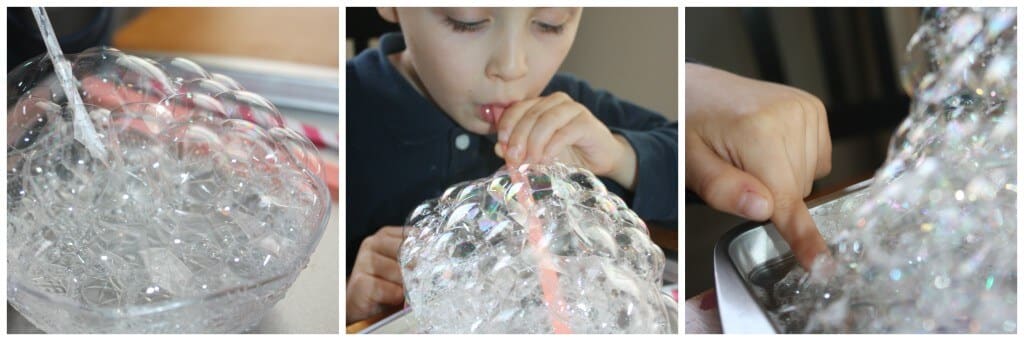
Dive into the science of bubbles and surface tension with this engaging activity.
Activity
- Mix dish soap, water, glycerin, or corn syrup in a giant bubble solution.
- Have students experiment with different ratios to find the ideal mixture.
- Let the solution rest before making giant bubbles with large wands or strings.
Scientific Explanation
- Bubbles form when a thin layer of water is trapped between two soap molecules.
- Glycerin or corn syrup helps slow water evaporation, allowing bubbles to grow and last longer.
- Surface tension keeps the bubble together, creating a mesmerizing spherical shape.
Classroom Application
- Challenge your students to design experiments that test factors affecting bubble formation and longevity, such as environmental conditions or solution recipes.
- Please encourage them to make predictions, record observations, and draw conclusions based on their findings.
Step-by-Step Experiment
- Step 1: Mix 6 cups of water, 1/2 cup of dish soap, and 1/2 cup of glycerin or corn syrup in a large container. Stir gently to avoid creating foam.
- Step 2: Let the solution rest for 15-20 minutes to allow any foam to settle.
- Step 3: Have students create bubble wands using various materials, such as pipe cleaners, straws, or string tied in a loop.
- Step 4: Take the bubble solution and wands outside, as this activity can get messy.
- Step 5: Dip the wands into the solution and slowly wave them through the air to create giant bubbles.
- Step 6: Please encourage students to experiment with different wand shapes, sizes, and blowing techniques to see how they affect the bubbles.
- Step 7: Have students record their observations and discuss the factors contributing to the bubbles’ formation and longevity.
3. Creamators
Explore changes in matter and physical properties with this tasty experiment.
Activity
- Fill a jar halfway with heavy cream and secure the lid tightly.
- Have students shake the jar vigorously until the cream separates into solid butter and liquid buttermilk.
Scientific Explanation
- The shaking process introduces air into the cream, causing the fat molecules to bond and separate from the liquid.
- This physical change transforms the liquid cream into a solid butter, demonstrating a change in the state and the science of emulsions.
Classroom Application
- Use this experiment as a starting point to discuss other state changes in cooking and nature, such as the water cycle or the process of making ice cream.
- Encourage students to think about how energy transfer and molecular interactions play a role in these transformations.
Step-by-Step Experiment
- Step 1: Fill a clean, empty jar halfway with heavy cream and secure the lid tightly.
- Step 2: Have students take turns shaking the jar vigorously for 5-10 minutes. As they shake, they should feel the cream becoming thicker and more movement-resistant.
- Step 3: Continue shaking until the cream separates into solid butter and liquid buttermilk. This may take up to 20 minutes of total shaking time.
- Step 4: Carefully pour off the buttermilk into a separate container, leaving the solid butter in the jar.
- Step 5: Rinse the butter with cold water and gently press it with a spoon to remove any remaining buttermilk.
- Step 6: If desired, add a pinch of salt to the butter and mix it in using a fork or spoon.
- Step 7: Discuss the process with your students, emphasizing the changes in state and physical properties during the experiment.
4. Di-sin-integrator
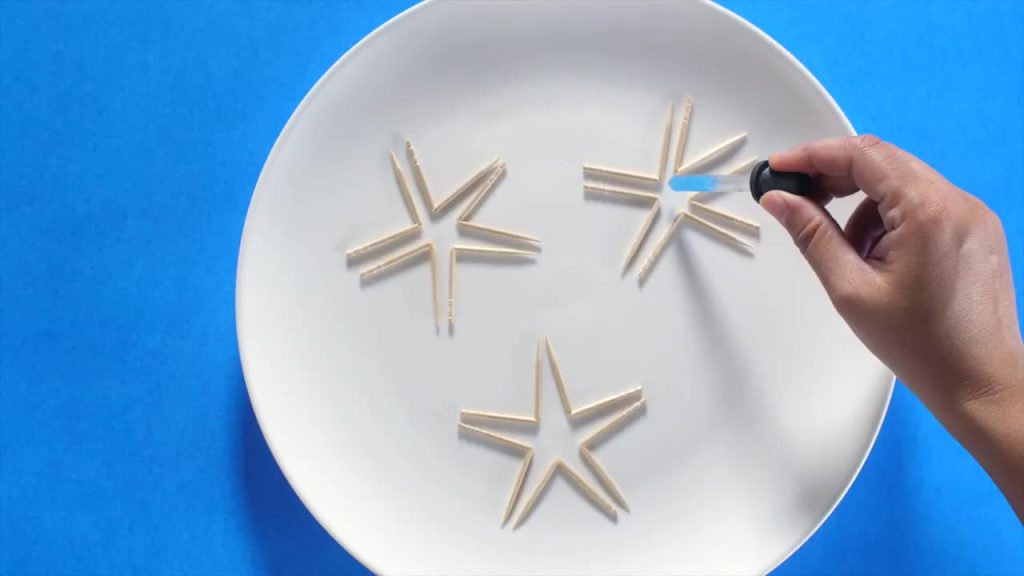
Introduce your students to the fascinating world of surface tension and cohesion using nothing more than toothpicks and water.
Activity
- Fill a bowl with water and place two toothpicks parallel on the surface.
- Gently touch a drop of dish soap to the water between the toothpicks and observe as they quickly move apart.
- The soap disrupts the water’s surface tension, causing the toothpicks to “disintegrate” or move away from each other.
Scientific Explanation
- The Di-sin-integrator experiment demonstrates the concept of surface tension.
- When toothpicks are placed on the water’s surface, they float due to the cohesive forces between water molecules.
- Adding dish soap disrupts the surface tension, causing the toothpicks to “disintegrate” or move away from each other.
Classroom Application
- Understanding surface tension is crucial in various fields, such as environmental science and engineering.
- For example, knowing how surface tension affects the spread of oil spills can help develop more effective cleanup strategies.
- Please encourage students to think about other instances where surface tension plays a role in their daily lives, like when insects walk on water or how water droplets form on leaves.
Step-by-Step Experiment
- Step 1: Fill a bowl with water and let it settle to minimize any disturbances on the surface.
- Step 2: Place two toothpicks on the water’s surface, parallel and about an inch apart.
- Step 3: Dip a cotton swab or finger in dish soap and gently touch the water’s surface between the two toothpicks.
- Step 4: Observe as the toothpicks quickly move apart, demonstrating the disruption of surface tension.
- Step 5: Discuss the results with your students, encourage them to ask questions, and share their thoughts on why the toothpicks moved apart.
5. Eggs Away
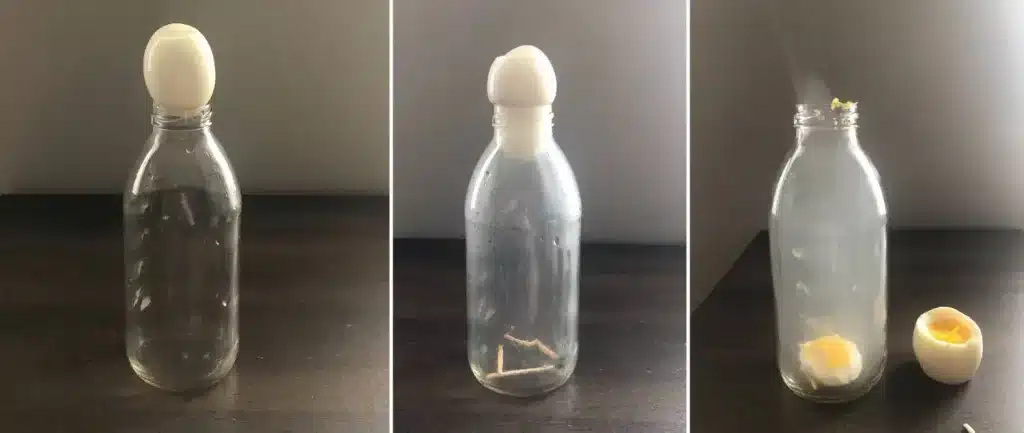
Teach students about air pressure and vacuum effects with a simple, engaging demonstration using a hard-boiled egg and a glass jar.
Activity
- Place a peeled, hard-boiled egg on top of a glass jar with an opening slightly smaller than the egg.
- Light a strip of paper on fire and drop it into the jar.
- Quickly place the egg back on top of the jar and observe as the egg gets sucked into the jar as the air inside cools and contracts, creating a vacuum.
Scientific Explanation
- The Eggs Away experiment illustrates the principles of air pressure and vacuum.
- When you light the paper on fire inside the jar, it heats the air, causing it to expand and some of it to escape.
- As the air inside the jar cools, it contracts, creating a lower pressure (partial vacuum) inside the jar than outside.
- The higher atmospheric pressure outside the jar pushes the egg inside.
Classroom Application
- This experiment is an excellent way to introduce students to air pressure and how it affects various environmental phenomena.
- For example, air pressure differences can create wind, influence weather patterns, and even affect the boiling point of water at different altitudes.
- Please encourage students to think about other examples where pressure differences play a role in their daily lives, such as when using a straw to drink or flying in an airplane.
Step-by-Step Experiment
- Step 1: Hard-boil an egg and let it cool completely before peeling it.
- Step 2: Find a glass jar with an opening slightly smaller than the egg so the egg can rest on top without falling in.
- Step 3: Cut a strip of paper about 2 inches wide and 6 inches long.
- Step 4: Place the egg in the jar and light the paper strip on fire.
- Step 5: Quickly drop the burning paper into the jar and immediately place the egg back on top.
- Step 6: Observe as the egg gets sucked into the jar due to the change in air pressure inside the jar.
- Step 7: Discuss the results with your students and encourage them to think about how the cooling air inside the jar created a vacuum, pulling the egg inside.
6. Dark Sparks

Explore the concept of electrical charge and light emission through mechanical stress on sugar crystals using Wint-O-Green LifeSavers.
Activity
- In a dark room, have students bite down on a Wint-O-Green LifeSaver with their front teeth and observe the brief blue spark that appears.
- This phenomenon is called triboluminescence, which occurs when certain crystals, like sugar, are subjected to mechanical stress, causing them to emit light.
Scientific Explanation
- The Dark Sparks experiment showcases the phenomenon of triboluminescence, which is the emission of light due to the breaking of chemical bonds in a material when it is subjected to mechanical stress, such as grinding or crushing.
- When you bite down on a Wint-O-Green LifeSaver, the stress causes the sugar crystals to break, releasing a small amount of visible light in the dark.
Classroom Application
- This experiment introduces the broader topic of electrical charges and how they are fundamental to understanding electrical circuits and electrostatic effects in daily life.
- Encourage students to think about other examples where electrical charges play a role, such as static electricity causing clothes to cling together or the operation of electronic devices like smartphones and computers.
Step-by-Step Experiment
- Step 1: Obtain a pack of Wint-O-Green LifeSavers and ensure the room is completely dark.
- Step 2: Give each student a LifeSaver and instruct them to place it between their front teeth.
- Step 3: Have the students bite down firmly on the LifeSaver while keeping their mouths open.
- Step 4: Encourage the students to observe the brief blue spark that appears as they bite down on the candy.
- Step 5: Repeat the process a few times to ensure everyone can see the triboluminescence effect.
- Step 6: Discuss the results with your students and explain how the mechanical stress on the sugar crystals causes them to emit light.
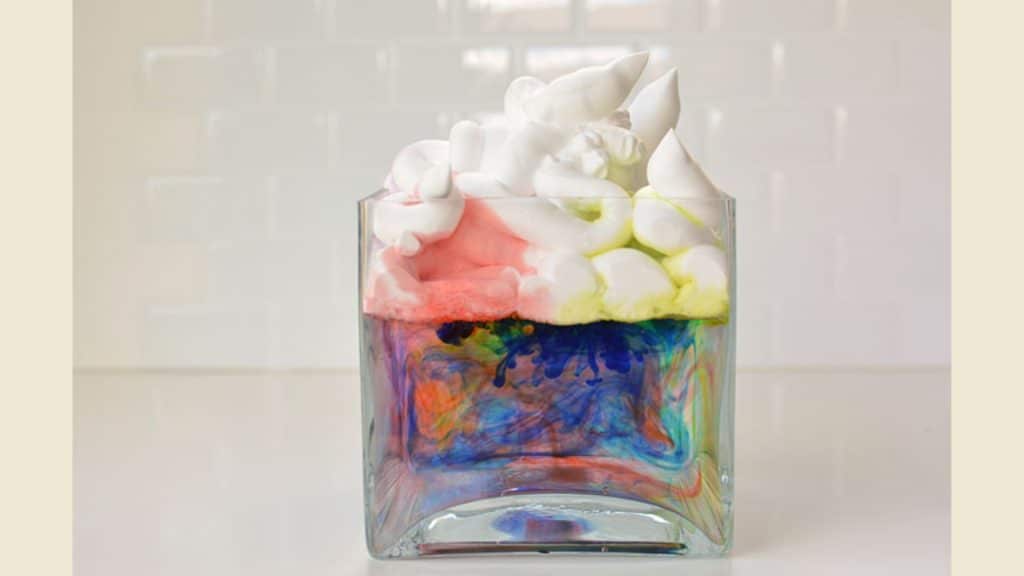
7. Reversible Reaction
Reversible reactions are chemical processes that can proceed in both forward and reverse directions, depending on the conditions.
These reactions are crucial in many industrial chemical processes and biological systems, as they allow for the adjustment of product yields and the maintenance of equilibrium.
By understanding reversible reactions, students can better grasp the dynamic nature of chemistry and its real-world applications.
Experiment Setup: Materials needed
- Vinegar
- Ammonia
- Color indicators (e.g., red cabbage juice, phenolphthalein)
- Clear containers
Safety Measures
- Wear protective gloves and eyewear when handling chemicals.
- Experiment in a well-ventilated area.
- Advise students not to inhale the vapors from the chemicals.
- Educational Objective
Step-by-Step Experiment
- Step 1: Pour vinegar into a clear container and add a few drops of the color indicator. Note the color change.
- Step 2: Gradually add ammonia to the vinegar solution, stirring gently. Observe the color change as the reaction progresses.
- Step 3: Continue adding ammonia until the color change reverses, indicating that the reaction has reached equilibrium.
- Step 4: Discuss the results and explain how adding ammonia caused the reaction to reverse.
8. Crystal Creation

Supersaturation and crystal growth are fundamental concepts in chemistry that have applications in various natural and industrial processes.
Supersaturation occurs when a solution contains more dissolved solute than it can normally hold at a given temperature.
Under these conditions, the excess solute can precipitate out of the solution, forming crystals.
Understanding the crystal growth factors can help students gain insights into forming minerals, producing pharmaceuticals, and developing new materials.
Materials Needed for This Experiment
- Sugar
- Water
- Heat source (e.g., stove, microwave)
- Glass jar or beaker
- String or popsicle stick
- Seed crystal (a small sugar crystal)
Step-by-Step Experiment
- Step 1: Create a supersaturated sugar solution by dissolving sugar in boiling water until no more sugar can be dissolved.
- Step 2: Allow the solution to cool slightly, then pour it into a glass jar or beaker.
- Step 3: Tie a seed crystal to a string or popsicle stick and suspend it in the solution, ensuring it does not touch the sides or bottom of the container.
- Step 4: Place the container in a cool, undisturbed location and allow the crystal to grow over several days.
- Step 5: Observe the crystal’s growth and discuss the factors influencing its size and shape.
9. Explosive Egg
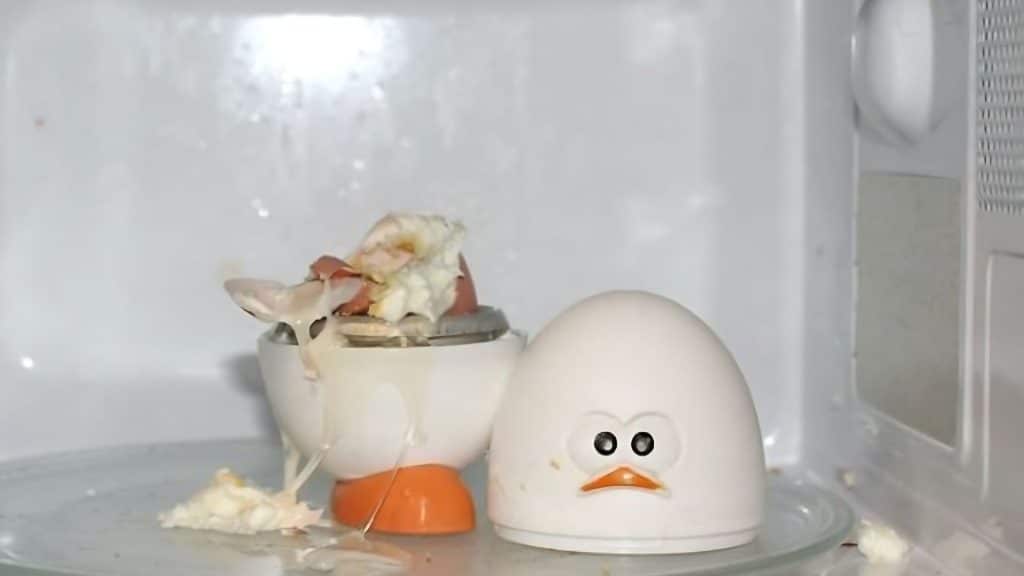
This experiment demonstrates the concept of pressure and its effects, which can be analogous to emotional stress.
Students can better understand the consequences of unmanaged stress by observing how the pressure builds up inside the microwave, causing the egg to explode.
Classroom Application
- Relate this experiment to real-life scenarios where pressure builds up, such as in personal or professional settings.
- Discuss the importance of finding healthy ways to manage stress and prevent “explosions” that can harm oneself or others.
- Encourage students to identify and practice stress-relief techniques, such as deep breathing, exercise, or talking to a trusted friend or mentor.
Safety Precautions
- Use a microwave-safe bowl to prevent damage to the microwave or injury from broken glass.
- Keep a safe distance from the microwave while the egg is cooking to avoid potential injury from the explosion.
- Clean the microwave thoroughly after the experiment to remove any egg residue.
Reflection Questions
- How does the pressure inside the microwave compare to the pressure you feel in stressful situations?
- What healthy ways to manage stress and prevent “explosions”?
- How can you support others who may be experiencing high stress levels?
Step-by-Step Experiment
- Step 1: Crack a raw egg into a microwave-safe bowl.
- Step 2: Place the bowl in the microwave and cook on high for about 1 minute or until the egg explodes.
- Step 3: Observe the results and discuss the effects of pressure on the egg.
10. Trinity in an Apple
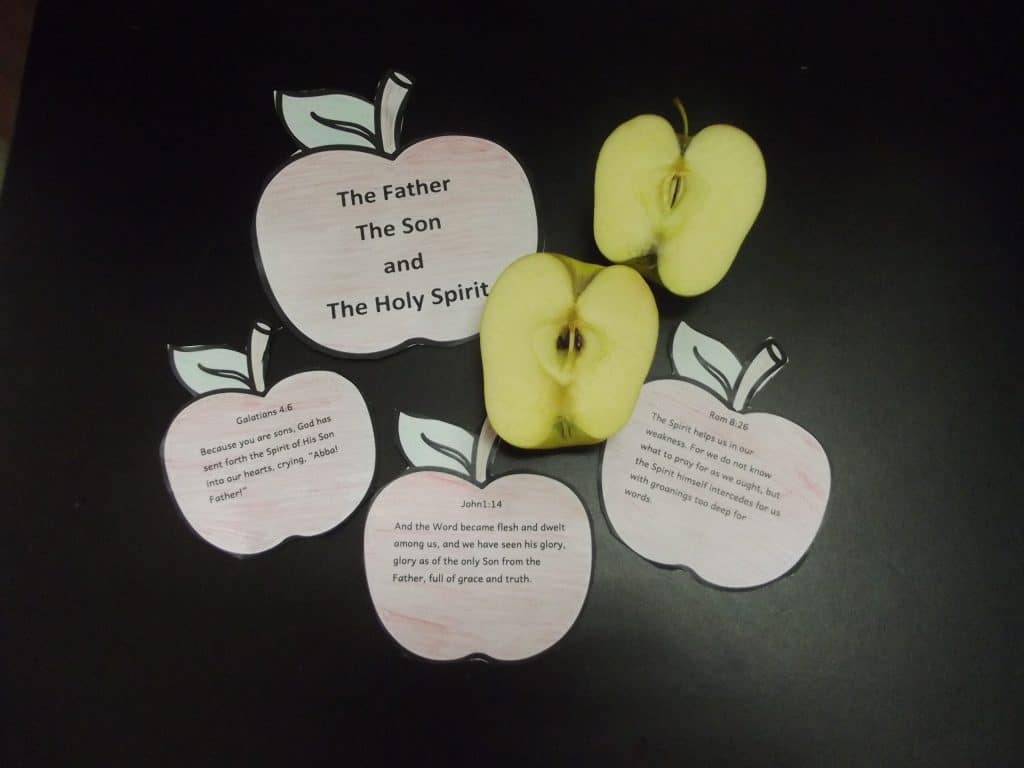
This experiment uses the parts of an apple (skin, flesh, core) to explain the concept of the Holy Trinity, illustrating how three distinct parts form a whole.
Students can better grasp complex relational or organizational structures by understanding this concept.
Classroom Application
- Discuss the theological implications of the Holy Trinity and how this model can help understand complex relationships or organizational structures.
- For example, in a team or family, each member has a unique role, but they all contribute to the overall functioning of the unit.
- Please encourage students to consider applying this concept to their own lives through group projects or community involvement.
Step-by-Step Experiment
- Step 1: Cut an apple in half crosswise, revealing the skin, flesh, and core.
- Step 2: Discuss how each part is distinct but contributes to the whole apple.
- Step 3: Relate this to the concept of the Holy Trinity, where the Father, Son, and Holy Spirit are distinct but form one God.
Reflection Questions
- How do the different parts of the apple work together to form a whole?
- How can you apply the concept of the Trinity to your own life, such as in relationships or organizations?
- How can understanding the Trinity help you appreciate the complexity and unity of the world around you?
11. Lies Will Last
This experiment teaches about the permanence of actions using salt in water to demonstrate how difficult it is to reverse certain actions, similar to the consequences of dishonesty.
By observing how the salt dissolves in the water and cannot be easily removed, students can better understand the long-term effects of their choices.
Classroom Application
- Extend this lesson to ethical situations in school, work, or relationships, emphasizing the long-term impacts of choices.
- Discuss how dishonesty, even in small matters, can erode trust and damage relationships over time.
- Please encourage students to practice honesty and integrity daily, even when challenging.
Step-by-Step Experiment
- Step 1: Fill a clear glass with water and add a spoonful of salt, stirring until the salt dissolves.
- Step 2: Discuss how the salt has become a permanent part of the water and cannot be easily removed.
- Step 3: Relate this to the concept of honesty and how lies can have lasting consequences.
Reflection Questions
- How does the salt in the water compare to the effects of dishonesty in our lives?
- What are some examples of situations where honesty may be challenging but is still important?
- How can you practice honesty and integrity daily, even in small matters?
12. From Sour to Sweet
This experiment shows how perception can be altered dramatically, using miracle berries to switch taste perception from sour to sweet.
By experiencing this change firsthand, students can better understand how perspective and context influence their understanding of the world.
Classroom Application
- Link this experiment to concepts of perspective-taking and empathy in social and professional situations.
- Discuss how understanding others’ perspectives can lead to more effective communication and problem-solving.
- Encourage students to practice active listening and to consider multiple viewpoints when facing challenges or conflicts.
Step-by-Step Experiment
- Step 1: Provide each student with a miracle berry tablet and a slice of lemon.
- Step 2: Have students taste the lemon before the miracle berry, noting its sourness.
- Step 3: Instruct students to let the miracle berry dissolve on their tongue, then taste the lemon again.
- Step 4: Discuss how the taste perception has changed from sour to sweet.
Safety Precautions
- Ensure that students do not have any known allergies to miracle berries or citrus fruits before experimenting.
- Provide appropriate utensils and disposable plates for the lemon slices to maintain hygiene.
Reflection Questions
- How did your perception of the lemon change after the miracle berry?
- How can our perceptions influence our understanding of the world around us?
- How can we practice perspective-taking and empathy in our daily lives?
Summary
These fascinating object lessons offer an exciting and engaging way to teach science education.
Students can develop a deeper understanding of complex scientific concepts by incorporating hands-on experiments and real-world applications.
These lessons provide a solid foundation for further scientific inquiry, from exploring the basics of physics to understanding chemical reactions and properties.
As you implement these object lessons in your classroom, foster an environment encouraging curiosity, questioning, and discovery.
By doing so, you’ll not only help your students grasp the scientific principles at hand but also cultivate a lifelong love for learning.
So, what’s next? Start incorporating these lessons into your curriculum and watch as your students become more engaged and enthusiastic about science.
The possibilities for exploration and growth are truly endless!
Frequently Asked Questions
What Are Object Lessons and Why Are They Important in Science Education?
Object lessons are hands-on demonstrations that make abstract concepts tangible. They engage students, promote critical thinking, and help retain knowledge.
How Can I Prepare to Conduct These Science Experiments Safely in a Classroom Setting?
Review safety guidelines, gather necessary materials, and practice experiments beforehand. Ensure proper ventilation, protective gear, and adult supervision when required.
What Age Group Are These Science Object Lessons Most Suitable For?
These object lessons are designed for students aged 6 to 12, but they can be adapted for different age groups depending on the complexity of the concepts.
Can These Experiments Be Conducted with Materials Commonly Found at Home or In School?
Yes, most of these experiments use everyday materials like water, food coloring, and household items, making them accessible and cost-effective.
How Do These Experiments Align With Educational Standards And Learning Outcomes?
These experiments align with science education standards by covering foundational physics, chemistry, and biology concepts. They promote inquiry-based learning and develop critical thinking skills.