Acrylic Painting for Beginners Step-by-Step
Standing in front of a blank canvas with a brush in hand can feel both thrilling and terrifying. If you’ve always admired vibrant acrylic paintings but thought “I could never create something like that,” you’re not alone.
The good news? Acrylic is actually the perfect medium for beginners – forgiving, fast-drying, and incredibly versatile.
Imagine creating your first masterpiece this weekend, watching as simple brushstrokes transform into a scene worthy of displaying in your home.
In this guide, I’ll walk you through proven techniques that have helped thousands of novice painters create stunning artwork without expensive classes or natural talent.
Ready to unlock your creative potential? Let’s get started with your first canvas creation!
What do you need to Get Started?
Before jumping into your first acrylic masterpiece, gathering the right supplies will set you up for success.
Start with quality student-grade acrylics in primary colors (red, blue, yellow), white, and black—this economical approach lets you mix countless hues while learning color theory.
- Choose brushes that offer versatility: a flat brush for coverage, a round brush for details, and a liner brush for fine lines.
- Select your surface based on your project goals: canvas for traditional paintings, smooth rocks for decorative art, or wood for rustic charm.
- Don’t forget the essentials: a palette for mixing, a water container for cleaning brushes, and paper towels for blotting and texture effects.
Your painting surface options are wonderfully versatile—pre-primed canvas panels offer an affordable starting point, while smooth rocks, watercolor paper, or wood panels provide interesting alternatives as you explore.
For rock painting enthusiasts, a clear acrylic sealant protects your finished work, while painter’s tape and simple stencils can help achieve crisp edges and consistent designs while you develop your freehand skills.
Acrylic Painting for Beginners: Step by Step Guide
Tools Needed:
| Tool | Purpose |
|---|---|
| Large flat brush | Creating sky background and blending colors |
| Medium pointed brush | Creating distant mountains and filling in larger areas |
| Small filbert brush | Adding clouds, foreground, and trees |
| Small liner brush | Adding fine details like stars, reflections, and branches |
| Small pointed brush | Creating leaves and ground details |
| Circular object | Tracing the perfect moon circle |
Materials Needed:
| Material | Purpose |
|---|---|
| Black acrylic paint | Night sky, foreground, and tree details |
| Dark blue acrylic paint | Sky gradient and water reflections |
| Light blue acrylic paint | Lower sky and upper water reflections |
| Dark purple acrylic paint | Creating cloud outlines and moon texture |
| Pink acrylic paint | Cloud details and moon variation |
| White acrylic paint | Stars, moon base, and reflections |
| Canvas | Painting surface |
| Water jar | Cleaning brushes |
| Paper towel | Blotting excess paint |
Step 1: Creating the Sky Background
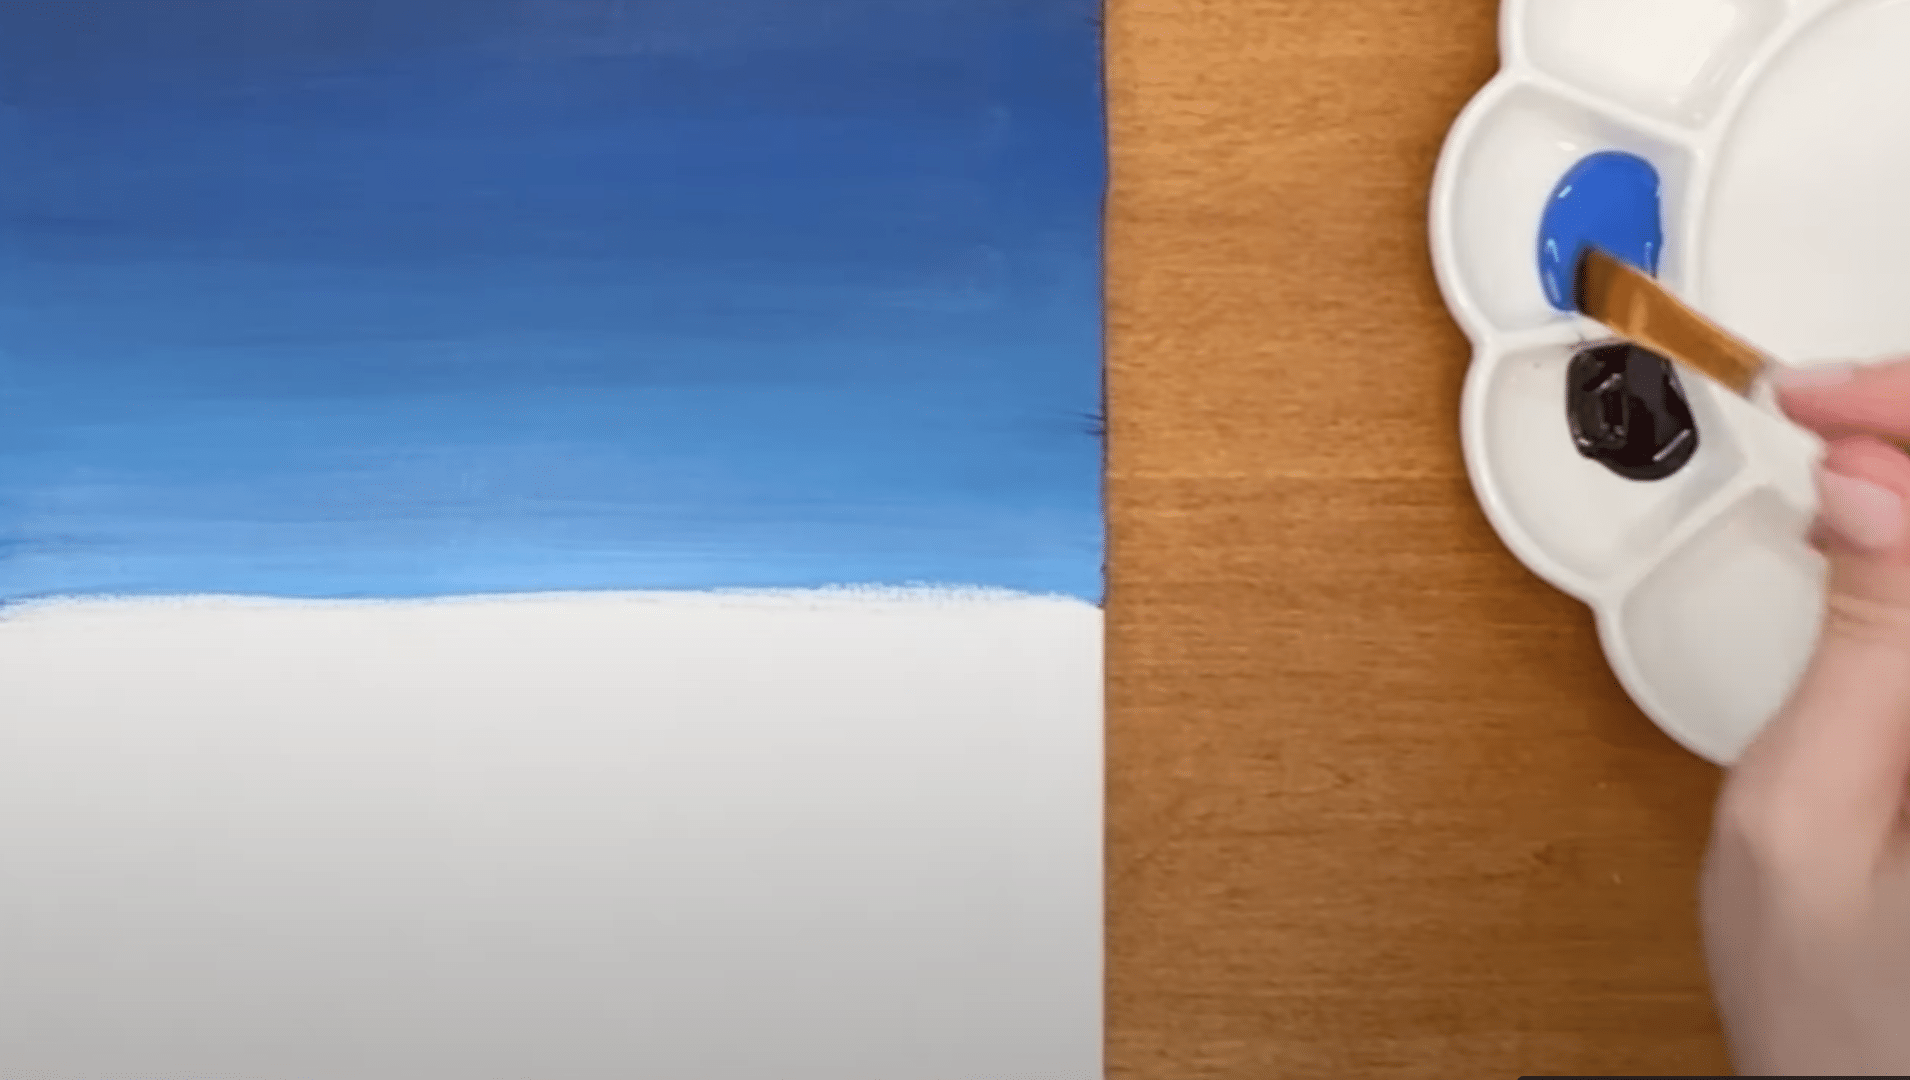
Begin with a large flat brush to establish your gradient sky. Start at the top with black paint, then blend into dark blue in the middle section, and finish with light blue at the horizon line.
Cover approximately the top two-thirds of your canvas, using long horizontal strokes to create a smooth transition between colors.
- Work quickly while the paint is still wet for the best blending results
- Keep your brush strokes in the same direction for a consistent look
- Use light pressure as you move down the canvas to create a natural fade
Pro Tip: If your paint begins to dry before you’ve finished blending, add a tiny drop of water to your brush to reactivate the acrylics.
Step 2: Adding Mountains and Clouds
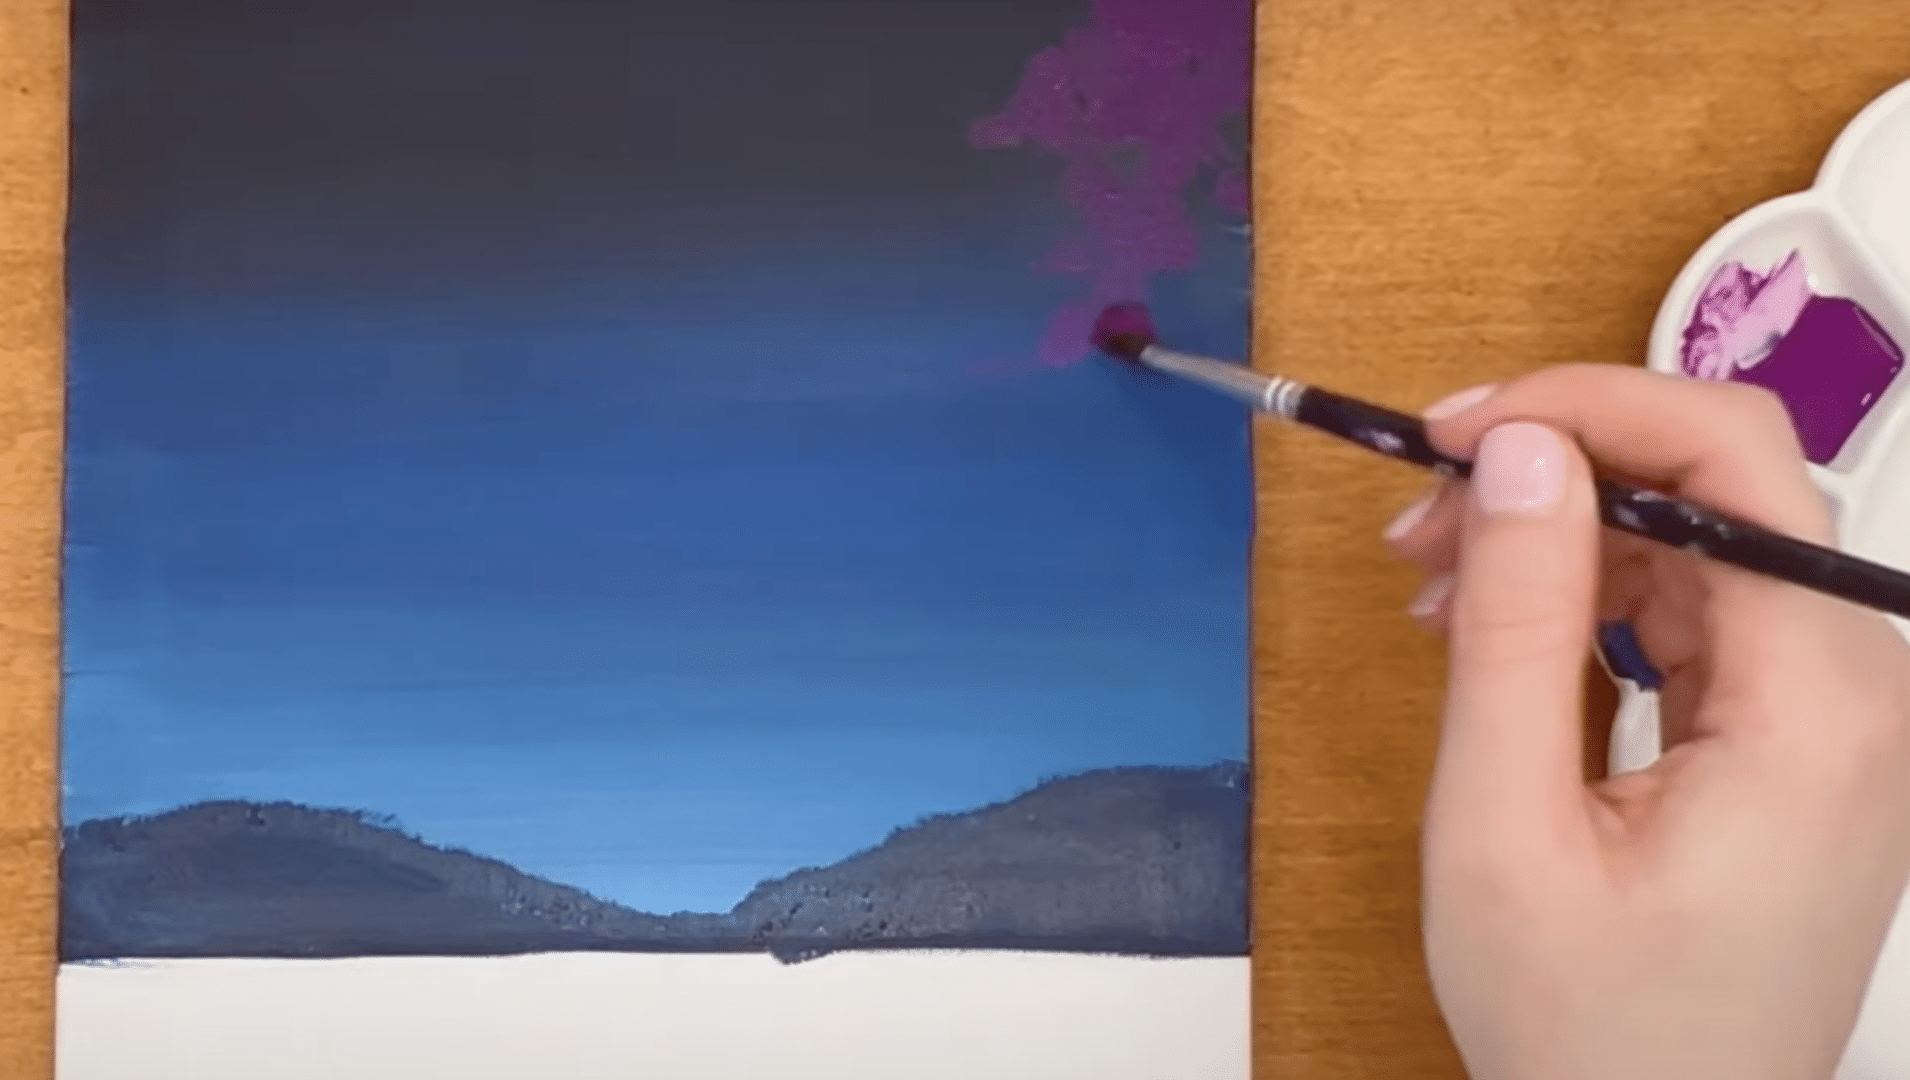
Use a medium pointed brush to create distant mountains with dark blue and black paint along the horizon line. Then switch to a small filbert brush and add dark purple clouds using a light scrubbing motion. Layer pink and white clouds below, making them smaller toward the horizon for depth.
- Create mountain texture by lightly pulling up with your brush to suggest distant trees
- Keep cloud edges soft by using a light touch with minimal paint
- Vary the size of clouds with larger ones closer to the viewer
Pro Tip: Blend the edges where dark purple and pink clouds meet to create a more natural, gradual transition between colors.
Step 3: Painting the Water and Moon
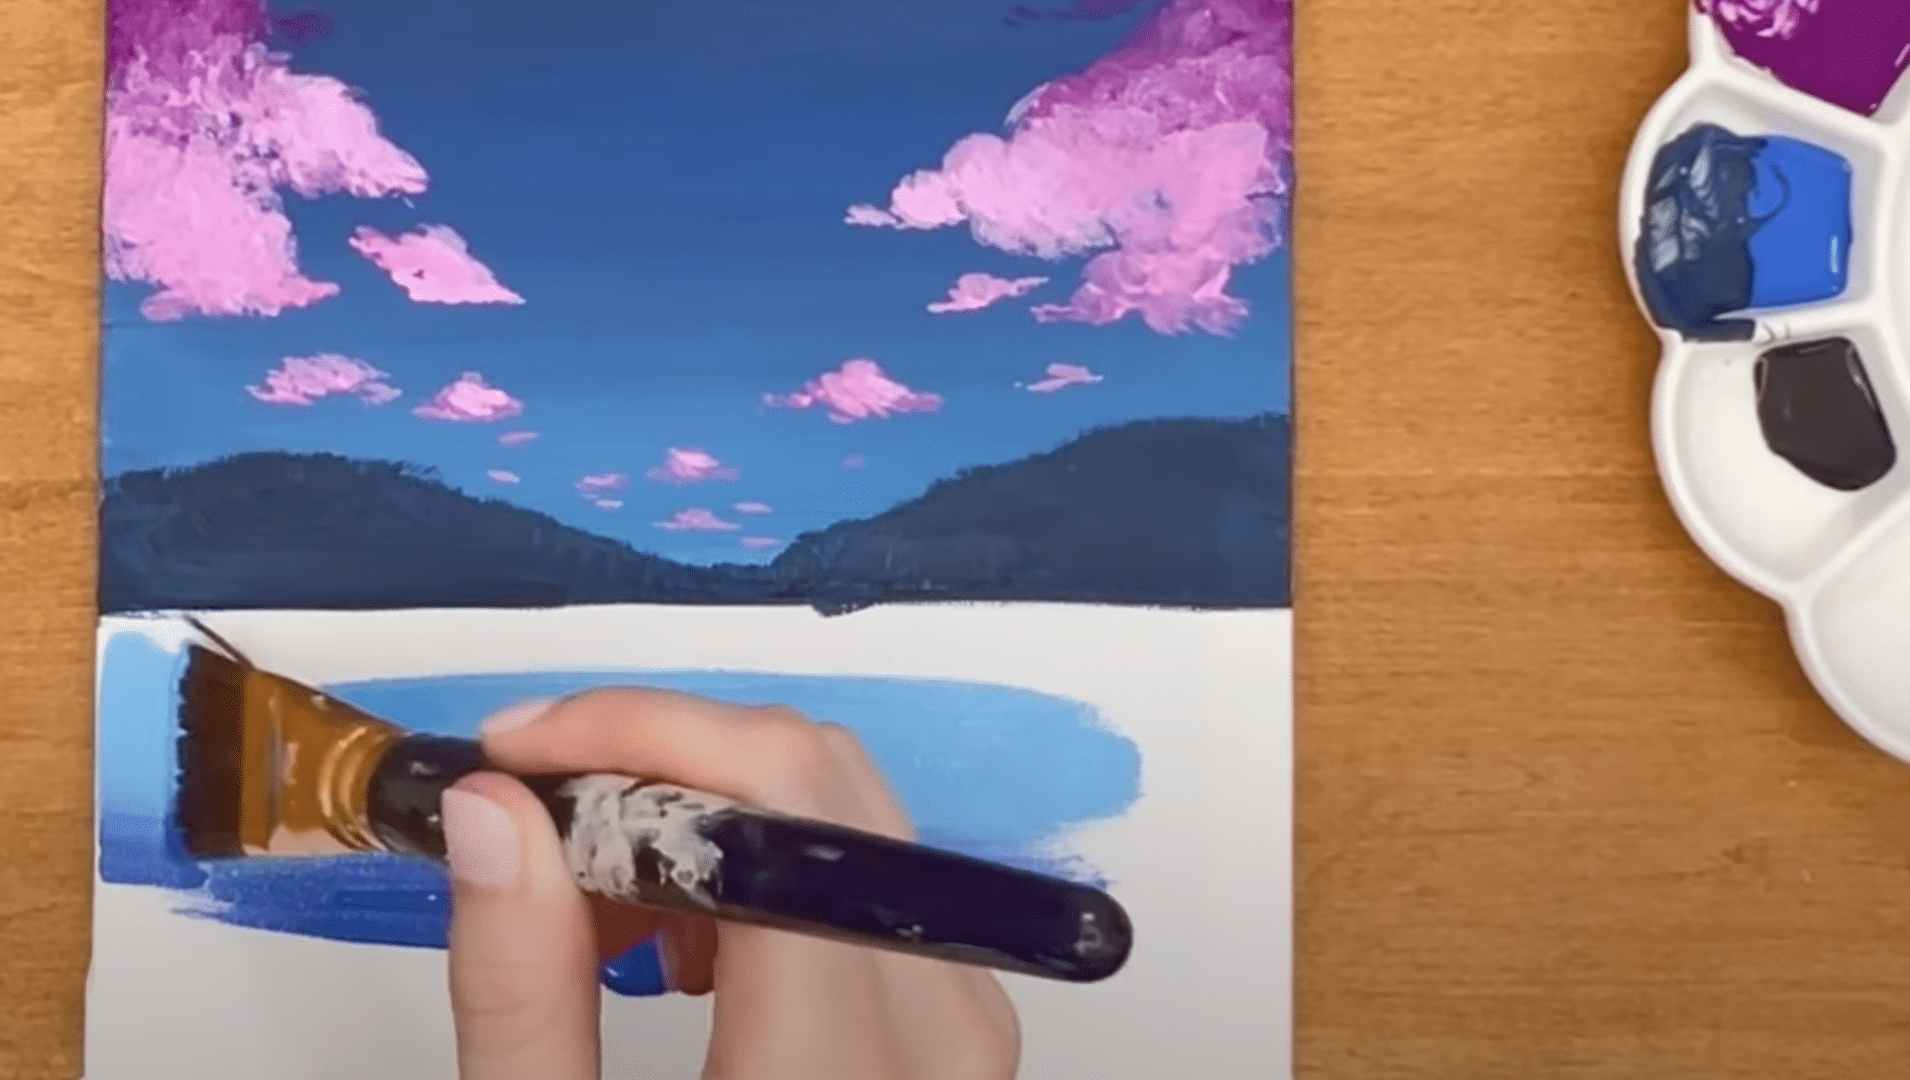
Reflect the sky colors in reverse on the lower third of your canvas, with light blue at the top blending into dark blue below. For the moon, trace a circular object with pencil, then fill with white paint using a medium filbert brush. While still wet, add purple and pink touches to create texture.
- Keep the reflection slightly less detailed than the sky for realism
- Use your finger to blend colors on the moon’s surface for a natural look
- Vary the opacity of colors on the moon to create depth and interest
Pro Tip: Add small white dots and lines to the moon with a liner brush to create the appearance of craters, giving dimension to your moon’s surface.
Step 4: Adding Stars and Reflections
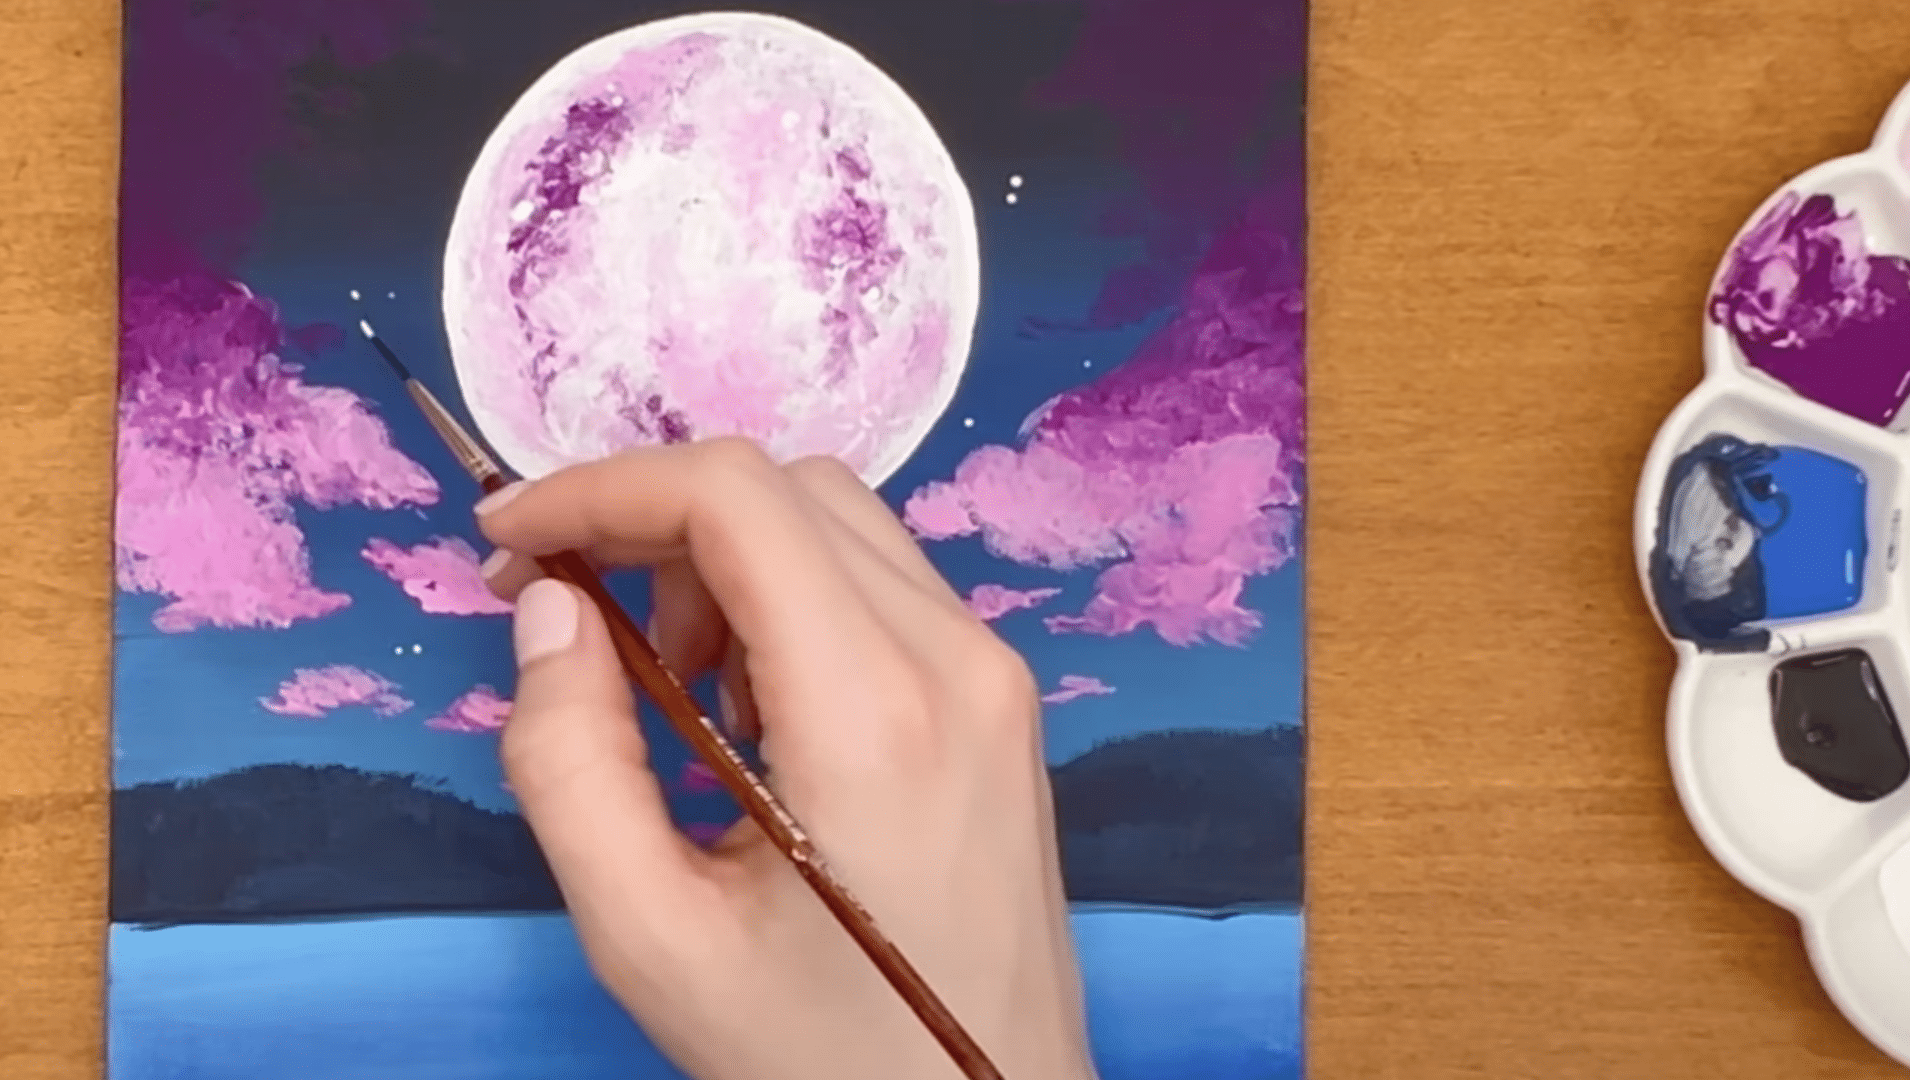
With a small liner brush and white paint, add stars throughout the sky, making them smaller toward the horizon. Then create the moon’s reflection on the water using short, light strokes. Add additional pink reflections to represent the clouds.
- Cluster some stars together while leaving other areas more sparse
- Use a very light touch when creating water reflections
- Create vertical lines of varying lengths for the most realistic water effect
Pro Tip: For twinkling stars that catch the light, add tiny crosses instead of simple dots for some of your stars.
Step 5: Creating the Foreground and Trees
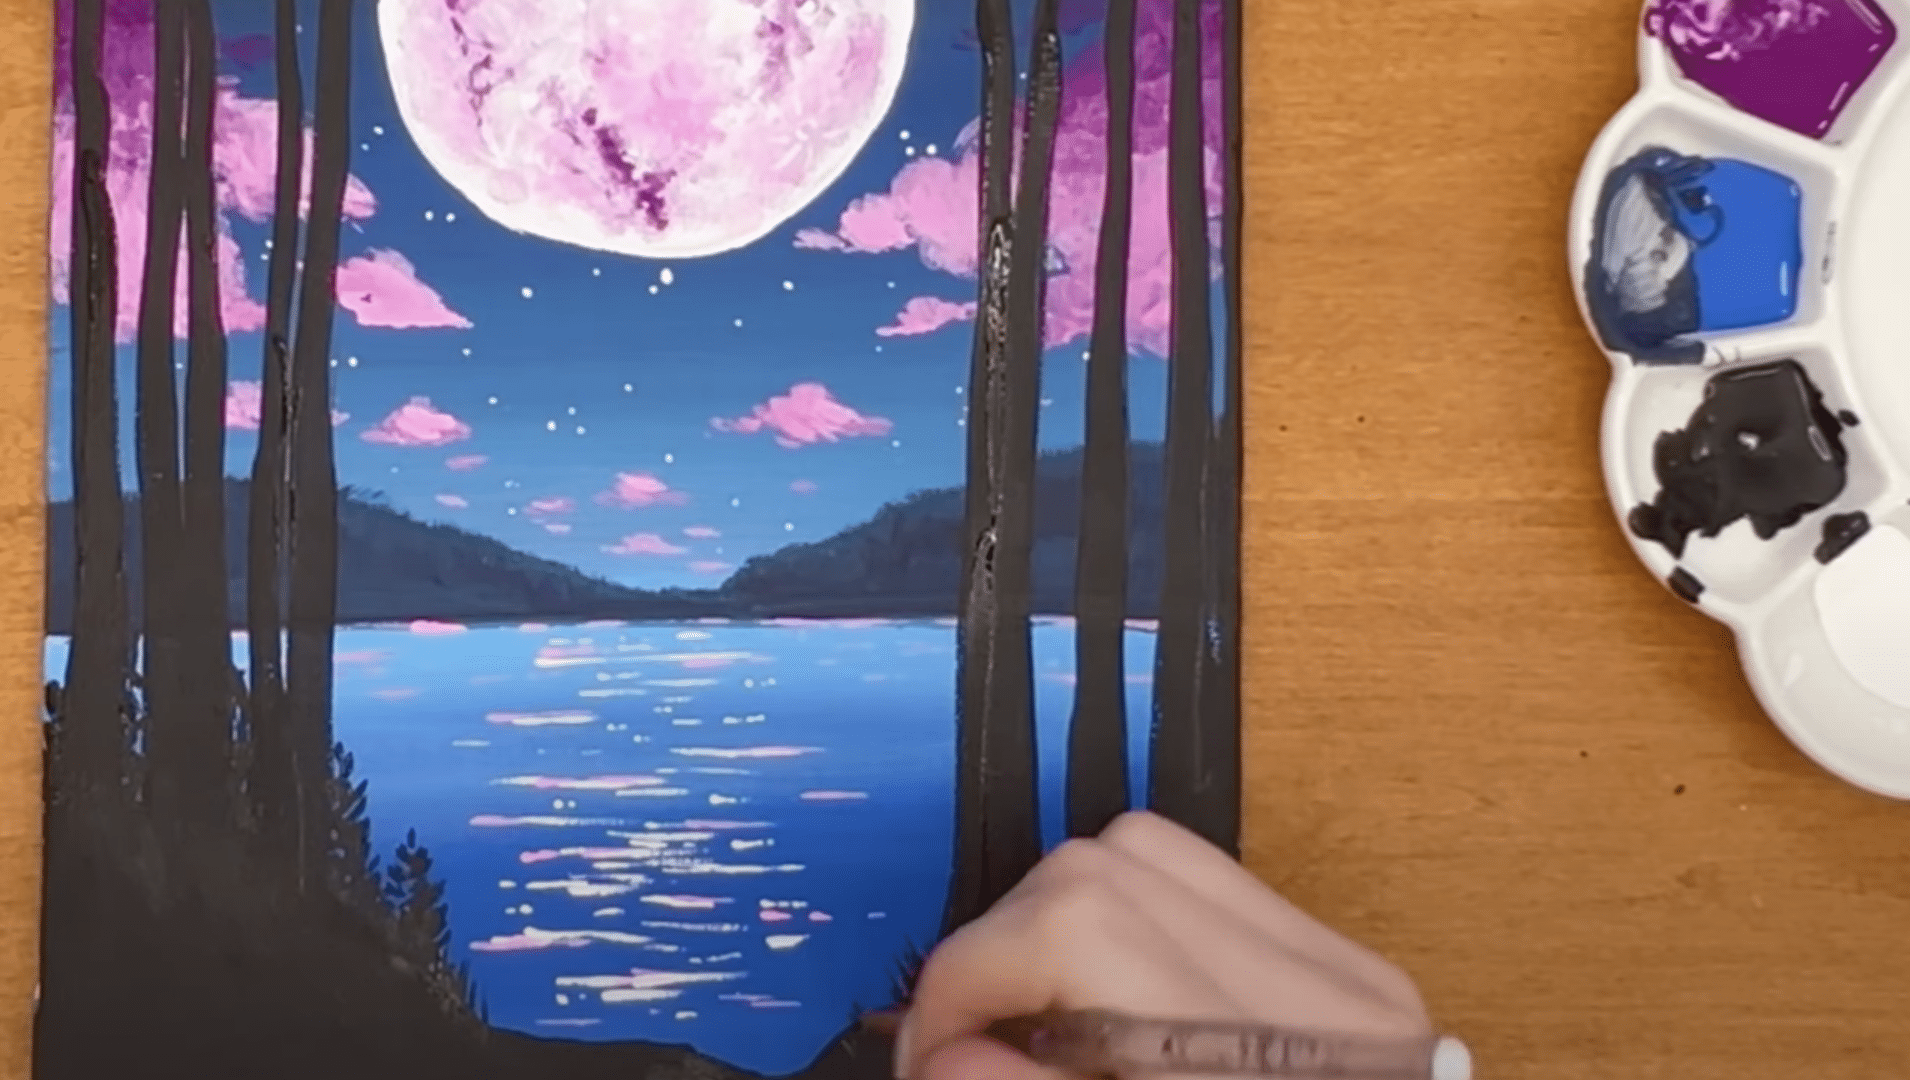
Finish by adding a black silhouette along the bottom of your canvas. Create trees by starting thin at the top and widening toward the ground. Add branches with your liner brush, focusing on framing the moon. Complete the scene with small leaves and ground texture.
- Position trees to create a natural frame around your moon
- Vary the thickness and height of your trees for visual interest
- Add small details like grass and rocks to ground your composition
Pro Tip: Less is more with foreground details—leave some empty spaces so viewers can still see the beautiful sky and reflections you’ve created.
For a visual tutorial, refer to this video by Kimkoart
5 Common Mistakes & How to Avoid Them
Even experienced artists stumble upon these pitfalls, but with awareness and the right techniques, they can be avoided effortlessly.
1. Using Poor Quality Brushes
Problem: Cheap brushes shed bristles into your paint and fail to hold their shape, creating frustrating streaks and uneven application.
Solution: Invest in mid-range synthetic brushes designed specifically for acrylics. They don’t need to be expensive, but look for brushes that spring back to shape when bent and have securely fastened ferrules.
2. Not Sealing Rock Paintings
Problem: Unsealed rock art will fade, chip, or wash away when exposed to moisture or handling.
Solution: Apply 2-3 light coats of clear acrylic sealer (matte or glossy) after your paint has fully dried for 24 hours. This creates a protective barrier that preserves your work for years.
3. Rushing Layers
Problem: Applying new paint before the underlying layers dry causes muddy colors and unwanted blending.
Solution: Allow 10-15 minutes between layers or use a hairdryer on a low setting to speed drying. Test by lightly touching a less visible area—if it feels tacky, wait longer.
4. Overblending Colors
Problem: Excessive blending creates muddy, dull results instead of vibrant transitions.
Solution: Blend colors while they’re still wet but with a light touch. Stop when colors begin to combine but before they fully mix. Leave areas of distinct color to maintain vibrancy.
5. Using Paint Straight from the Tube
Problem: Undiluted acrylic paint dries quickly, shows brush marks, and wastes expensive materials.
Solution: To improve flow and workability, create a “palette puddle” by mixing a small amount of water or acrylic medium with your paint. Aim for a cream-like consistency for most applications.
Conclusion
Your artistic voyage with acrylics has just begun!
By following simple steps and avoiding common pitfalls, you’ve unlocked the door to endless creative possibilities.
Remember that every masterpiece starts with a single brushstroke, and each painting—whether perfect or flawed—builds your skills for the next canvas adventure.
Don’t let perfectionism hold you back. The beauty of acrylics lies in their forgiving nature—mistakes can become happy accidents or be painted over entirely.
Start with simple subjects like our moon scene and gradually challenge yourself with more complex compositions as your confidence grows.
Most importantly, enjoy the process. The meditative quality of painting offers a wonderful escape from daily stress while producing something beautiful you can proudly display or gift to others.
What will you create next?