Are you looking to build a workbench that saves space and moves easily around your area?
A well-built mobile workbench with storage can make your workshop more organized and efficient.
Many woodworkers struggle with limited space and the need for flexible work areas.
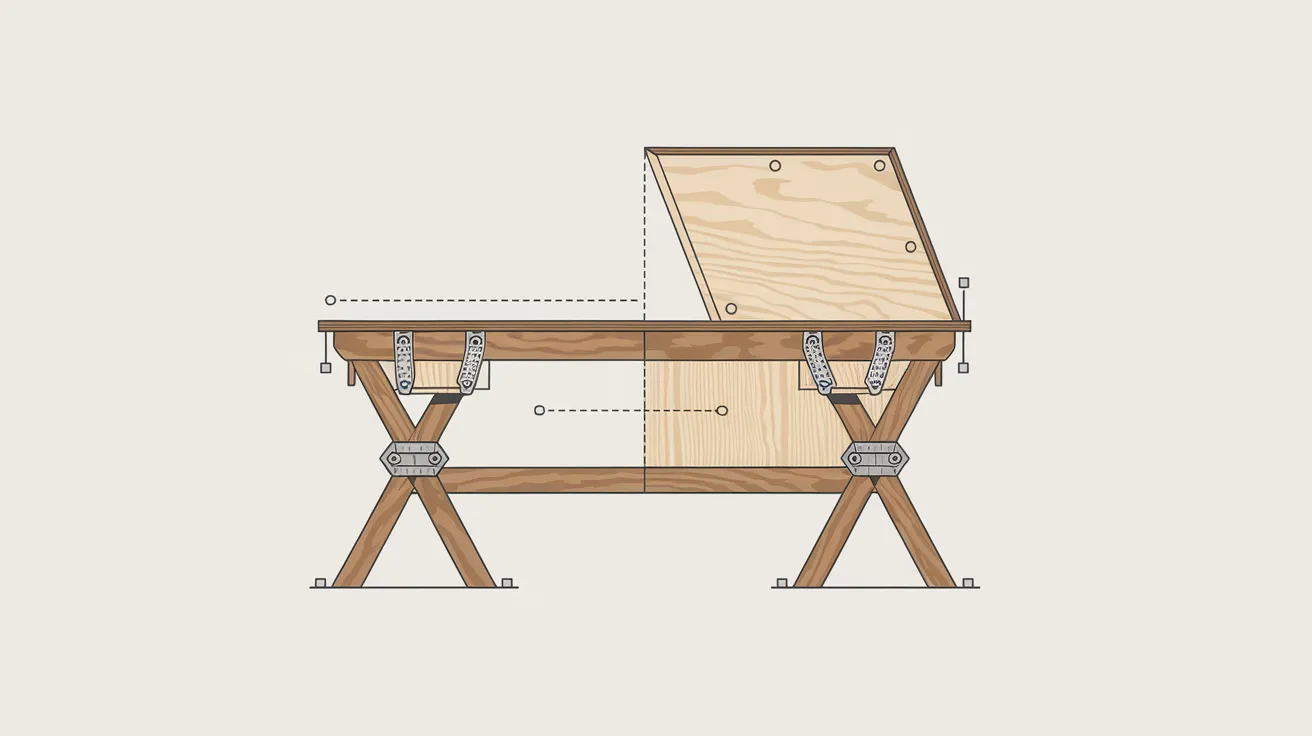
This DIY mobile workbench project offers a smart solution with built-in drawers on both sides and a clever flip-top design.
The bench features sturdy construction using basic materials like 2x4s and plywood, making it affordable and simple.
Plus, the heavy-duty caster wheels let you roll it exactly where needed.
Ready to make your workshop more functional?
Let’s build this mobile workbench together.
Materials And Tools Needed
Wood Materials
| Material | Details |
|---|---|
| 2×4 Lumber | 8 pieces at 31 inches (legs) |
| 2×4 Lumber | Additional pieces for horizontal and vertical supports |
| 3/4-inch Plywood | For drawer boxes, side panels, middle shelf, and top surface |
| 1/4-inch Plywood | For drawer bottoms |
Hardware
| Item | Details |
|---|---|
| Ball-bearing drawer slides | 4 pairs (16-inch length) |
| Heavy-duty caster wheels | 4 pieces (5-inch height) |
| Piano hinge | For flip-top |
| Basic door hinges | For support braces |
| Black drawer pulls | 4 pieces |
| Wood screws | 1-1/4 inch |
| Pocket hole screws | For assembly |
| Washers | For caster installation |
Tools Required
| Tool | Details |
|---|---|
| Circular saw | With a guide for precise cuts |
| Drill and drill bits | For making holes and driving screws |
| Pocket hole jig | For creating strong joints |
| Measuring tape | For accurate measurements |
| Speed square | For marking straight lines |
| Sander | For smoothing surfaces |
| Pencil | For marking measurements |
| Screwdriver | For manual adjustments |
| Jigsaw | For notching corners |
Optional But Helpful
| Item | Details |
|---|---|
| Wood glue | For securing joints and edges |
| Staple gun | For attaching drawer bottoms |
| Spacer blocks | It can be made from scrap wood |
| Level | For ensuring alignment |
Step-By-Step Guide To Craft Your Perfect Workspace
Step 1 – Building The Base Structure

Creating the Legs
To make the legs, start with eight pieces of 2x4s cut to 31 inches long.
You’ll want to sand each piece well before putting them together – this prevents any rough spots or splinters later.
Take two pieces and join them with wood glue and screws to create one thick leg.
Do this four times to make all your workbench legs.
Make sure the flat sides of the legs face the front and back of your bench.
Frame Assembly
The frame uses 2x4s connected with pocket holes and screws.
Place the 2x4s standing up (like a wall) for the top part of the frame.
But for the bottom part, lay the 2x4s flat – this gives you more space for drawers.
Connect all pieces using pocket hole screws, checking that everything stays square as you work.
This creates a strong box frame that will hold your workbench top and storage.
Adding Mobility
For your workbench to move easily, attach heavy-duty wheels at each corner.
Turn the frames upside down to install them.
Tilt the wheel plates slightly when mounting them so you’re not screwing directly into the end grain of the wood – this makes the connection stronger.
Use washers with 1¼-inch screws to attach each wheel.
Ensure all wheels are tight and spin freely before turning the frame right side up.
Step 2 – Storage System Construction

Drawer Frame
- Cut plywood pieces into 6.5-inch strips for the sides and center support.
- Place them 3/4 inch back from the frame edge using pocket hole screws.
- Add plywood pieces between the center support and bottom frame to mount drawer slides.
Drawer Components
- Make four identical boxes from plywood, each with four sides and a bottom.
- Connect sides with pocket holes and screws.
- Cut 1/4 inch plywood for the bottom and staple it on.
- Keep all boxes the same size for simple installation.
Slide Installation
- Put wood blocks on the sides where needed for flat mounting surfaces.
- Install 16-inch ball-bearing slides at the same height on both sides.
- Work with the bench on its side for easier access and better accuracy.
Drawer Fronts
- Cut fronts slightly smaller than openings, leaving 1/8-inch gaps.
- Use small wood shims for spacing.
- Attach fronts to drawer boxes from the inside with screws.
- Add handles to complete each drawer.
Step 3 – Work Surface Design
Middle Shelf
- Cut plywood to fit the frame.
- Cut out 3-inch corner squares where the legs are.
- Secure with screws through the top and into the sides.
- Add corner pocket screws for extra support.
Flip-top Mechanism
- Add a piano hinge down the middle of your top panel.
- Fix it between the plywood edge and frame.
- This lets your top flip up when needed.
Support System
- Build braces from 2x4s – two at 90 degrees with an angled piece between them.
- Mount door hinges to braces.
- Set them 3/4 inch below plywood so they catch and hold the top when it’s flipped.
Top Panel Installation
- Attach the top panel to the piano hinge.
- Test the flip motion.
- When closed, the top sits flat for work.
- When open, braces swing out to hold it steady.
Step 4 – Final Steps And Usage

Hardware Installation
Put black drawer pulls on all drawers, spacing them evenly across each front.
Check all wheel casters to make sure they’re tight and rolling well.
Test hinges on the flip-top braces – they should move freely but hold steady when open.
Make sure all screws are tight, but don’t over-tighten and split the wood.
Functionality Check
Test each drawer – they should slide smoothly and close fully.
Try the flip-top mechanism several times to ensure it works right. Push the workbench around to check if all wheels roll well.
The top should stay level when closed and stable when flipped open.
Open and close each drawer from both sides to ensure they work from either direction.
Video Tutorial
Below, I have attached the tutorial video on building an EASY DIY Mobile Workbench with Drawers by Shara Woodshop Diaries.
Maintenance Tips
1.Clean the wheel casters monthly by wiping them down with a damp cloth and removing any stuck debris or wood shavings.
Look for any small nails or screws that might have gotten caught in the wheels – these can damage your shop floor and make rolling harder.
After cleaning, add a tiny drop of machine oil to each wheel’s bearing point so they keep turning smoothly.
2. Check all screws and fasteners once every three months, especially around the most-used parts like drawer handles and hinges.
The workbench movement and daily use can slowly loosen these connections.
Keep a screwdriver nearby and tighten anything that feels loose.
3. Take care of your drawer slides by pulling out each drawer and wiping down the metal tracks with a clean cloth.
Look for any wood chips or dust that could block smooth movement.
Apply a small amount of silicone spray lube to the drawer slides twice a year – avoid using WD-40 as it can attract dust.
Test each drawer’s movement after cleaning to make sure they glide properly.
4. Keep your work surface in good shape by cleaning up spills right away and avoiding leaving wet items on the plywood.
When you notice any rough spots developing, sand them lightly to prevent splinters.
Apply a coat of paste wax to the top surface every six months – this helps prevent glue and finish from sticking to it and makes cleanup easier.
Remember to clean both sides of the flip-top, since both surfaces will be used as work areas.
Conclusion
Building your mobile workbench brings both value and function to your workshop.
This project combines storage, mobility, and a smart flip-top design to maximize your space.
You can create a sturdy work surface that fits your needs with basic tools and materials.
The real beauty of this workbench is how it grows with your workshop – add different handles, change drawer layouts, or adjust the height to match your needs.
Remember to follow the safety tips and keep up with maintenance to make your bench last longer.
Ready to start building?
Grab your tools and materials list and get started on your workbench this weekend.