Are you looking for a practical way to organize your space without drilling holes in every photo or document?
I get it. After watching countless notes fall off my fridge and dealing with corkboards that turned into pin cushions, I knew there had to be a better solution.
I created a custom magnetic board that looks great and keeps everything in place.
The best part? It costs a fraction of store-bought options and can be made using basic materials in just a few hours.
In this guide, I’ll walk you through my tried-and-tested process for crafting a magnetic l and stylish.
Whether creating a magnetic board, organizing a home office, or sprucing up your kitchen, you’ll learn every step to create the perfect solution.
Tools and Materials Required
Tools Required
| Tool | Purpose | Quantity |
|---|---|---|
| Router with 60-degree chamfer bit | To create smooth edges and decorative details | 1 |
| Router with a template bit | Used for precise cuts or curves with templates | 1 |
| Planer and jointer | Optional for flattening and smoothing wood (if using rough lumber) | 1 each (optional) |
| Table saw | Cuts wood into precise dimensions | 1 |
| Miter saw | Used for angled cuts (for the shelf supports or edges) | 1 |
| Drill press | For accurate and straight holes for mounting | 1 |
| Domino joiner | Used for creating strong joints in shelf construction | 1 |
| Clamps (including hand screw clamps) | Holds pieces together during assembly and finishing | 4-6 (depends on project scale) |
| Line laser | Ensures precise placement and alignment of shelves | 1 |
Materials Required
| Material | Purpose | Quantity |
|---|---|---|
| Hard maple boards (or pre-milled lumber) | Used to build the floating shelves | Varies based on shelf size |
| Heavy-duty blind shelf supports | Provides structural support for the floating shelves | 4-6 (depends on shelf length) |
| “Simple Finish” from Maker Brand | It provides a smooth, protective finish to the wood | 1 can/bottle |
| Wall anchors and mounting hardware | Secures the shelf to the wall | 4-6 (depends on number of shelves and wall material) |
Step-by-Step Guide on DIY Magnetic Board
Step 1- Frame Preparation
Frame Preparation starts with carefully dismantling the poster frame. The plastic cover must be removed while maintaining the frame’s structural integrity. This creates a clean foundation for the magnetic board’s construction.
Step 2- Base Assembly
Base Assembly focuses on upgrading the standard backing. The original material is replaced with a hardboard, which offers superior strength and resistance to daily pressure.
This modification ensures long-term durability.
Step 3- Metal Layer
The application of the Metal Layer requires precision and patience. Position the sheet metal over the hardboard and temporarily secure it with double-stick tape.
This creates the essential magnetic surface while maintaining a smooth appearance.
Step 4- Mounting Hardware
Mounting Hardware installation transforms the piece into a wall-ready creation. Place D-ring hangers through both layers, securing them with pop rivets and washers.
This dual-layer attachment ensures safety and stability.
Step 5- Surface Finish
Surface Finish adds style and functionality. Methodically apply contact paper over the metal surface to achieve a professional appearance.
This layer protects the metal while offering customization options.
Step 6- Edge Treatment
Edge Treatment completes the construction phase. Secure the frame edges using strategic tape placement, creating a solid, unified piece that functions silently and smoothly.
Video Tutorial
Check out this YouTube video for a detailed step-by-step tutorial on making a DIY Magnetic Board.
Maintenance of a Magnetic Board
Maintaining a magnetic board for home organization, office tasks, or as a creative surface is essential to ensure its functionality and longevity. Here are some key maintenance tips:
1. Regular Cleaning
- Surface Cleaning: Wipe the surface regularly using a soft or microfiber cloth to remove dust, fingerprints, or any marks. Avoid abrasive cleaners, as they can scratch the board’s surface.
- Deep Cleaning: For a deeper clean, gently wipe the board with a mild soap solution (dish soap and water). Always dry the surface with a clean cloth to avoid watermarks or damage.
- Magnetic Surface Care: If you use a magnetic dry-erase board, clean the surface with a dry-erase cleaner to prevent stains or ink build-up.
2. Avoiding Scratches and Dents
- Protect the Surface: Avoid dragging magnets or hitting the surface with hard or sharp objects when placing magnets on the board.
- Use Soft Magnets: To minimize the risk of scratching the board, opt for soft rubber-coated magnets instead of metal ones.
3. Magnet Care
- Storing Magnets: Do not stack too many magnets on each other for long periods, as this can weaken the magnetic force. Store magnets properly and clean them regularly.
- Check for Magnetic Strength: Some magnets might lose their magnetic pull over time. If magnets seem weak, replace them or switch to stronger ones.
4. Repairing Damage
- Fixing Dents or Marks: If the magnetic surface has dents or visible marks, use a furniture touch-up marker or spray paint to correct minor imperfections. For bigger issues, consider repainting the board with magnetic paint or a magnetic whiteboard.
5. Repainting
- If the board is made of magnetic paint, it might be recessed to be repainted for years, especially if the surface is worn or has lost its magnetism. Repainting ensures the board continues to work properly.
Alternate Ideas for DIY Magnetic Boards
If you’re looking to diversify your magnetic board project or personalize it further, here are some alternate ideas:
1. Magnetic Bulletin Board

Combine cork and magnetic paint to create a hybrid bulletin board for pinning and magnet use. This board perfectly combines the classic bulletin board style with a modern magnetic feature.
2. Magnetic Chalkboard

Use chalkboard paint over a magnetic surface. This allows you to write messages or draw on the board with chalk while still being able to use magnets for notes or photos. It is ideal for kids’ rooms, kitchens, or offices.
3. Framed Magnetic Board

Create a stylish, framed magnetic board using a simple metal sheet and a beautiful frame around it. This gives the board an elegant look while still providing functionality for your magnets.
4. DIY Magnetic Calendar

Use magnetic sheets to create a functional calendar board. You can move magnetic dates and event pieces around, which is great for organization and planning.
5. Upcycled Magnetic Board

Repurpose old metal objects, such as cookie sheets or an old metal tray, as a base for your magnetic board. Clean and paint them for a fresh look, and mount them on the wall for a rustic, upcycled feel.
6. Magnetic Dry-Erase Board
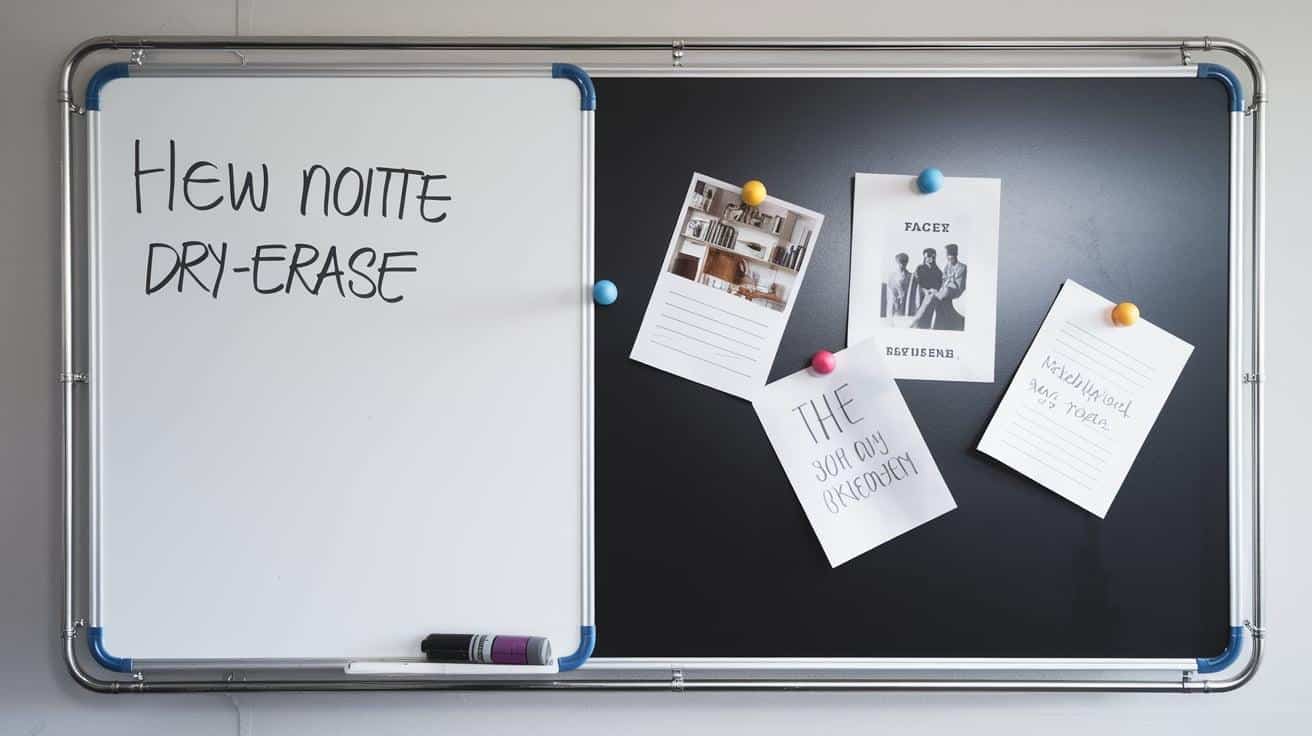
Combine a dry-erase board with a magnetic surface. This way, you can write and erase on the board while sticking important notes and reminders with magnets.
Common Mistakes When Making a DIY Magnetic Board
Even though making a magnetic board is a simple project, some common mistakes can compromise the result:
1. Choosing the Wrong Metal
Some metals are not magnetic or may not hold magnets strongly. Use metals with magnetic properties, such as steel or aluminum. Avoid metals like copper, brass, or stainless steel.
2. Incorrect Magnet Choice
Not all magnets are created equal. A board with weak magnets may not hold anything securely. Choose strong neodymium magnets or magnetic strips, which have higher magnetic power.
3. Overlooking the Surface Preparation
Before applying any paint or coating, ensure the surface is smooth and clean. Any dust, dirt, or debris will affect the paint’s adhesion, leading to uneven or flaky surfaces.
4. Applying Magnetic Paint Inefficiently
For best results, magnetic paint requires multiple coats. Don’t skimp on the number of layers, as this can impact the board’s magnetism. Also, let each layer dry completely before applying the next one.
5. Not Testing Before Mounting
Before mounting the board on the wall, test the magnet strength on a small section to ensure the board will securely hold your magnets.
6. Not Considering the Weight of Magnets
Heavy magnets can leave dents or marks on your magnetic board. If you plan to use heavy-duty magnets, ensure the material is durable enough to support them.
Conclusion
Looking at my finished magnetic board, I can’t help but smile at how this simple project transformed my space.
That sleek metal surface now proudly displays everything from my kids’ artwork to important reminders, adding function and style to what was once a blank wall.
The graduated shelf widths create an unexpected visual element, while the strategic placement ensures perfect visibility.
What started as a practical solution became something more—a personalized piece that added character to my room.
The best reward? I watched how easily my family interacted with it daily, pinning up memories and messages without fuss.
This magnetic board isn’t just another organizational tool; it’s become a dynamic part of our home’s story.