21 Before and After Kitchen Remodel Ideas
Scrolling through perfect kitchen photos on Pinterest feels great until you close the app. Then what?
Most before-and-after kitchen remodel galleries show you the dream, but skip the actual roadmap to get there.
This guide is different. We’re covering the planning decisions that matter before you pick a single tile.
You’ll get real ideas with the before problems, after solutions, and exactly what to buy. Plus, the truth about contractor hiring that inspiration posts conveniently forget to mention.
Inside, you’ll learn how to plan your remodel based on real life, not just pretty pictures. Which changes give you the biggest impact for your budget? And when to hire a pro versus when to grab your own drill.
Quick Planning Snapshot Before the Inspiration List
Looking at stunning before-and-after kitchen remodel photos is exciting. But without a solid plan, those beautiful images stay just that.
Before you start saving pins and screenshots, take 20 minutes to nail down your real-world needs. This quick planning snapshot will help you turn inspiration into actual results.
- Goals and Constraints: Lifestyle, Cooking Habits, Entertaining, Kids, Pets. List your top 3 daily kitchen activities and who uses the space most often.
- Layout Reality Check: Work Zones (Cook, Clean, Prep, Store) and Clear Walkways. Measure your current walkways and ensure they’re at least 36 inches wide.
- Budget Guardrails: Must-Haves vs. Nice-to-Haves; Contingency. Write down your firm’s budget ceiling and add 15% for unexpected costs.
- Timeline Reality: Planning Phase vs. Build Phase; Long-Lead Items. Add 2 weeks to whatever timeline your contractor gives you.
- Permissions and Safety Basics: Electrical, Plumbing, Ventilation. Call your local building department before you start any structural changes.
Many before-and-after kitchen remodel galleries skip the boring planning stuff. They show you the finished product without explaining how to get there. This creates a gap between inspiration and reality. Use this snapshot to bridge that gap and set yourself up for success.
21 Before and After Kitchen Remodel Ideas
These before-and-after kitchen remodel ideas highlight real modifications that completely changed how each space looks and functions. From small upgrades to full kitchen remodels, each example shows what thoughtful design choices can achieve.
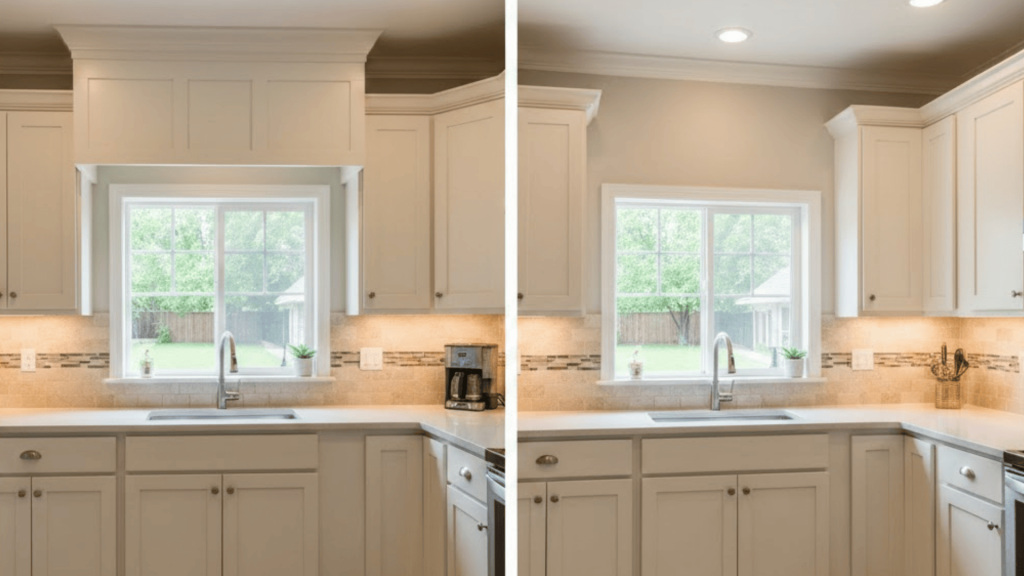
1. Upper Cabinets to Statement Hood
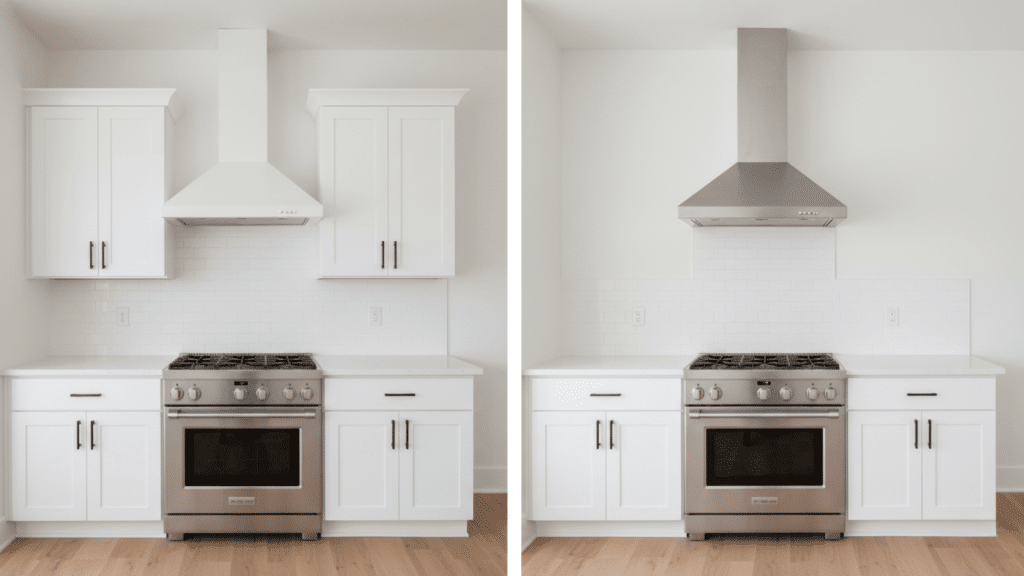
Before: Upper cabinets boxed in the cooking area, making the kitchen feel closed off. The basic vent hood blended into the cabinet run and provided weak ventilation.
After: A large statement hood takes center stage, drawing the eye upward. The open wall space on either side creates breathing room and makes the ceiling feel higher.
Steal This Idea
This works if you have storage elsewhere. Choose a hood that handles your cooking volume, not just looks. Metal suits modern styles while painted wood fits traditional homes.
Quick Checklist:
- Statement range hood with proper CFM
- Wall repair and paint
- New lighting for open areas
- Storage audit before removing cabinets
2. Peninsula to Island with Seating
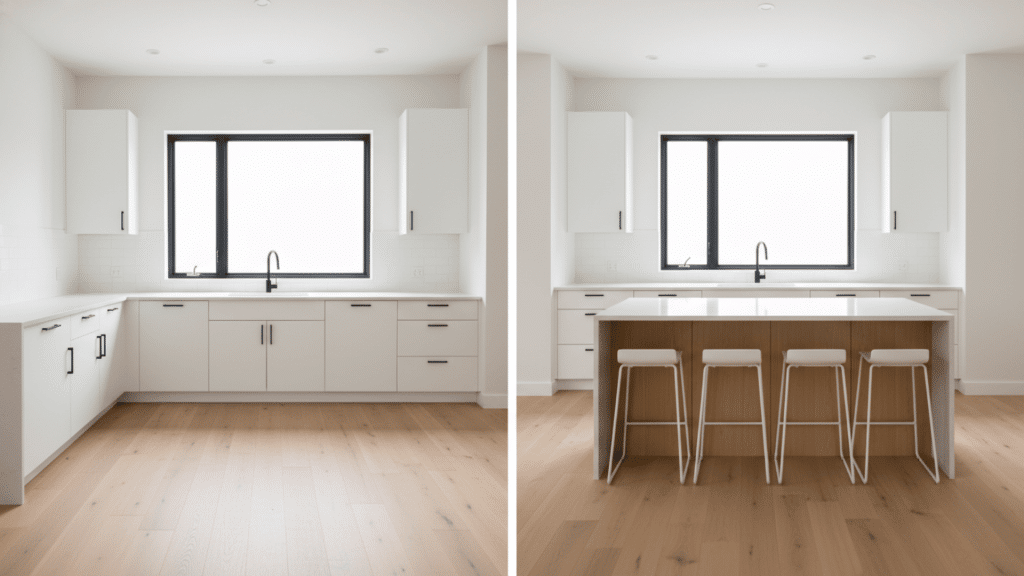
Before: The peninsula created a dead end and forced traffic through one narrow path. No casual seating existed.
After: An island opens circulation on all sides. Built-in seating adds function without a separate table.
Steal This Idea
You need at least 42 inches of clearance around the island. Add outlets on the ends for charging. Include deep drawers on the back for pots and dishes.
Quick Checklist:
- Measure clearance zones (42-48 inches)
- Electrical permits for outlets
- Island base with seating overhang
- Counter-height chairs
3. New Cabinet Doors Only
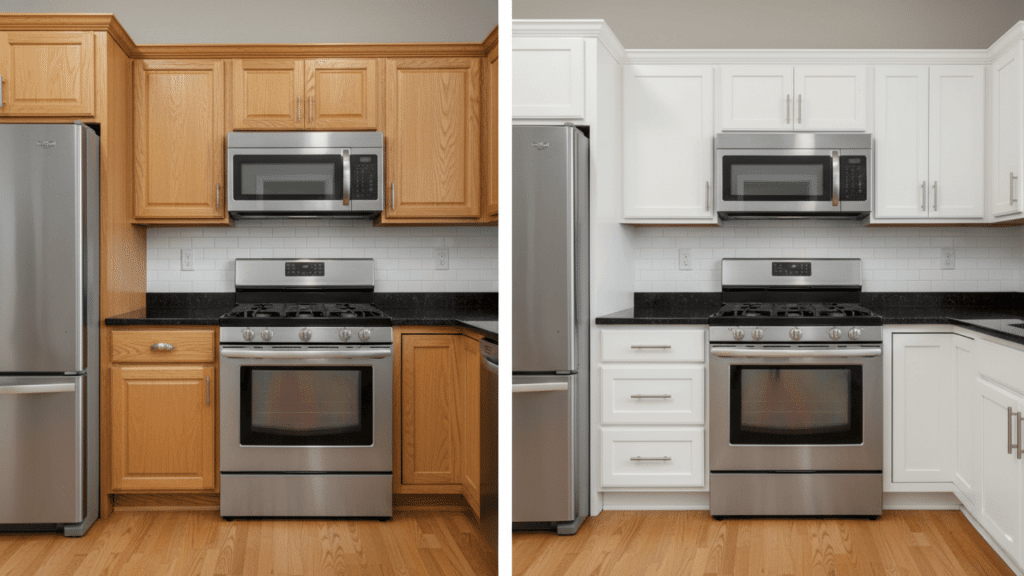
Before: The old doors looked dated, but the cabinet boxes were solid. Replacing everything felt wasteful and expensive.
After: New door fronts give a fresh face at a fraction of replacement cost. You keep the existing layout.
Steal This Idea
Measure cabinet boxes carefully for exact dimensions. Shaker doors work for any style. This before-and-after kitchen remodel saves 40-60% versus new cabinets.
Quick Checklist:
- Measure all cabinet openings
- Choose door style (shaker, flat, raised)
- New hinges if needed
- Paint or stain finish
4. Pantry Closet to Pull-Out System
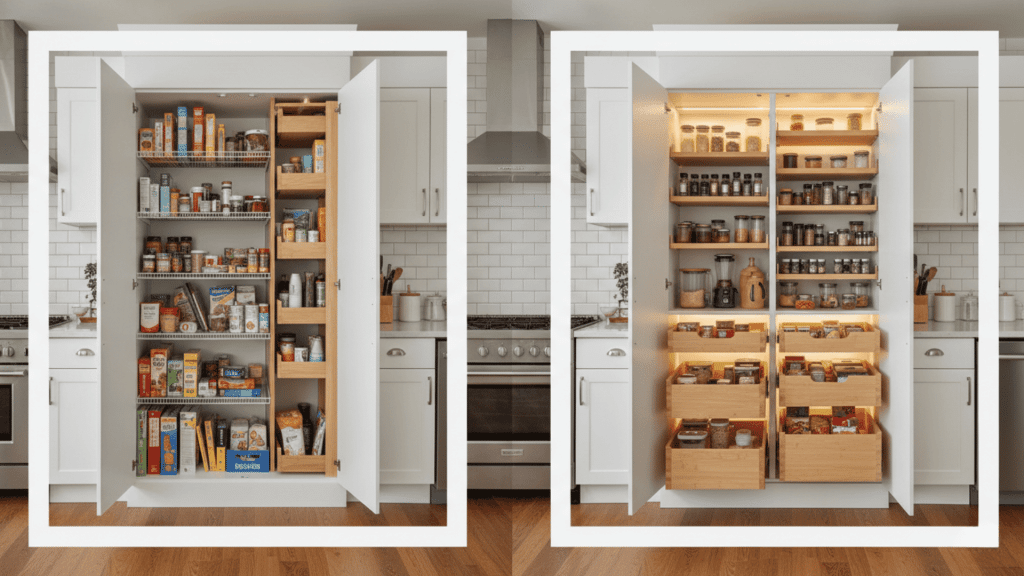
Before: Wire shelves let items get lost in the back. Deep shelves meant stacking three rows deep.
After: Custom pull-out shelves bring everything forward. Tall cabinets use vertical space efficiently.
Steal This Idea
Add pull-out shelves that extend fully. Place shallow shelves for cans next to deeper ones for bulk items. Soft-close hardware prevents slamming.
Quick Checklist:
- Tall pantry cabinet (84-96 inches)
- Pull-out shelf system
- Soft-close slides
- Interior lighting
5. Dark Backsplash to Light Tile
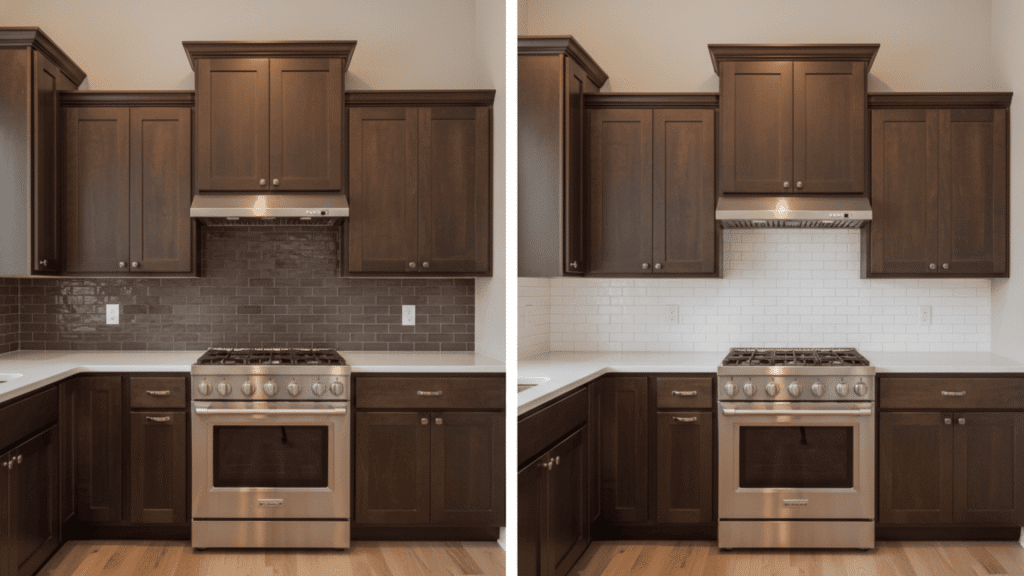
Before: Dark textured tile absorbed light and made the kitchen feel small. Grout lines collected grime.
After: Light tile reflects both natural and artificial light. The room feels bigger and cleaner.
Steal This Idea
White subway tile is affordable and timeless. Glossy finishes reflect more light than matte. Large tiles mean fewer grout lines to clean.
Quick Checklist:
- Light-colored tile (white, cream, gray)
- Glossy or polished finish
- Light grout to match
- Grout sealer
6. Cabinets to the Ceiling

Before: The gap above the cabinets collected dust and looked unfinished. Wasted storage space sat empty.
After: Floor-to-ceiling cabinets make the room feel taller. You gain a full row of storage.
Steal This Idea
Add crown molding at the ceiling line. Use top cabinets for seasonal items. This before-and-after kitchen remodel adds real storage value.
Quick Checklist:
- Upper cabinet extensions
- Crown molding
- Step stool for access
- Paint to match the existing
7. Under-Cabinet Lighting
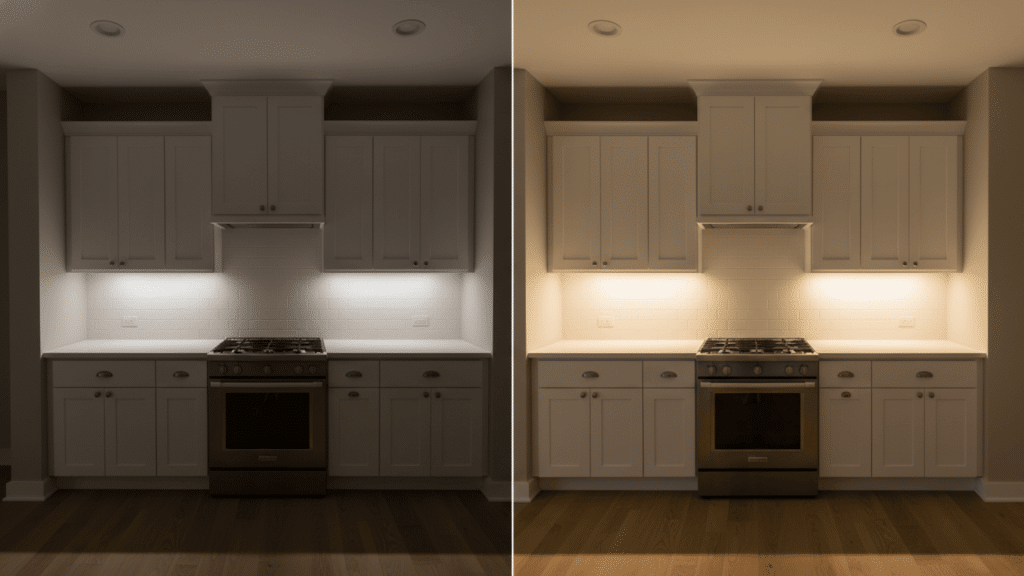
Before: Overhead lights cast shadows on counters. Evening cooking meant working in your own shadow.
After: Under-cabinet lights eliminate shadows. The kitchen feels brighter without adding ceiling fixtures.
Steal This Idea
LED strips are easy to install. Choose warm white (2700-3000K) for a cozy feel. Add a dimmer to adjust the mood.
Quick Checklist:
- LED strips or puck lights
- Power source (plug or hardwired)
- Dimmer switch
- Wire channels to hide cords
8. Double Sink to Deep Single Bowl
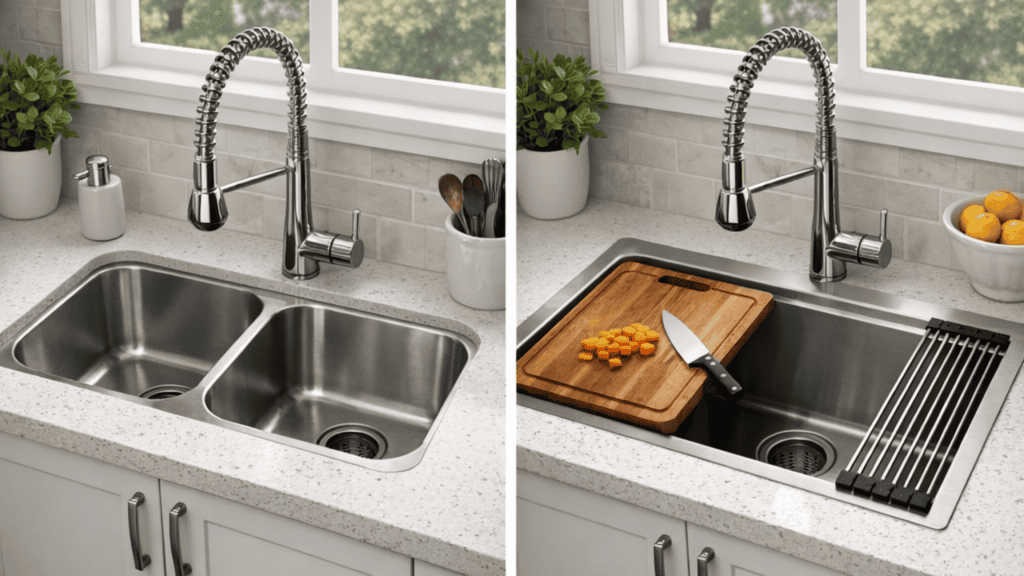
Before: Two shallow bowls couldn’t fit large pots or baking sheets. The divider got in the way.
After: A single deep bowl handles oversized items. Accessories like cutting boards slide across the top.
Steal This Idea
Workstation sinks include ledges for accessories. Choose undermount for easier cleanup. Get at least 9-10 inches deep for this before and after kitchen remodel.
Quick Checklist:
- Deep single-bowl sink (9-10 inches)
- Workstation accessories
- Undermount installation
- Updated faucet to match
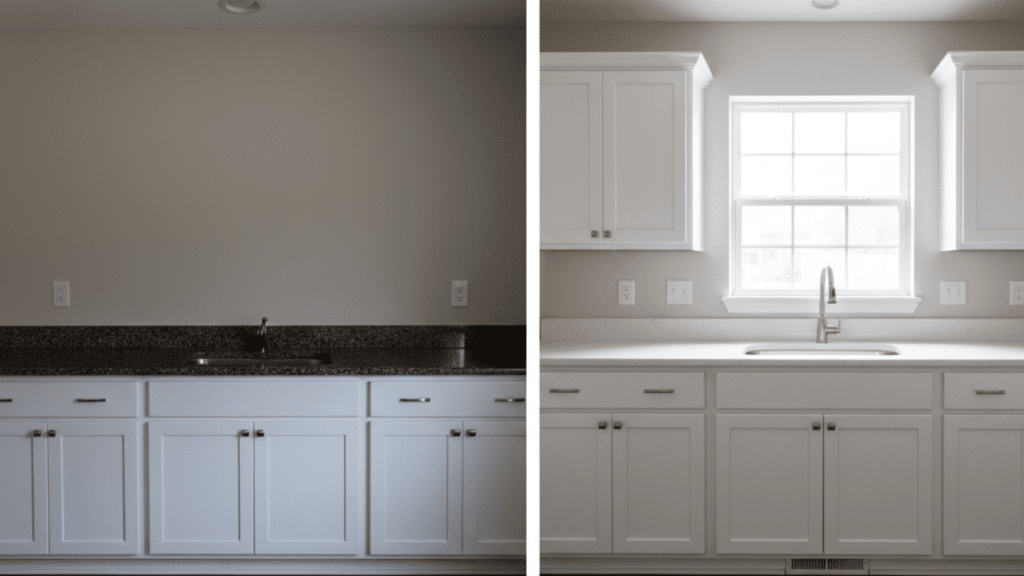
9. Countertops Only Update
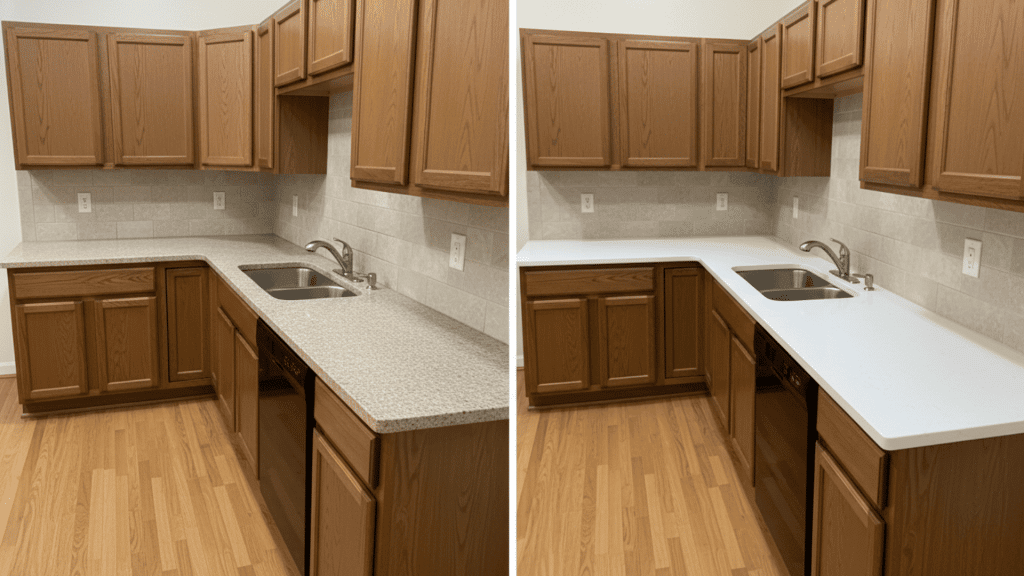
Before: Old countertops dominated the visual space and dated everything. Stains couldn’t be fixed.
After: New countertops reset the look without touching cabinets. You shift styles with one change.
Steal This Idea
Quartz is durable and low-maintenance. Choose neutral for resale or bold for your forever home. Keep edge profiles simple.
Quick Checklist:
- Countertop material (quartz, granite, butcher block)
- Edge profile
- Backsplash update
- Sink cutout
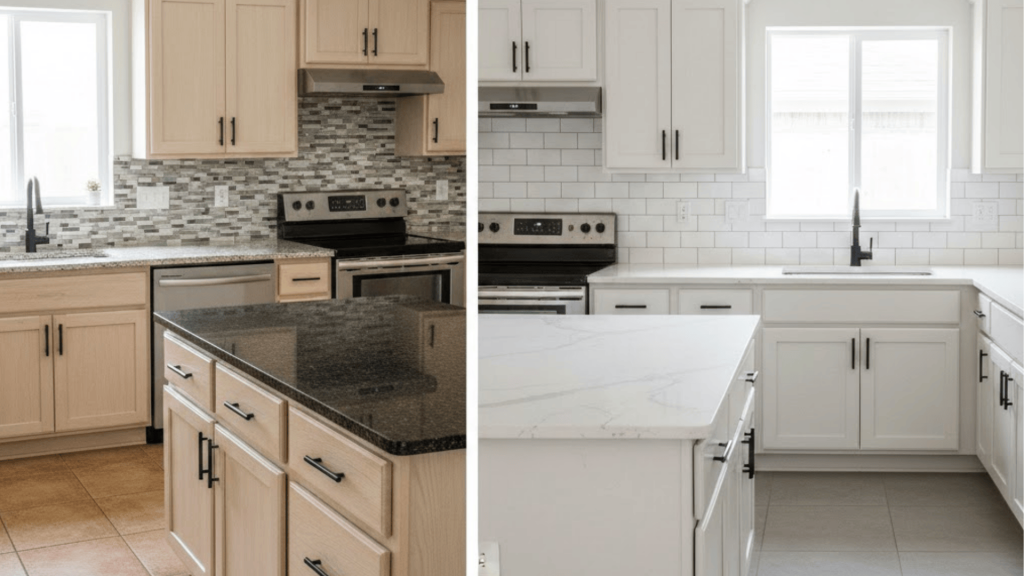
10. Busy Granite to Calm Surface
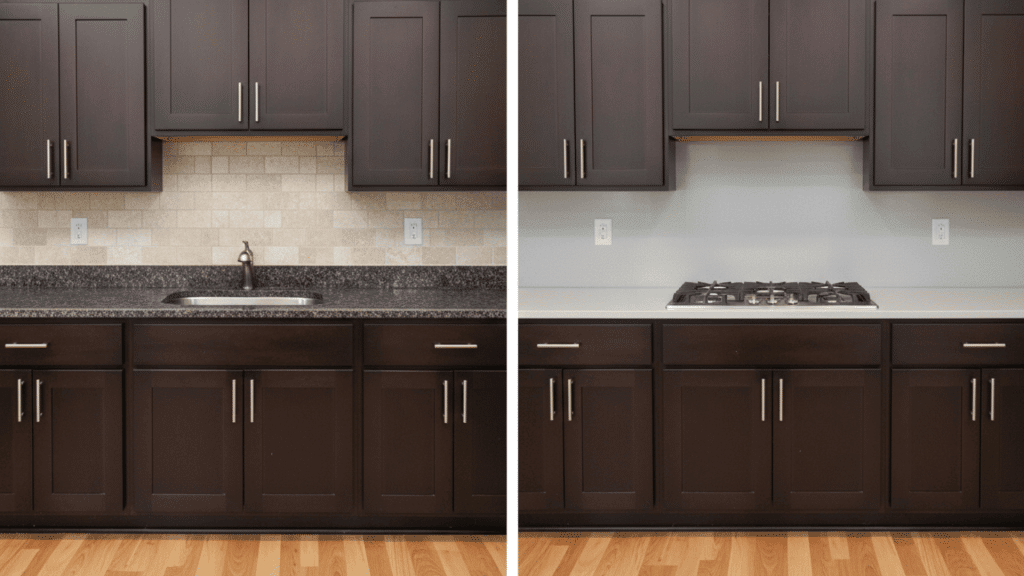
Before: Heavy patterned granite fought with everything. A short backsplash chopped the wall into sections.
After: Calm countertop lets other elements shine. Full-height backsplash creates one smooth surface.
Steal This Idea
White or light gray quartz works in any style. A full-height backsplash looks expensive and protects walls better during cooking.
Quick Checklist:
- Solid-color countertop
- Matching slab or coordinating tile
- Professional slab installation
- Blending grout color
11. Hardware and Faucet Match
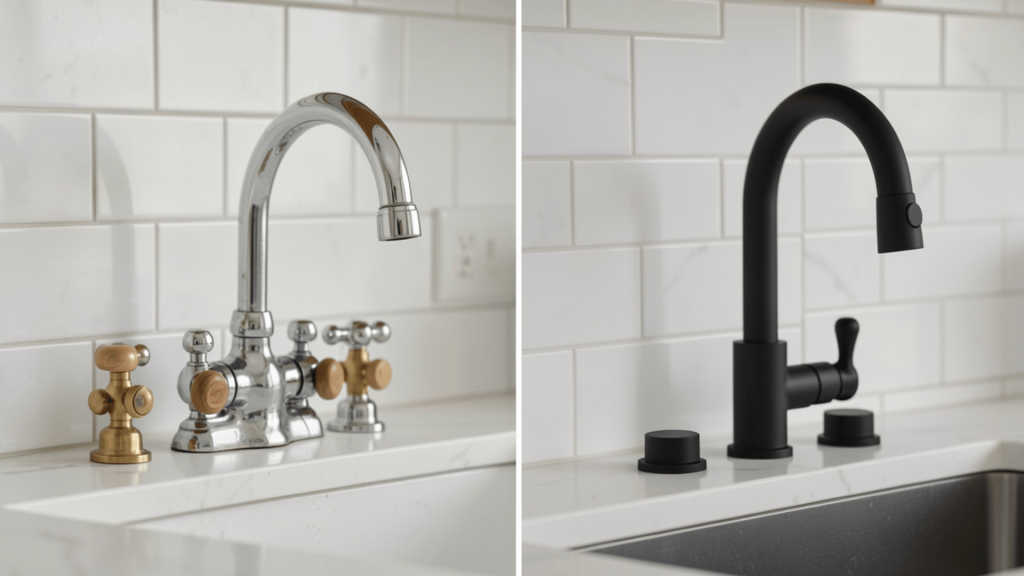
Before: Mixed metal finishes from different eras looked accidental. Old hardware was worn or loose.
After: One metal finish throughout ties everything together. New hardware makes cabinets look updated.
Steal This Idea
Matte black and brushed gold are popular now. Measure cabinet doors before buying pulls. Choose a faucet with a pull-down sprayer for this before-and-after kitchen remodel.
Quick Checklist:
- Cabinet pulls and knobs
- Kitchen faucet with matching finish
- Screwdriver or drill
- Plumber’s putty
12. Coffee Nook Addition
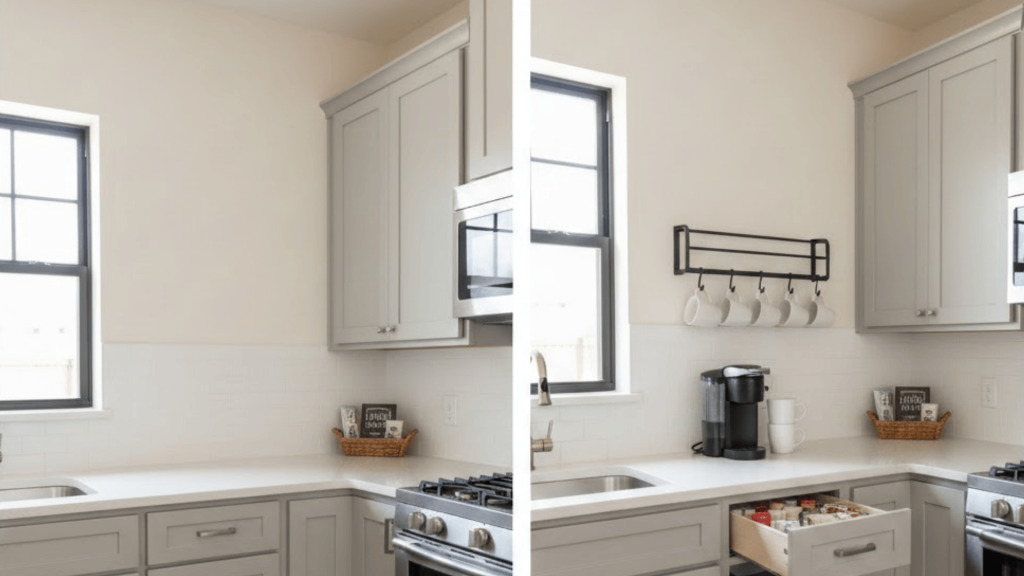
Before: Everyone crowded the main sink during morning routines. Coffee supplies are scattered across multiple cabinets.
After: A dedicated beverage zone keeps coffee and supplies in one spot. No more traffic jams.
Steal This Idea
You need only 24-30 inches of counter space. Add an outlet nearby. Include a drawer below for filters and pods.
Quick Checklist:
- 24-30 inches counter space
- Dedicated outlet
- Drawer for supplies
- Mug storage above
13. Refrigerator Relocation
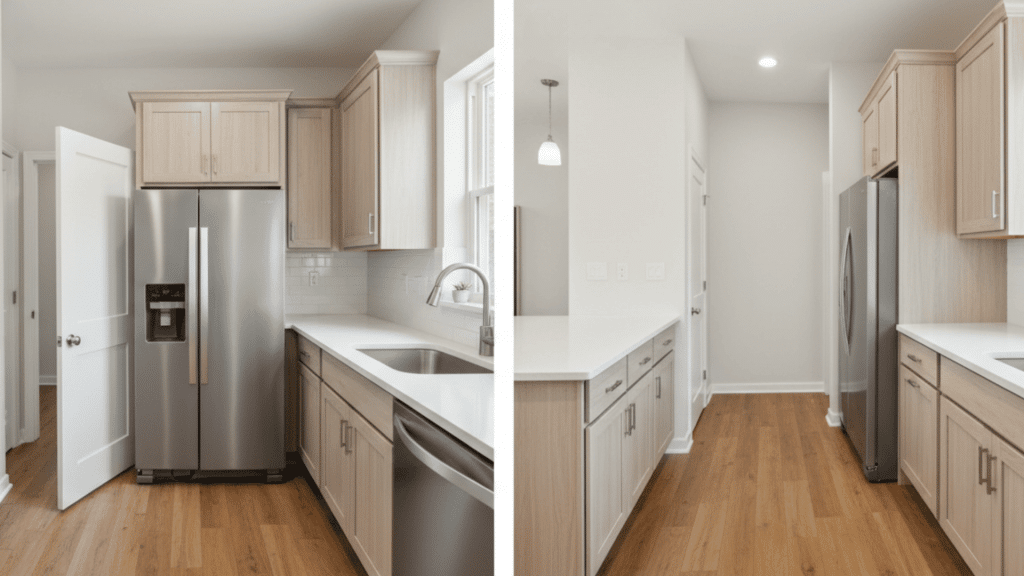
Before: The fridge door swung into the walkway and blocked traffic. It sat too far from prep areas.
After: Moving the fridge opens circulation. Placing it near prep makes cooking more efficient.
Steal This Idea
Allow 36 inches of clearance in front of the door when it opens. Consider counter-depth models to save space in your before and after kitchen remodel.
Quick Checklist:
- New location with proper clearance
- Electrical outlet relocation
- Water line extension
- Flooring repair
14. Corner Storage Solutions
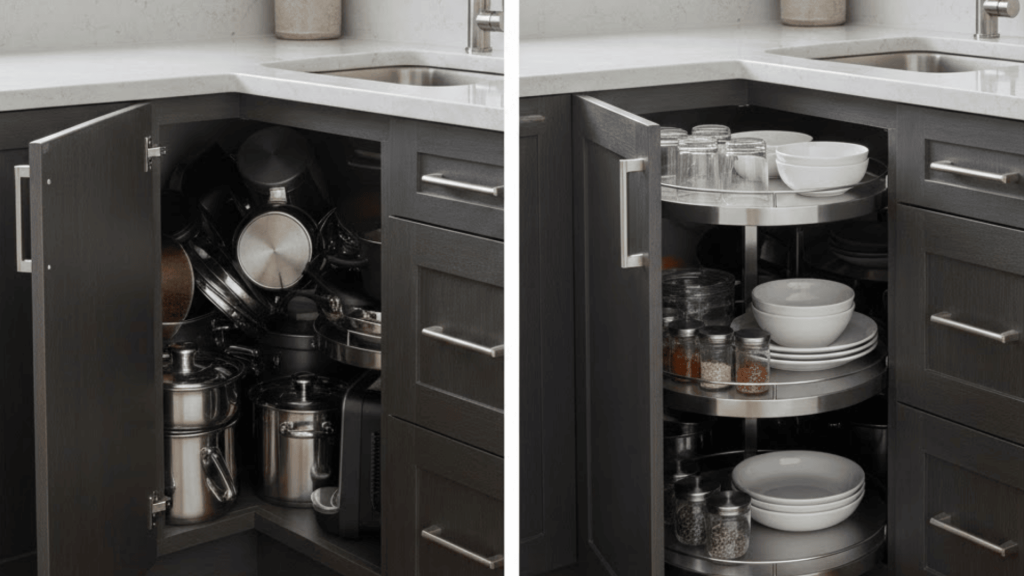
Before: Corner cabinets were impossible to reach. Items disappeared forever. You lost 50% of that space.
After: Lazy Susans or pull-out systems bring everything within reach. You use every inch now.
Steal This Idea
Lazy Susans cost less, but pull-out systems maximize storage. LeMans solutions are pricey but worth it. Soft-close prevents slamming.
Quick Checklist:
- Corner solution (lazy Susan, pull-out)
- Soft-close hardware
- Installation brackets
- Professional install if needed
15. Two-Tone Cabinets
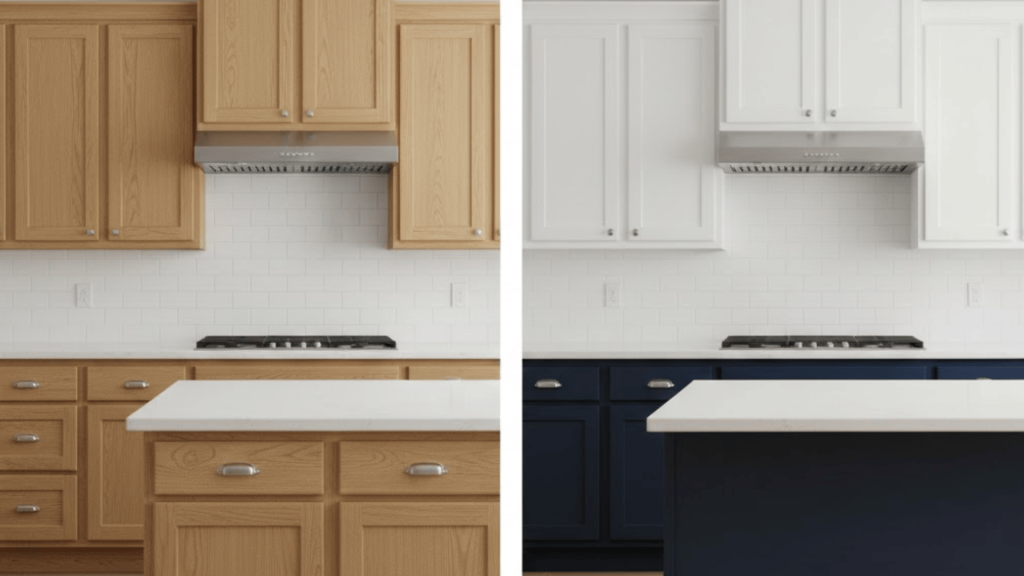
Before: All-matching cabinets looked flat. The kitchen felt like every other house in the neighborhood.
After: A second color adds depth. Island or lower cabinets in a contrasting color ground the space.
Steal This Idea
Paint the lower cabinets darker and keep the upper cabinets light. Navy, green, or charcoal work for bases. White upper cabinets keep the ceiling from feeling low in this before-and-after kitchen remodel.
Quick Checklist:
- Two paint colors (light and dark)
- Cabinet primer
- Quality cabinet paint
- Matching hardware throughout
16. Remove the Soffit
Before: The soffit dropped the ceiling, making the room feel cramped. It added visual weight.
After: Removing it opens up the ceiling and adds height. Cabinets can now go all the way up.
Steal This Idea
Check what’s inside before demolition. Sometimes ductwork needs rerouting. Add recessed lights in the new ceiling space.
Quick Checklist:
- Contractor to check contents
- Drywall repair materials
- Recessed lighting
- Ceiling paint
17. Better Ventilation and Lighting
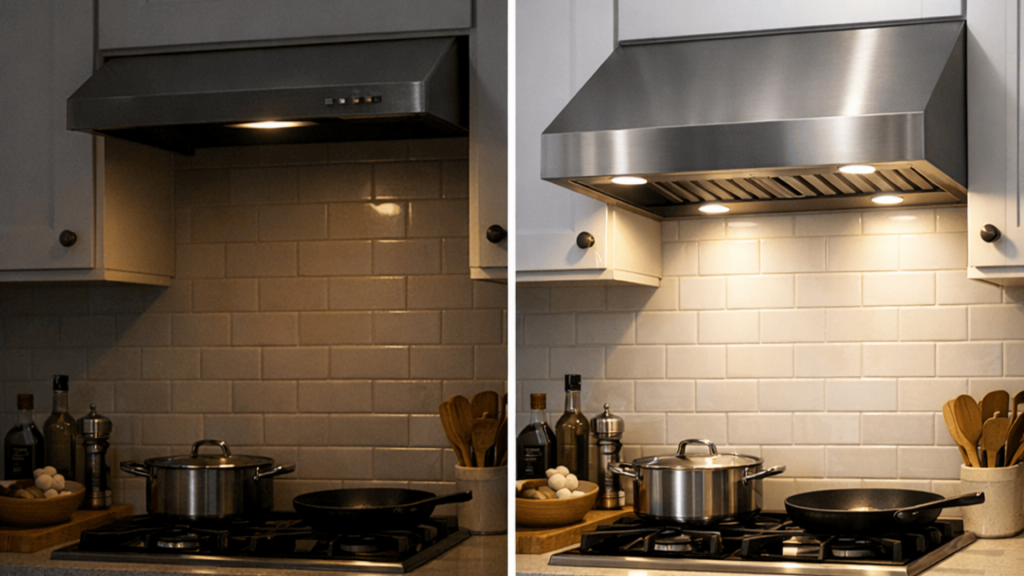
Before: The old vent was loud but didn’t remove smoke. Cooking at night meant working in shadow.
After: A proper hood quietly removes cooking byproducts. Integrated lighting illuminates the cooktop perfectly.
Steal This Idea
Look for CFM ratings matching your cooktop’s output. A 30-inch cooktop requires a minimum of 300 CFM. Ducted vents work better than recirculating systems for your before-and-after kitchen remodel.
Quick Checklist:
- Range hood with adequate CFM
- Ductwork installation
- LED task lighting
- Electrician for wiring
18. Strategic Open Shelving
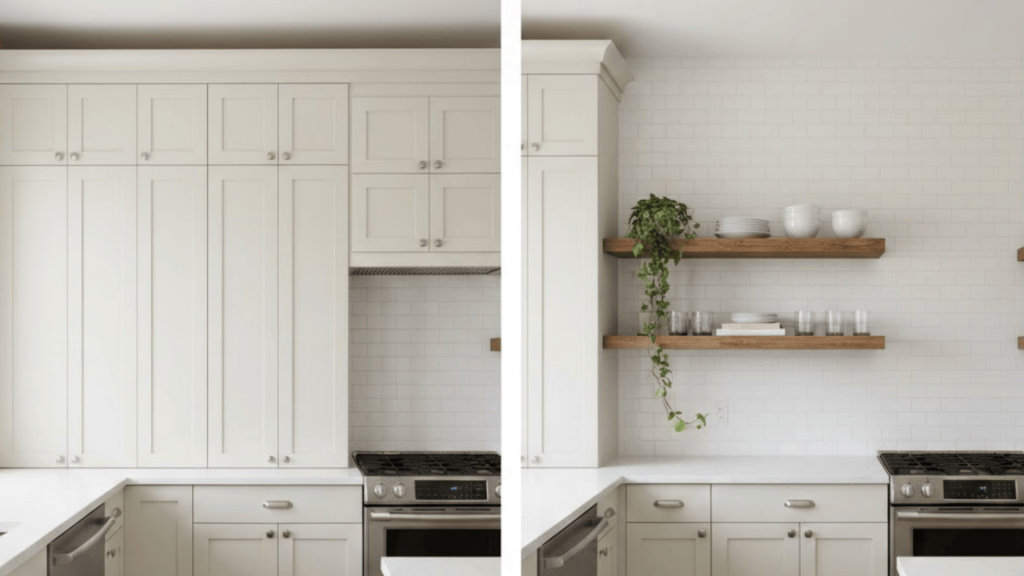
Before: Wall-to-wall cabinets felt heavy and closed in. The kitchen looked dark despite good lighting.
After: One or two open shelves break up the cabinet wall. They add breathing room and display space.
Steal This Idea
Replace the uppers on just one wall. Keep cabinets for everyday dishes. Use open shelves for pretty items you like viewing.
Quick Checklist:
- Floating shelves or brackets
- Heavy-duty wall anchors
- Display items
- Cabinet patching if needed
19. New Flooring
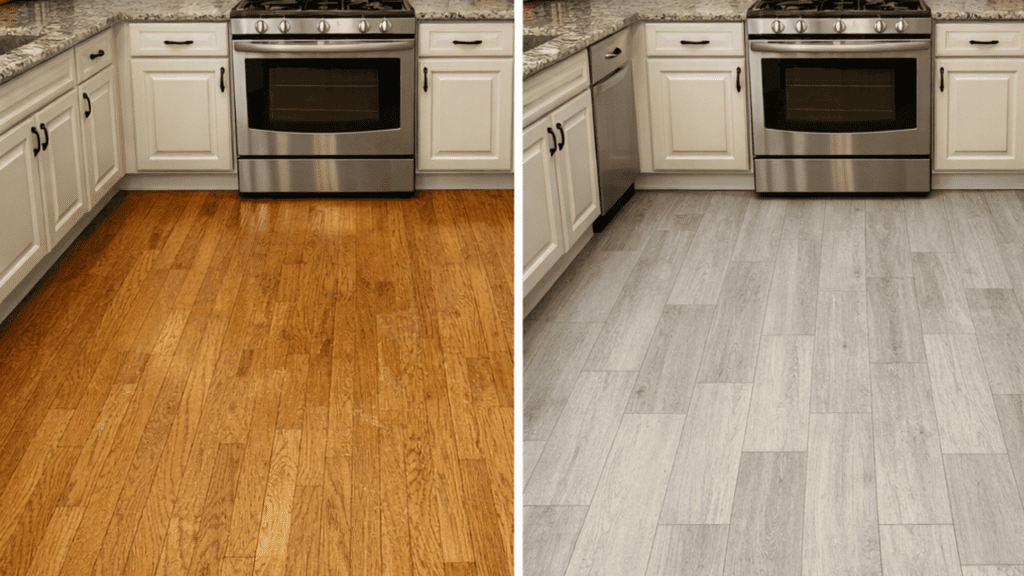
Before: Dark or orange-toned floors made everything feel dated. The flooring didn’t match the new colors.
After: New flooring resets the mood. Light floors make the space feel bigger and fresher.
Steal This Idea
Luxury vinyl plank handles water well and looks like wood. Light oak or gray works with any style in a before-and-after kitchen remodel. Prep the subfloor properly first.
Quick Checklist:
- Flooring material (LVP, tile, hardwood)
- Underlayment if needed
- Room transitions
- Subfloor prep
20. Add or Expand Windows
Before: The lack of natural light made the kitchen feel like a cave. Overhead lights stayed on all day.
After: A new or larger window lets in daylight. If windows aren’t possible, layered lighting helps.
Steal This Idea
Adding a window requires structural work and permits. Can’t add windows? Layer overhead, under-cabinet, and pendant lighting instead. Place mirrors to reflect existing light.
Quick Checklist:
- Window installation permit
- Structural engineer consultation
- Professional installation
- Alternative: layered lighting and mirrors
21. Consistent Finishes Throughout
Before: Too many colors and materials chopped the space into tiny sections. Every surface competed for attention.
After: Matching finishes, create a continuous flow. The room reads as a single space rather than fragments.
Steal This Idea
Use the same countertop throughout for this before-and-after kitchen remodel. Match hardware everywhere. Keep flooring consistent. Limit yourself to three main colors maximum.
Quick Checklist:
- One countertop material
- Matching hardware finish
- Continuous flooring
- Simple backsplash pattern
Hiring Pros vs DIY for a Before and After Kitchen Remodel
You’ve picked your favorite ideas. Now decide which parts need a professional and which you can handle yourself.
| What | Key Points |
|---|---|
| Always Hire Licensed Help For | Electrical, plumbing, structural work, and gas lines. These require permits and insurance. |
| Good Quote Includes | Scope, allowances, timeline, payment schedule. Protects both parties. |
| How to Vet | Check portfolio, call 3+ references, verify permits, and confirm 1-year warranty. |
| Safe to DIY | Painting, hardware, demo, and backsplash if experienced. |
| Red Flags | No license, full payment upfront, won’t pull permits, no contract. |
Hire pros for anything involving wires, pipes, gas, or walls. Your before-and-after kitchen remodel should end safely and legally.
Final Thoughts
Your before-and-after kitchen remodel doesn’t have to drain your savings or take a year to finish. Start with the planning snapshot to nail down what you actually need.
Pick one or two high-impact changes from our list of ideas that solve your biggest pain points first. Remember, new cabinet doors or a statement hood can change your space without touching the layout.
Hire pros for anything involving wires, pipes, or structural work. DIY the rest if you’re comfortable with tools. Your dream kitchen is closer than you think.
Ready to start your modification? Drop a comment below telling us which idea you’re trying first.
Got questions about your specific kitchen situation? Ask away, and we’ll help you figure out the best approach.