Your furnace just stopped working on the coldest night of the year, and you’re facing an expensive emergency repair call that could cost hundreds of dollars.
But here’s something most homeowners don’t know: 80% of furnace problems are simple fixes you can handle yourself in under 30 minutes.
I’ve helped thousands of homeowners save money by teaching them basic troubleshooting skills that require no special tools or technical experience.
What if you could restore heat to your home tonight without waiting for a technician or paying emergency service fees?
You’ll learn the exact step-by-step process I use to diagnose and fix the most common furnace issues that leave families shivering.
Follow this proven troubleshooting guide, and you’ll have your furnace running again before bedtime.
What is a Furnace?
A furnace is a heating system that burns fuel or uses electricity to generate heat for buildings. It works by creating warm air and distributing it through ducts to different rooms in your home.
Most furnaces burn natural gas, oil, or propane, while others use electricity to produce heat.
The heated air gets pushed through your home’s ductwork by a blower fan, keeping indoor temperatures comfortable during cold weather.
Modern furnaces incorporate safety features such as automatic shut-off valves and carbon monoxide detectors.
They typically last 15-20 years with proper maintenance and can heat homes efficiently when sized correctly for the space.
Key Features of Furnaces
- Heat Distribution: Uses ductwork and blower fans.
- Efficiency Ratings: Measured by AFUE (Annual Fuel Utilization Efficiency).
- Components: Heat exchanger, blower motor, gas valve, and thermostat controls.
- Safety Features: Automatic shut-off systems and ventilation requirements.
- Maintenance: Requires regular filter changes and annual inspections.
- Installation: Typically placed in basements, utility rooms, or closets.
Types of Furnaces with their Fixes
Understanding your furnace type is essential for proper troubleshooting and maintenance – each fuel source requires specific safety procedures and repair approaches.
1. Natural Gas Furnaces
The most common and cost-effective residential heating systems burn natural gas through a burner assembly.
Connected to municipal gas lines, they offer reliable heat distribution through ductwork with high efficiency ratings and lower operating costs than other fuel types.
How to Fix:
- Check that the gas valve is open and the pilot light is lit with a blue flame. Relight if needed after waiting 15 minutes.
- Ensure the thermostat is set to heat mode and verify the gas supply by checking other gas appliances in the home.
2. Oil Furnaces
Burn heating oil stored in tanks to generate heat, a common practice in areas without access to natural gas.
Require regular fuel deliveries and tank maintenance, but provide consistent heating performance. Oil furnaces need annual cleaning due to soot buildup from the combustion process.
How to Fix
- Check the oil tank gauge to ensure adequate fuel supply and inspect the oil filter for clogs or blockages.
- Reset the furnace by pressing the reset button once, then check the fuel lines and nozzle for proper oil flow.
3. Propane Furnaces
Use propane gas from portable tanks or bulk storage systems, which are ideal for rural homes without access to natural gas service.
Burn cleaner than oil with fewer emissions, offering reliable heating with tank refills as needed. More expensive fuel costs but efficient combustion rates.
How to Fix
- Verify that the propane tank has an adequate fuel supply and check that the tank valve is fully open.
- Inspect gas lines for leaks using the soapy water test and ensure the pilot light burns a steady blue flame.
7-Step Furnace Troubleshooting Guide
This comprehensive 7-step furnace troubleshooting guide walks you through the most common heating system problems homeowners can safely diagnose and fix themselves.
Step 1: Check Furnace Filter
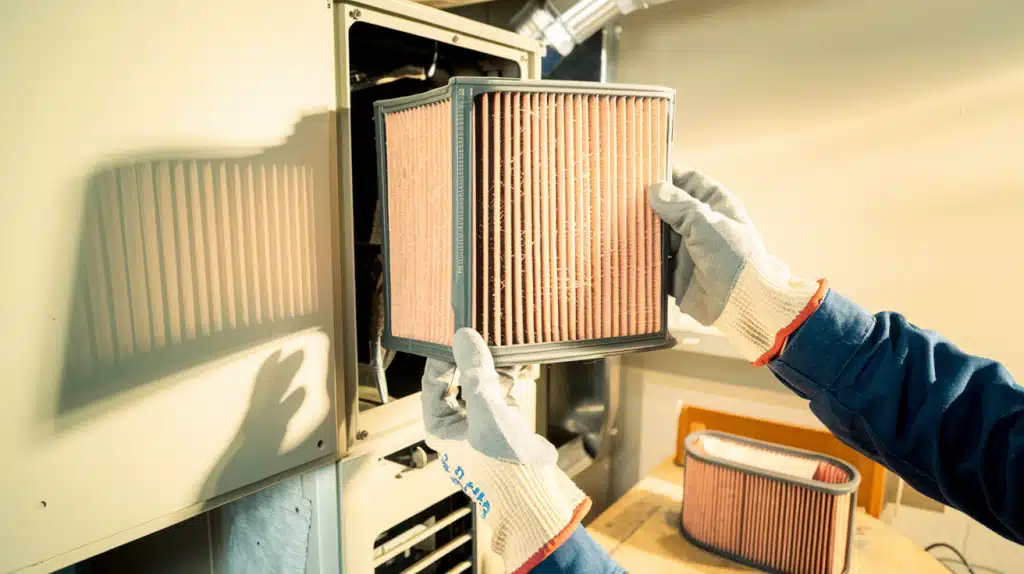
Start by turning off your thermostat and furnace for safety. Remove the filter and hold it up to light. If you can’t see through it clearly, replace it immediately.
A dirty filter blocks airflow and reduces furnace efficiency, making your system work harder than necessary.
Pro Tip: Write the installation date on your filter with a marker. This helps you track when it needs replacement and maintain a regular schedule.
Step 2: Check the Thermostat
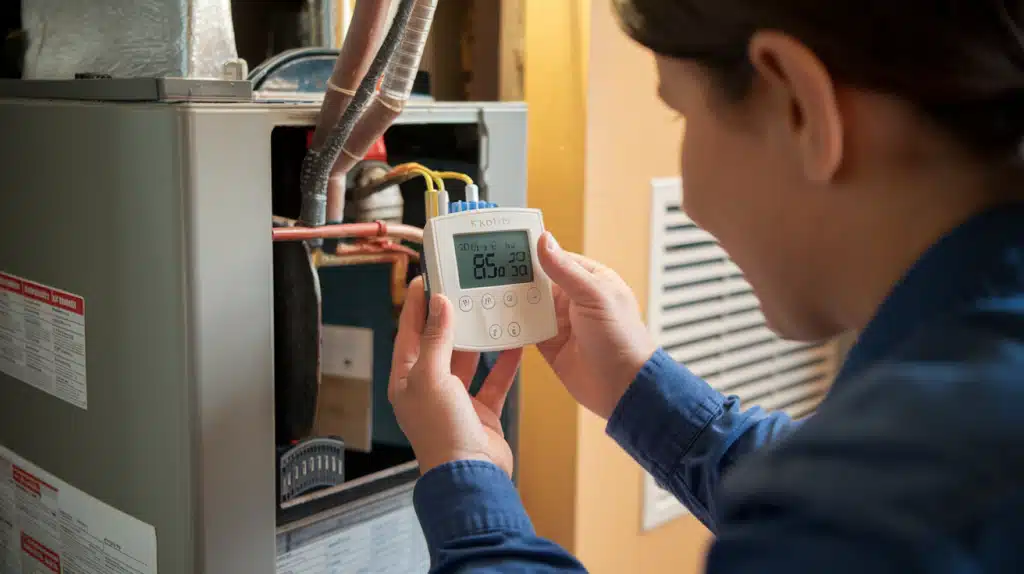
Set your thermostat to “heat” mode and adjust the temperature higher than your current room temperature.
Replace batteries if your thermostat uses them. For older electromechanical thermostats, gently clean away dust using a soft brush to ensure proper operation.
Pro Tip: Test your thermostat by raising the temperature 5 degrees above room temperature. You should hear the furnace kick on within a few minutes.
Step 3: Check Furnace Power
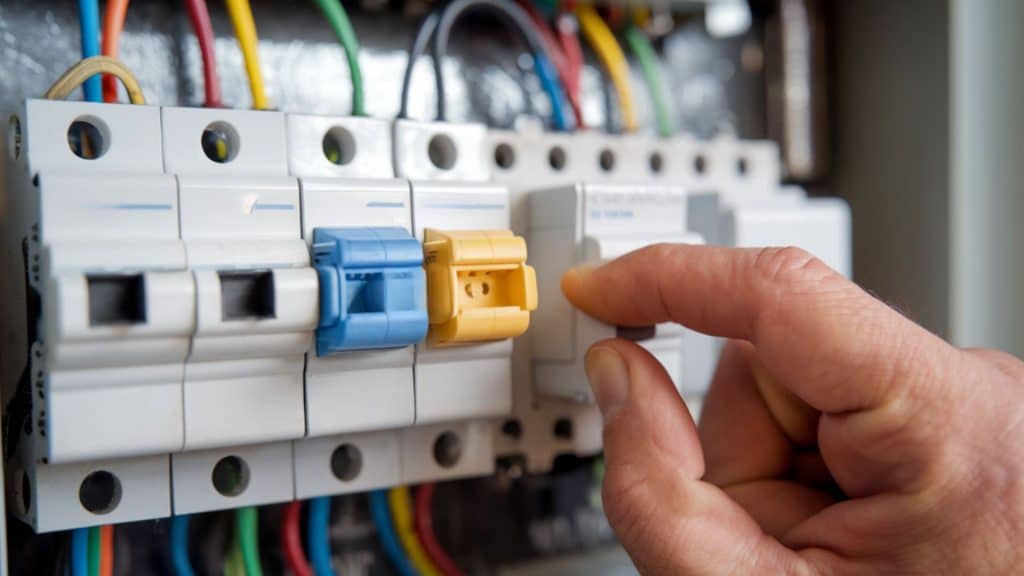
Locate the furnace switch and ensure it’s in the “on” position. Go to your electrical panel and check for tripped breakers or blown fuses. If you find a tripped breaker, reset it by switching it off completely, then back on.
Pro Tip: Label your electrical panel breakers clearly. This saves time during emergencies and helps you quickly identify the furnace circuit when needed.
Step 4: Check the Furnace Flame
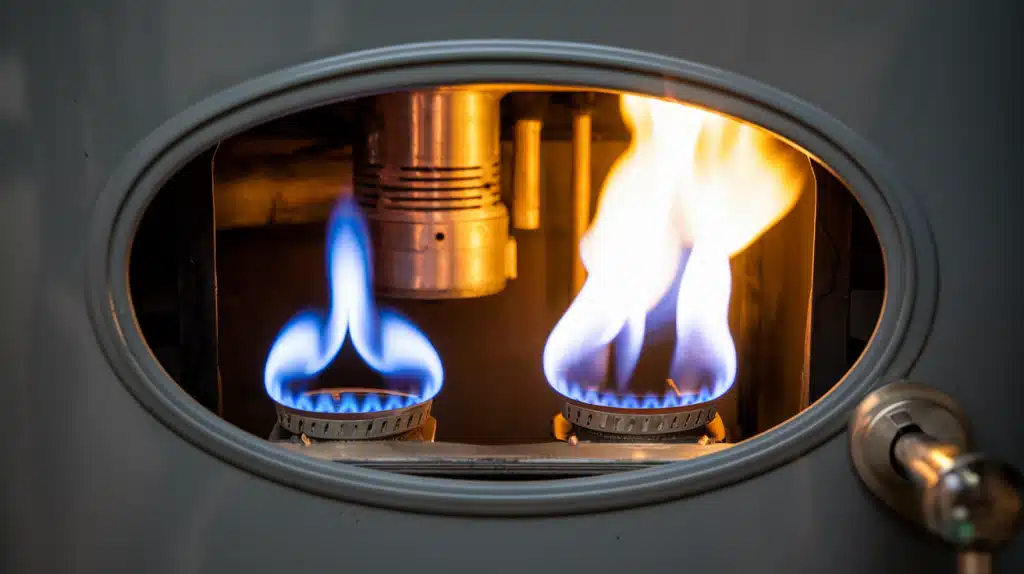
Look at your furnace flame through the viewing window. A healthy flame should be blue, which indicates safe and efficient combustion. If you see red, yellow, or orange flames, turn off your furnace immediately and contact a professional technician for inspection.
Pro Tip: Take a photo of your normal blue flame when the furnace is working properly. This gives you a reference point for comparison during future inspections.
Step 5: Relight the Pilot Light
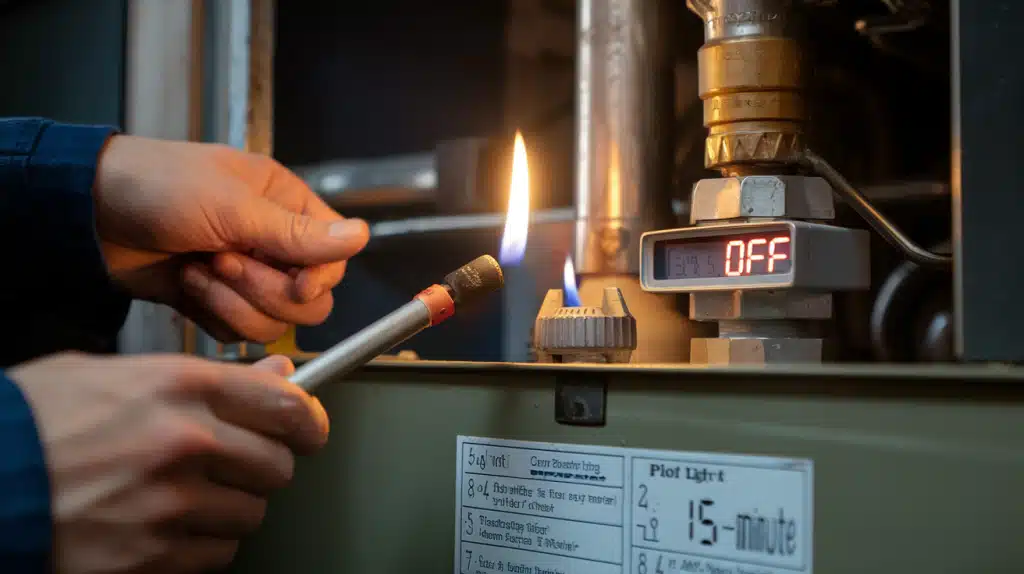
If your pilot light is out, turn off the gas valve and wait 10-15 minutes for gas to clear. Follow your furnace manual’s specific lighting instructions carefully. Always prioritize safety and call a professional if you’re uncomfortable performing this task yourself.
Pro Tip: Keep a long lighter or long matches near your furnace specifically for pilot light relighting. Never use short matches or regular lighters for safety reasons.
Step 6: Check for Blocked Vents
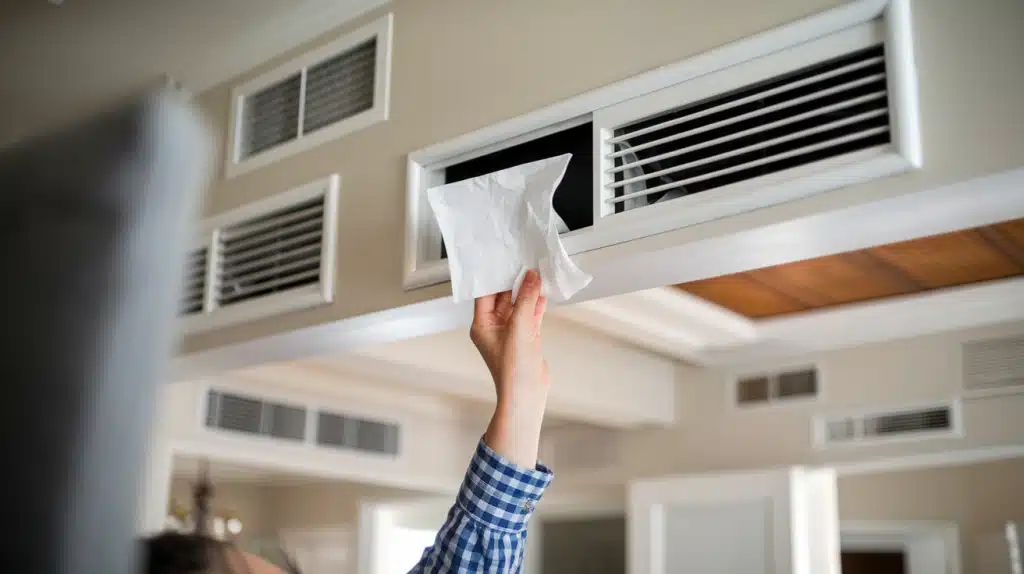
Walk through your home and ensure all vents and registers are open and unblocked. Remove furniture, rugs, or other objects that cover them. Avoid closing vents in unused rooms, as this creates pressure imbalances that can damage your heating system and reduce efficiency.
Pro Tip: Use a tissue or lightweight piece of paper near each vent to test airflow. The paper should move noticeably when held near an open, working vent.
Step 7: Inspect the Front Panel
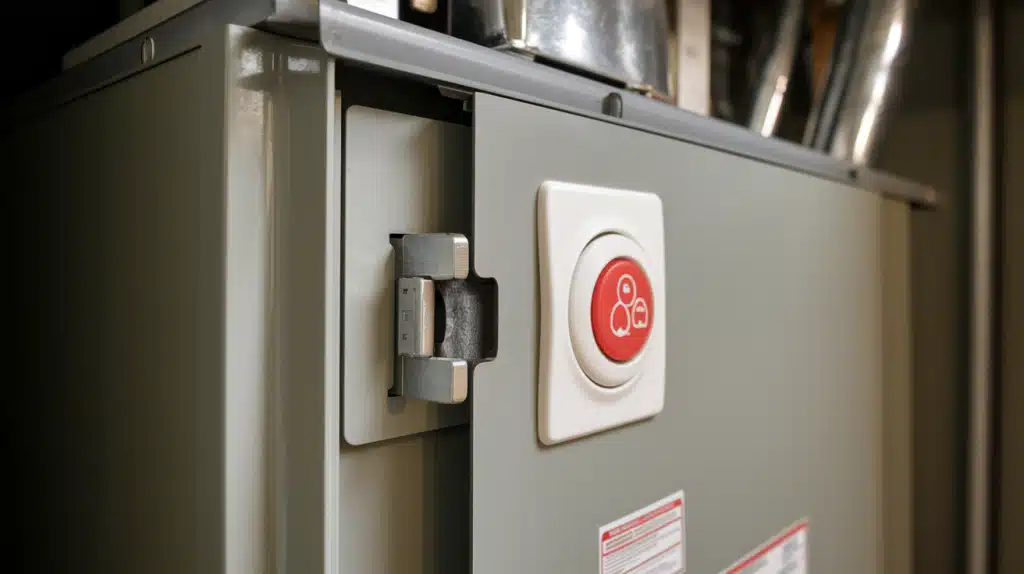
Verify that your furnace’s access panel is securely fastened and fully attached. Many modern furnaces have safety switches that prevent operation when the panel is loose or missing. Push the panel firmly into place until you hear it click or lock securely.
Pro Tip: Look for a small button or switch on the panel frame. This safety switch must be fully pressed in for the furnace to operate properly.
Mistakes to Avoid While Fixing a Furnace
Avoiding these common furnace repair mistakes can save you hundreds of dollars in unnecessary damage and keep your family safe.
- Skipping the power check first – Always verify electrical power and switches before checking other components. This simple step solves many furnace problems instantly.
- Forcing a stuck thermostat – Never force or bang on a non-responsive thermostat. Gentle cleaning and battery replacement usually fix most thermostat issues safely.
- Ignoring safety waiting periods – Always wait 10-15 minutes after turning off the gas before relighting pilot lights. Rushing through this step can create a dangerous gas buildup.
- Closing vents in unused rooms – This creates pressure imbalances that strain your system. Keep all vents open for proper airflow and system efficiency.
- Working on live electrical components – Turn off power at the breaker before touching any electrical parts. Live wires can cause serious injury or death.
- Attempting complex repairs without experience – Know your limits. Call professionals for gas line issues, electrical problems, or internal component failures to avoid costly damage.
When to Call a Professional: Contact a heating technician immediately if you smell gas, see yellow or orange flames, hear unusual noises, or notice frequent system cycling. Also call for electrical issues, cracked heat exchangers, or if these troubleshooting steps don't restore heat within 24 hours.
Conclusion
Most furnace issues stem from simple problems that homeowners can fix themselves in minutes. By following these seven troubleshooting steps, you’ve learned how to check filters, thermostats, power sources, and safety components that keep your heating system running smoothly.
Remember, regular maintenance prevents most furnace breakdowns. Check your filter monthly, test your thermostat seasonally, and keep vents clear year-round. These small actions save you from emergency repairs and costly service calls during winter’s coldest days.
What’s your next step? Start by checking your furnace filter right now; it’s the most common culprit behind heating problems. Have you tried these troubleshooting steps?