Ready to turn your craft room chaos into springtime magic? Those forgotten treasures hiding in your supply bins are about to become the stars of your seasonal decor!
Spring beckons with possibilities, and your creative hands hold the power to change overlooked materials into conversation pieces that radiate warmth and personality.
Imagine guests asking, “Where did you find that?” only to be amazed when you reveal that it emerged from your creativity. These five projects require no specialized skills—just your imagination and those materials gathering dust.
The carrot wreath, bird condo, and other designs await your personal touch. Why purchase generic decorations when custom creations cost less and bring more joy? Your craft supplies have waited long enough.
Their moment to shine has arrived!
The Psychology of Crafting: Why DIY Matters
Did you know that engaging in creative crafting activities triggers the release of dopamine in your brain? This “happiness hormone” boosts your mood and reduces stress and anxiety.
A study from the British Journal of Occupational Therapy found that 81% of participants reported feeling happier after knitting.
The act of creating something connects you to traditions while allowing for personal expression.
As you work on these spring projects, you’re practicing mindfulness, improving hand-eye coordination, and boosting cognitive function. The satisfaction of converting unused supplies into something beautiful provides a sense of accomplishment that purchased decorations cannot match.
What You’ll Need: Tools and Materials for Your DIY
Before diving into these projects, gather these common supplies:
| Category | Items |
|---|---|
| Adhesives | Hot glue gun and glue sticks |
| Cutting Tools | Scissors (regular and “fussy cutting”), craft knife |
| Painting Supplies | White/brown/black paint, paintbrushes, water for diluting |
| Natural Elements | Spanish moss, raffia, florals |
| Fasteners | Twine, jute string, ribbon (burlap, satin, patterned) |
| Base Structures | Wreath forms, wooden boxes, canvas boards |
| Decorative Items | Buttons, wooden eggs, birdhouses, wagon/crate |
| Paper Products | Scrapbook paper, stamps, ink pads |
| Fabric | White burlap, drop cloth, ticking stripe ribbon |
| Tools | Popsicle sticks, crocodile punch, drill (optional) |
5 Spring DIY Ideas and How to Create Them
1. Whimsical Carrot Wreath
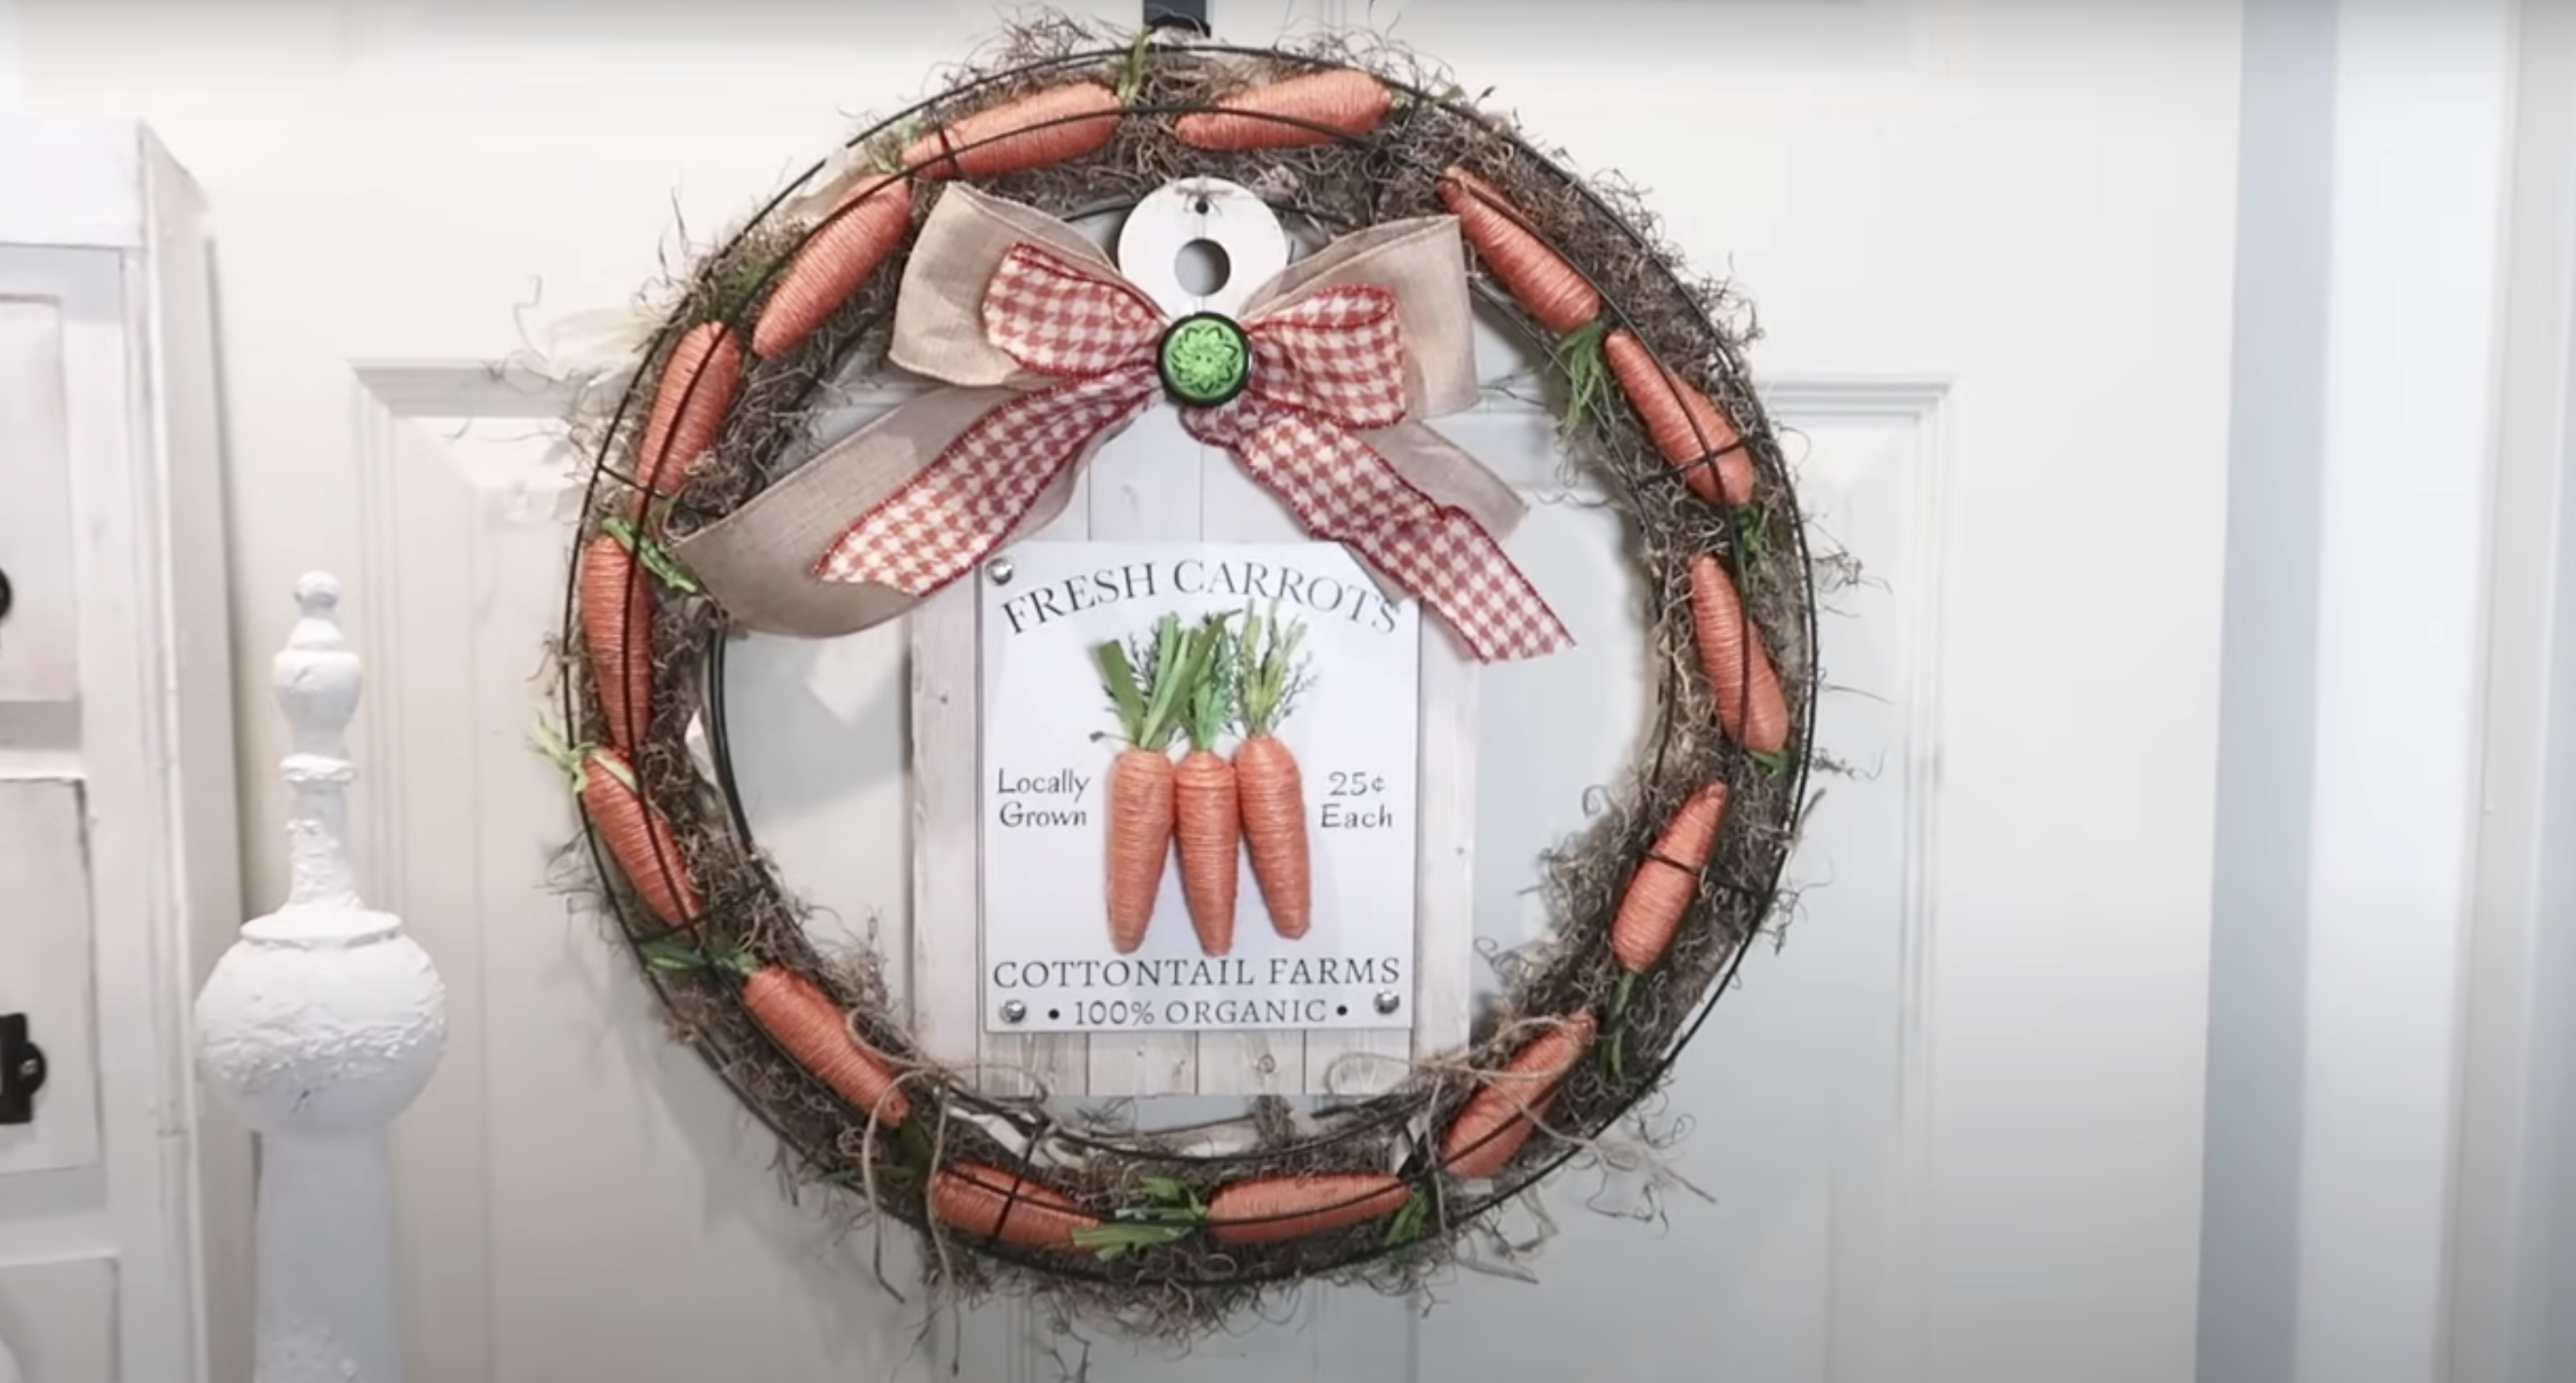
Create an eye-catching carrot wreath using two 18-inch wreath forms tied together with twine. Line the inner curve with burlap ribbon, then layer raffia and Spanish moss for texture. Arrange Dollar Tree carrots around the wreath, tucking them under the wire form.
Add a carrot sign with twine, plus three loose carrots for dimension. Complete with a burlap bow, houndstooth ribbon, and decorative buttons. This playful piece celebrates spring with varied textures and bright orange carrots that pop against the natural moss.
2. Spring Market Wagon Planter
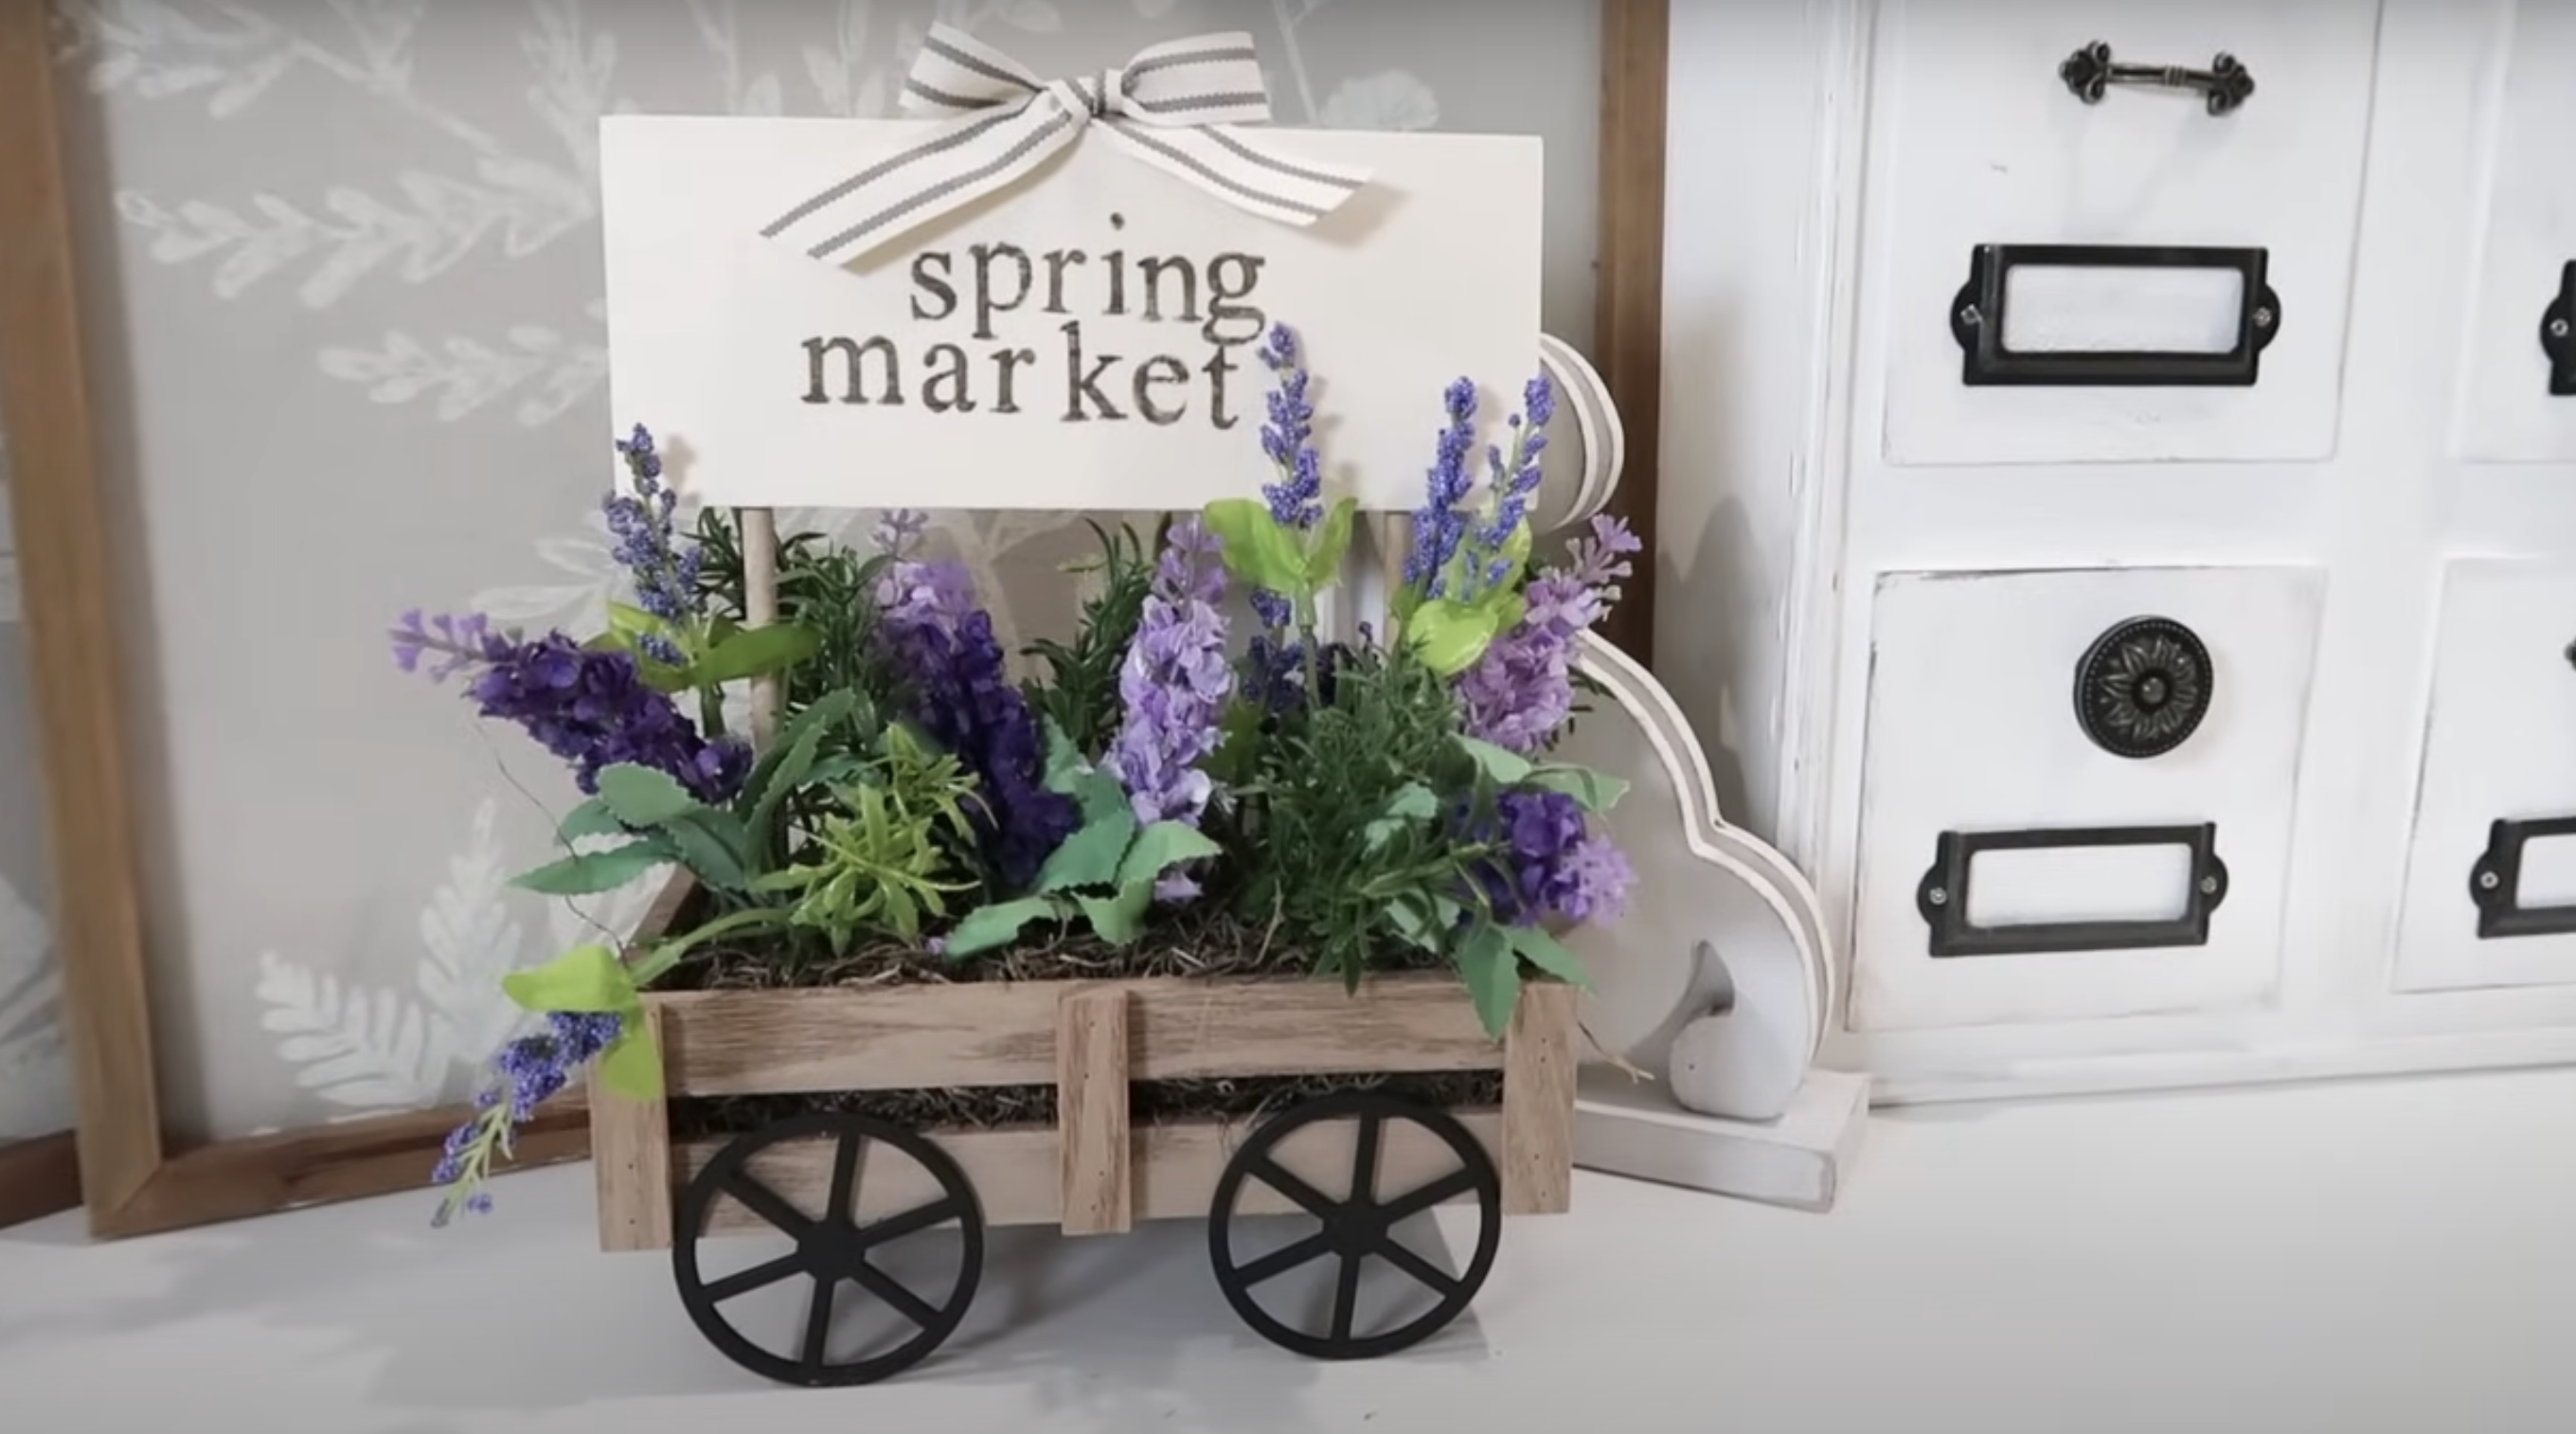
Transform a small wagon into a charming spring planter. Cut foam to fit inside, leaving space for Spanish moss along the sides. Stamp text on a wooden plank attached to craft sticks to create a “Spring Market” sign. Insert the foam, conceal it with moss, and secure your sign in the center.
Arrange florals around the sign and finish with a ticking stripe ribbon. This versatile decoration brings farmhouse charm to your home and can be updated seasonally by changing the flowers and message.
3. Scrapbook Paper Easter Egg Display
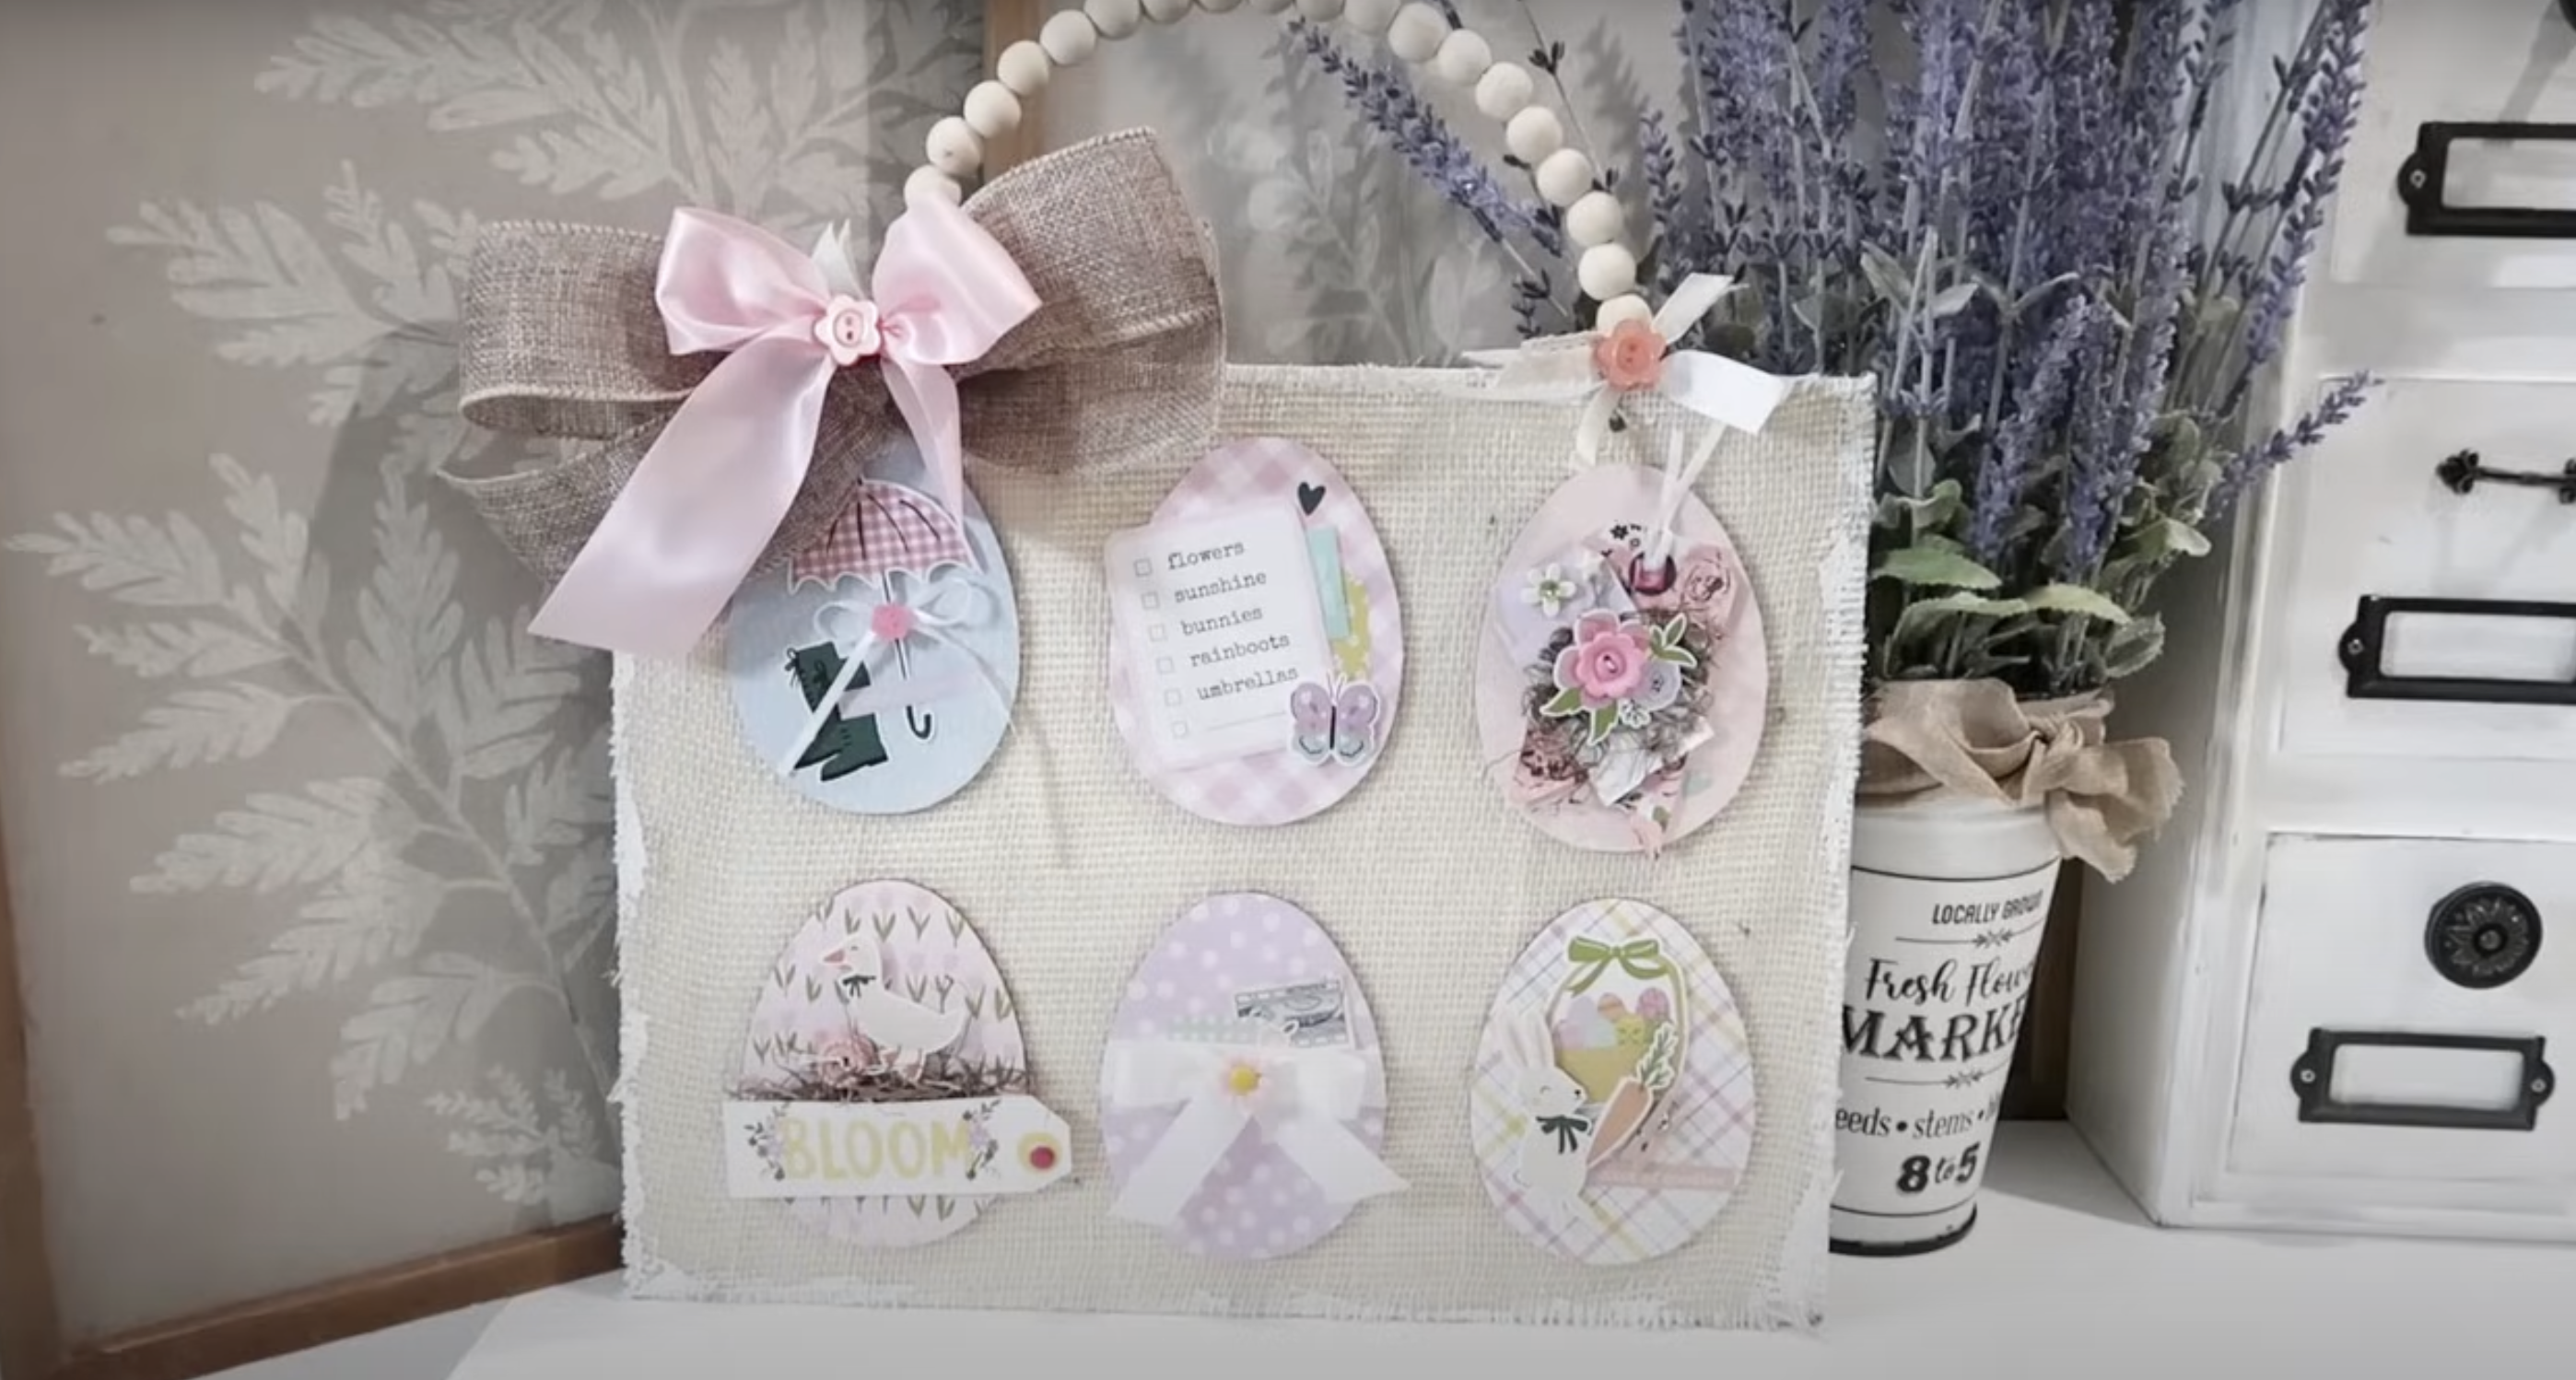
Fashion an elegant Easter display using wooden eggs covered with patterned scrapbook paper. Start with a canvas board wrapped in white burlap. Decorate each paper-covered egg with unique embellishments to give it character. Arrange the eggs on the canvas with Spanish moss for a nest effect.
Add a beaded handle through punched holes for hanging, then distress the edges with paint. Complete with decorative bows for whimsy. This project beautifully repurposes your scrapbooking supplies into a seasonal accent.
4. Spring Garden Box with Banner
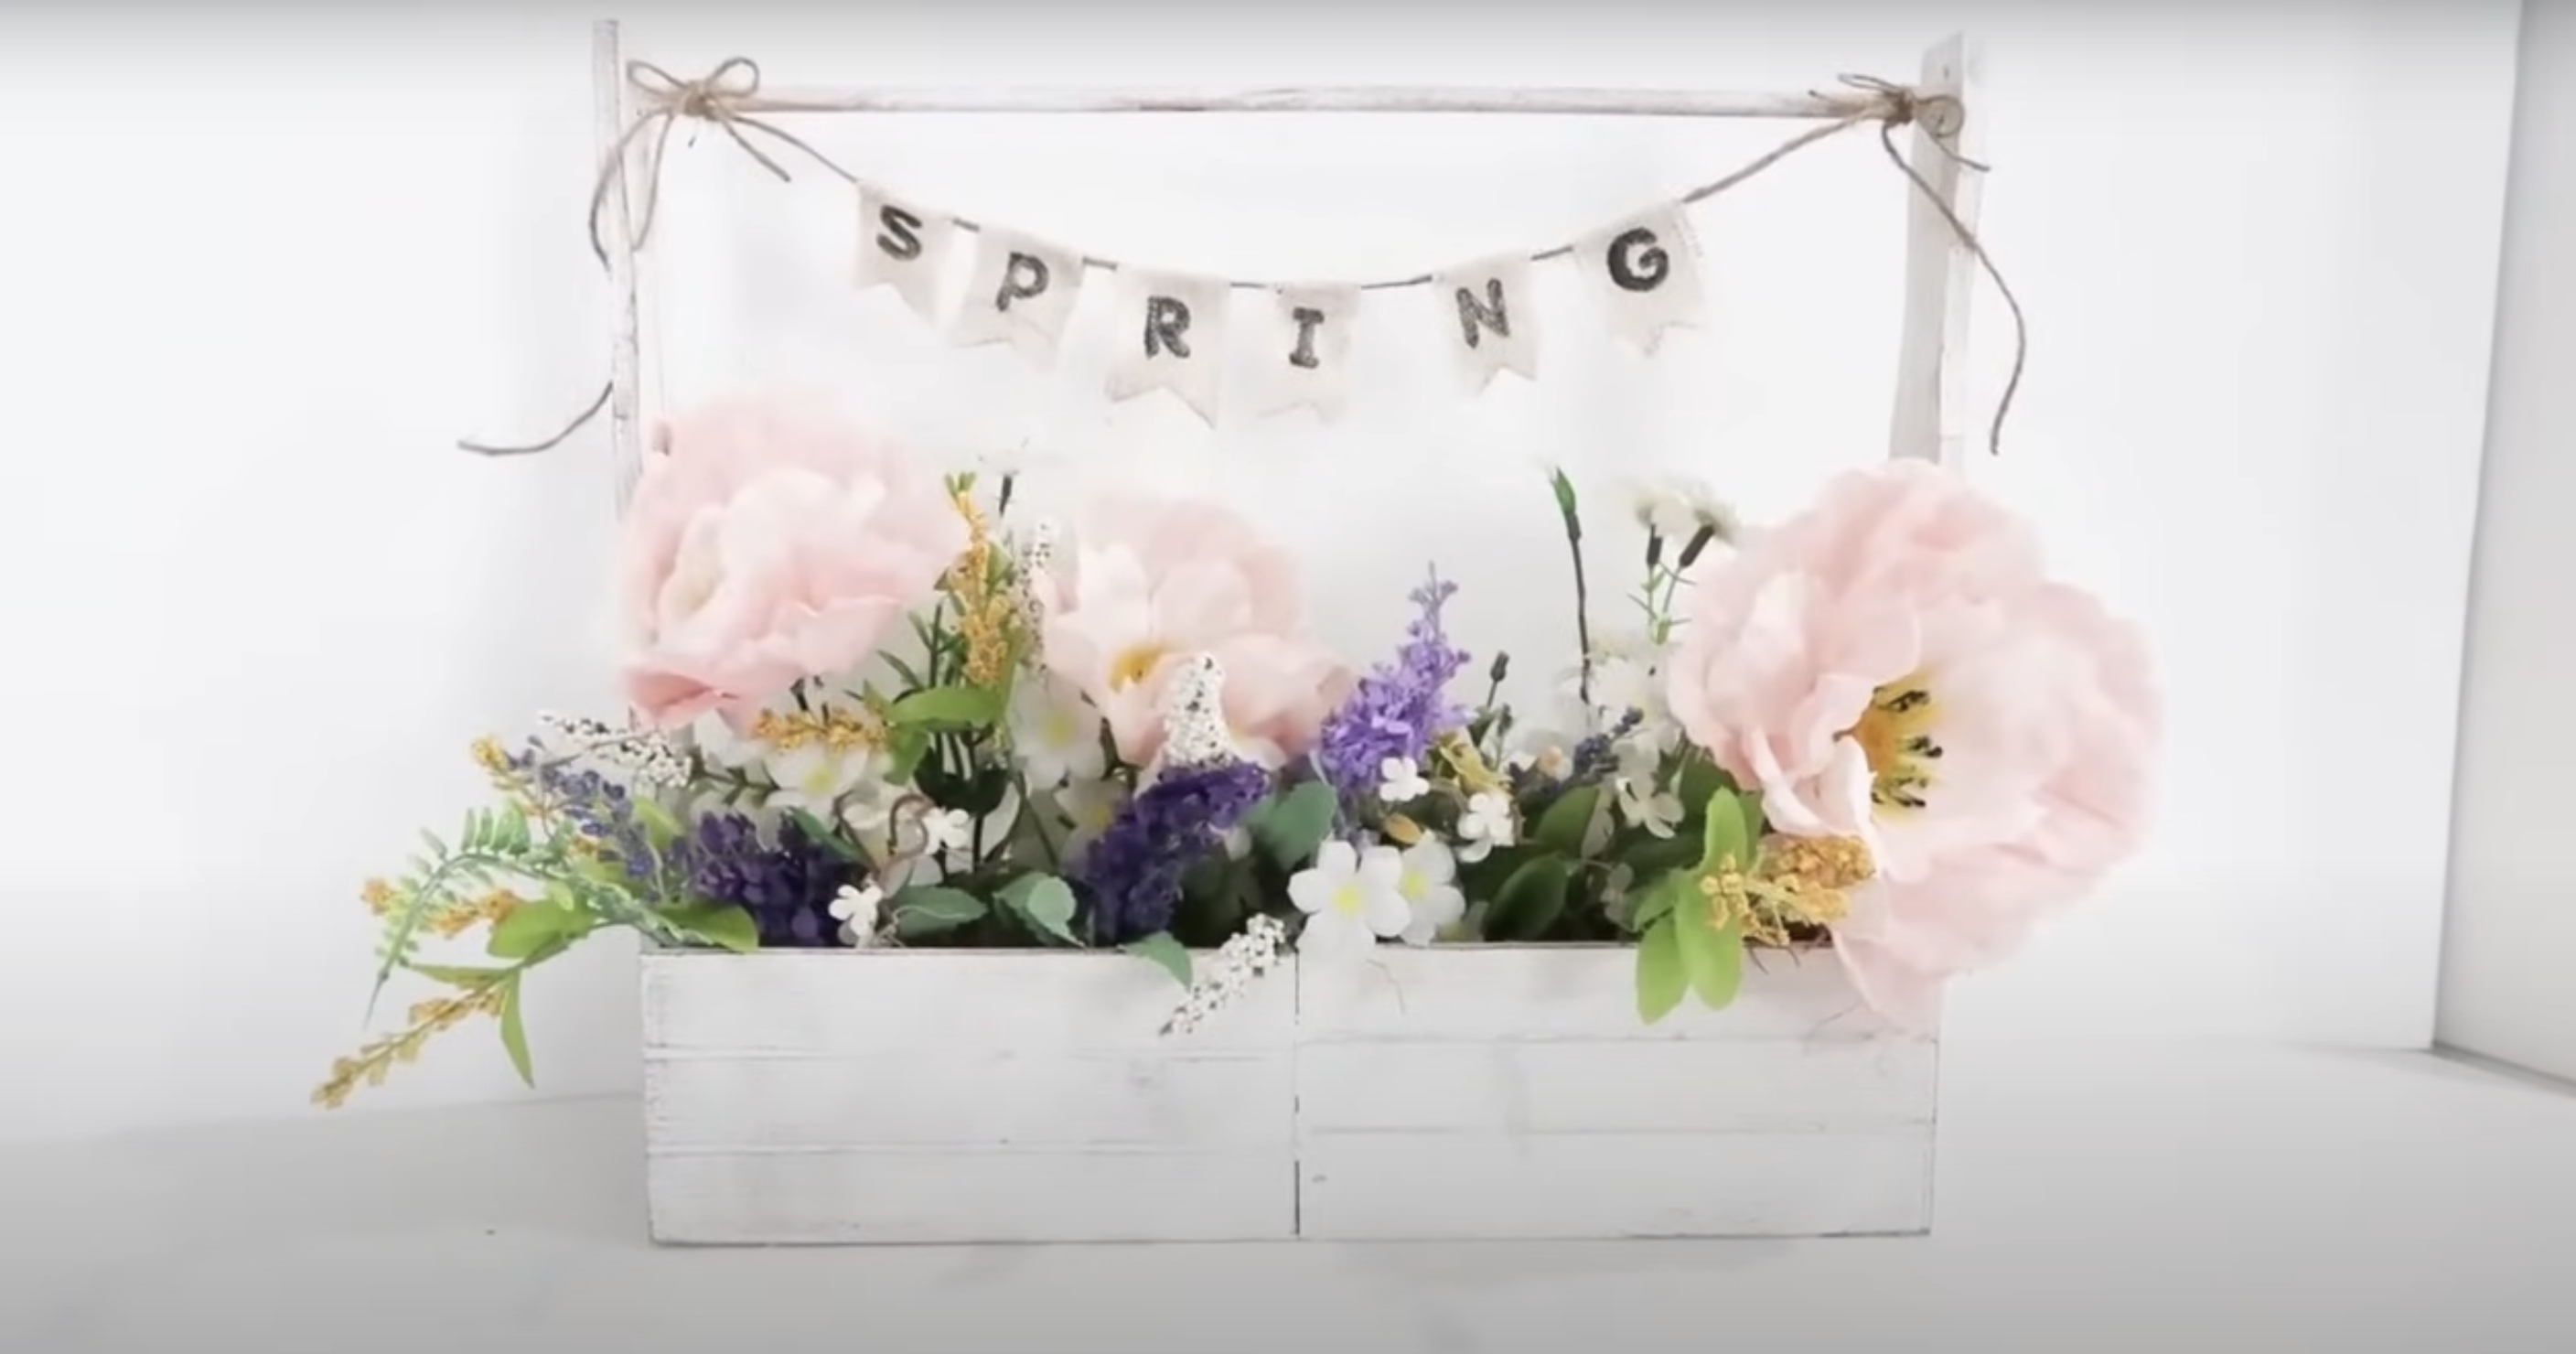
Construct a garden box by joining two wooden boxes with painter’s sticks on the sides. Add a wooden dowel across the top, paint everything white, and distress with brown and black paint.
Create a fabric banner by stamping “SPRING” on drop cloth strips with dovetail ends. String on the o twine and attach to the dowel, adding small bows at each end. Fill the boxes with foam, flowers, and moss. This adaptable piece works year-round—change the banner text and florals to match the season.
5. Bird Condo Decoration
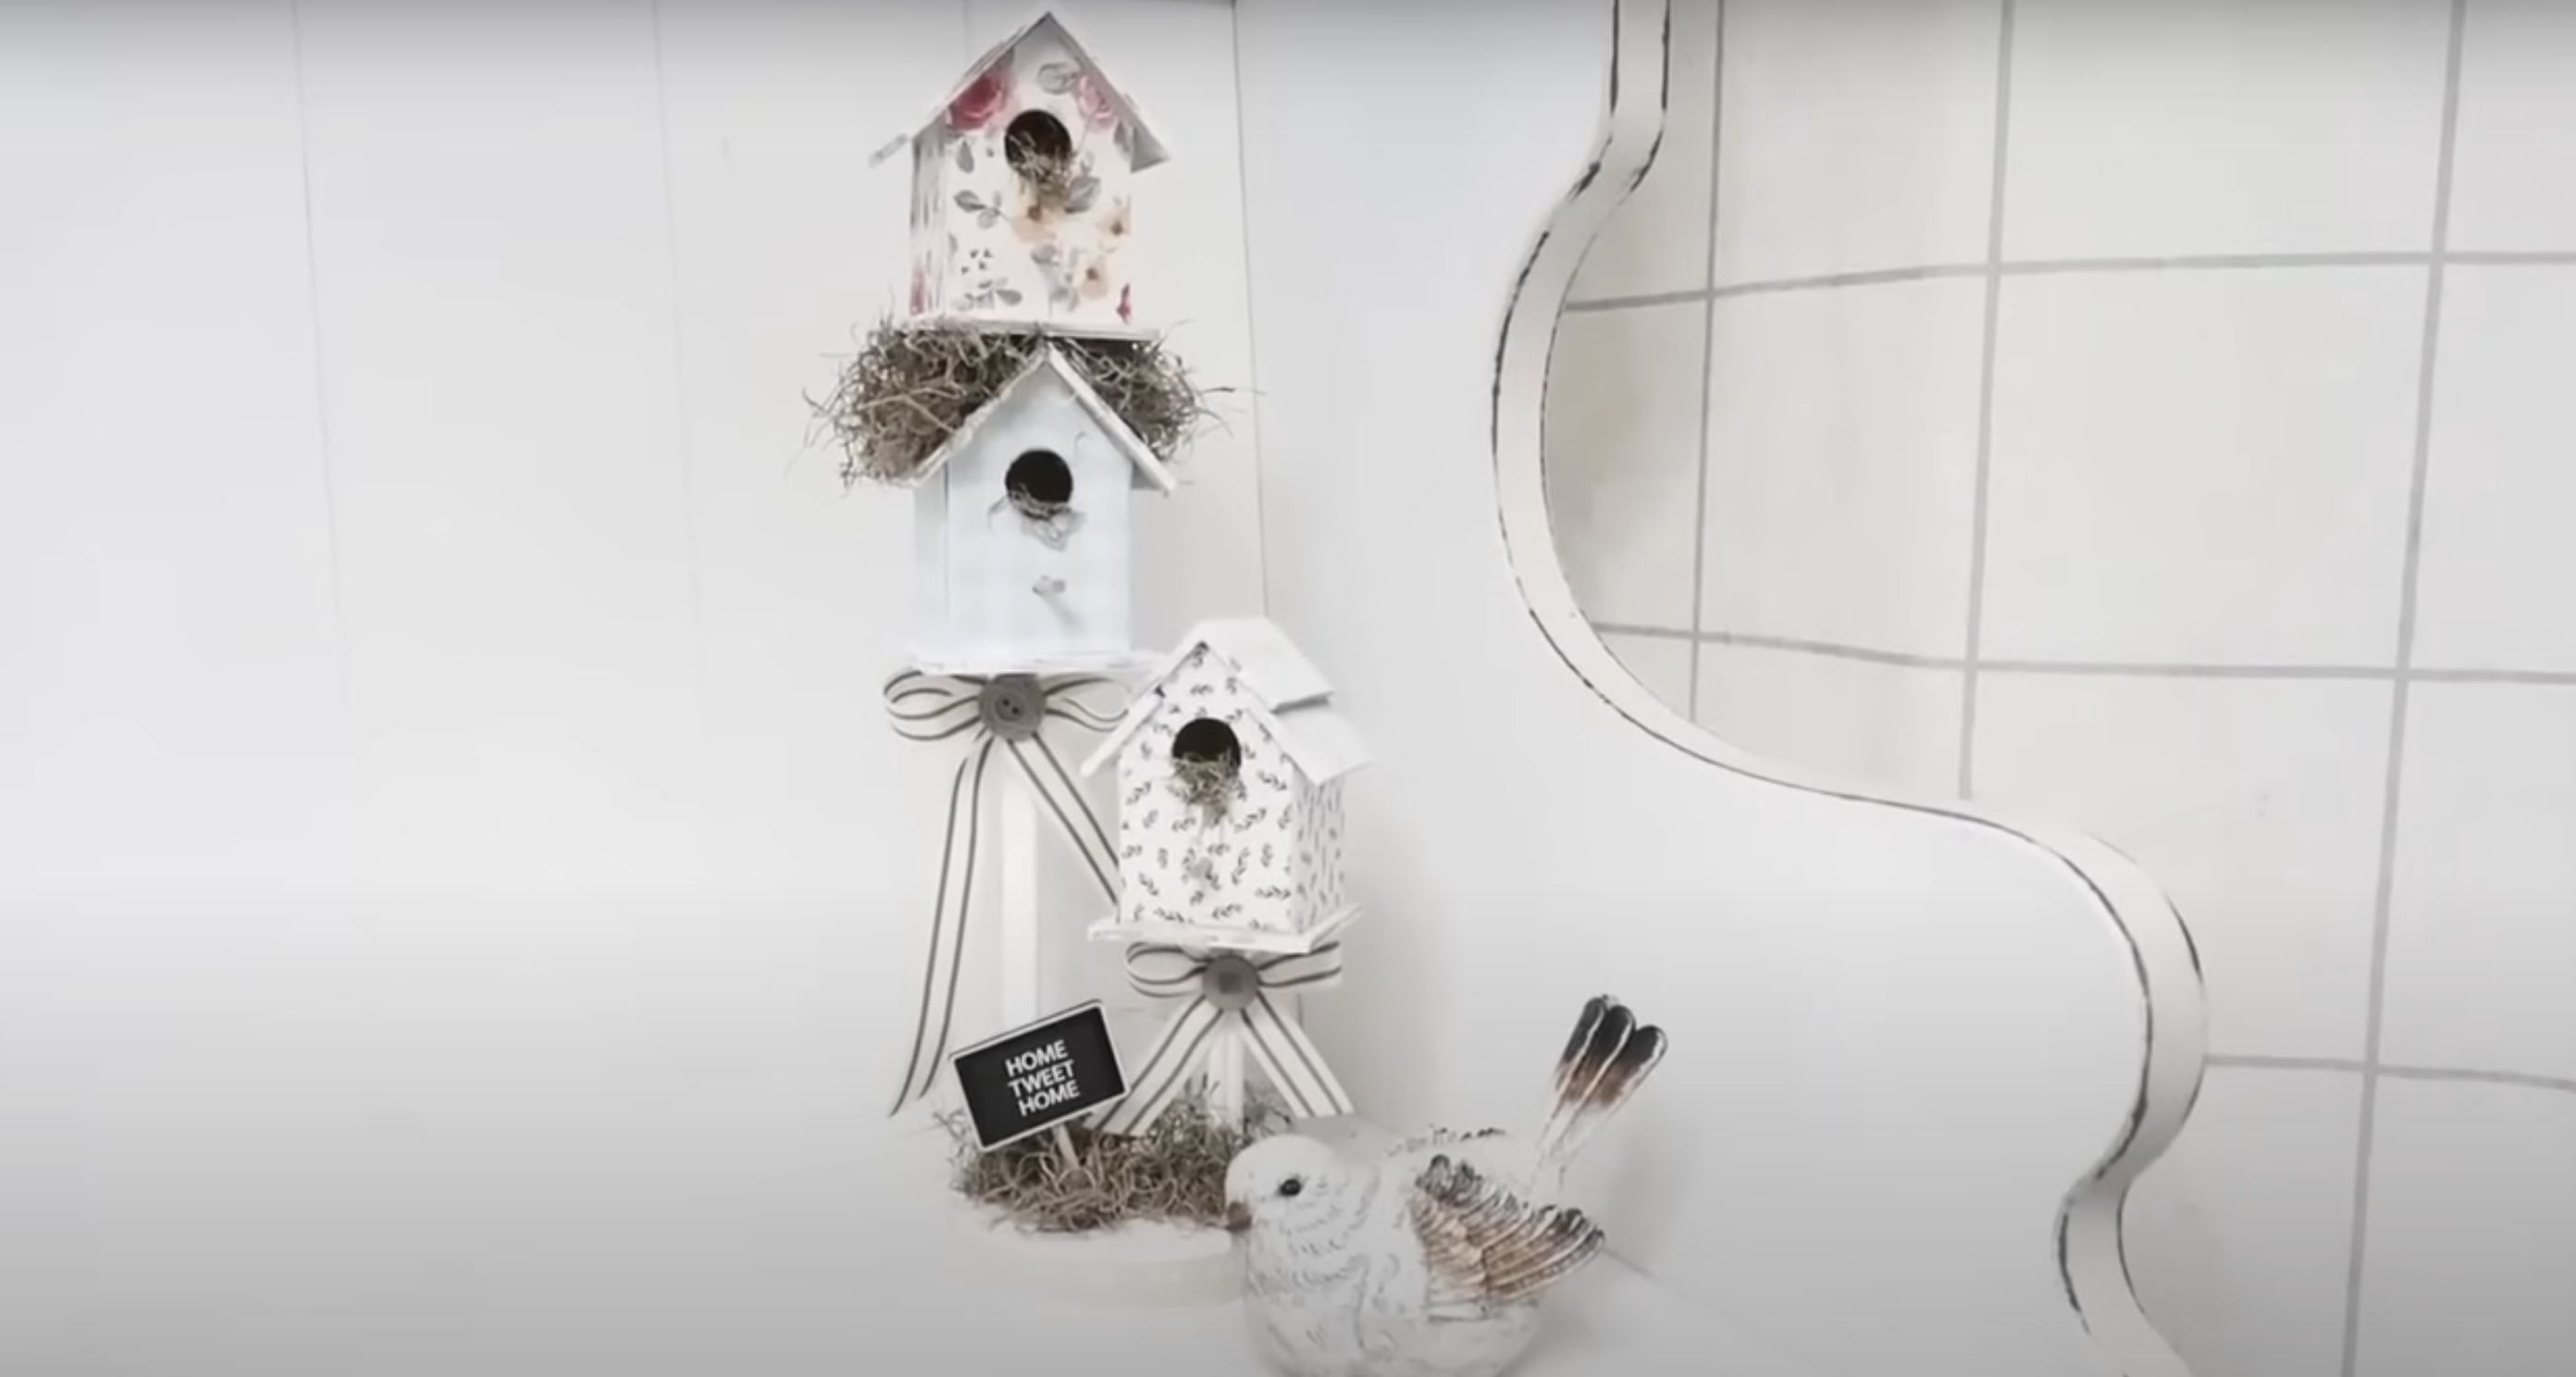
Build a whimsical bird neighborhood using three small wooden birdhouses covered with coordinating scrapbook paper. Stack them by creating ledges with wooden squares between each house.
Conceal connection points with Spanish moss and mount on a wooden base using craft stakes of different heights. Add a “Home Tweet Home” sign, paint the base white, and distress the roofs. Finish with moss details and tiny decorative bows. This unique three-dimensional display combines paper crafting with charming home decor.
Video Tutorial
Check out this YouTube video for a detailed step-by-step Tutorial by Heidi Sonboul DIY
Helpful Tips for Proper Care and Maintenance
Protecting Paper Elements
To prevent damage, apply a protective sealer to paper-covered projects. Use Mod Podge or clear acrylic spray in a well-ventilated area, applying 2-3 thin coats rather than one thick layer.
Allow each coat to dry completely before adding another. Choose your finish—glossy for vibrant colors, satin for subtle sheen, or matte for a natural look. This creates a moisture-resistant barrier that prevents fading and extends the life of your paper crafts, especially for items displayed in areas with changing humidity.
Refreshing Wreath Decorations
With seasonal maintenance, keep your carrot wreath looking fresh. Gently fluff compressed Spanish moss with your fingers or a wooden skewer. Remove dust using compressed air rather than water, which damages natural materials.
Secure loose elements with fresh hot glue, removing old adhesive first. Store off-season wreaths in plastic bags, hanging them to maintain their shape. Before displaying each spring, check ribbons for fading and replace them if necessary. Position outdoor wreaths under a covered area to protect them from rainfall and harsh sunlight.
Maintaining Wooden Elements
Apply a clear sealer to protect wooden components from moisture damage. Choose water-based polyurethane that won’t yellow with age. Regularly inspect for loose joints, reinforcing with fresh glue before problems worsen.
Clean wooden surfaces with a barely damp microfiber cloth, never saturating the wood. Touch up worn painted surfaces with small artist brushes rather than repainting entirely—position wooden crafts away from heating vents and extreme temperature fluctuations to prevent cracking or warping.
Avoid These Common Errors
| Issue to Avoid | Reason | Better Alternative |
|---|---|---|
| Using regular craft glue on wood projects | Dries out over time on porous surfaces | Use hot glue or wood glue for better adhesion |
| Overcrowding decorative elements | Creates a cluttered appearance | Follow the “less is more” principle for elegant designs |
| Skipping distressing on farmhouse-style projects | Results in a too-new, artificial look | Lightly distress edges with dry brush technique |
| Using water-based products to clean Spanish moss | Causes matting and potential mold growth | Use compressed air or gentle fluffing instead |
| Placing paper-based crafts in humid areas | Paper absorbs moisture and warps | Apply sealant or display in climate-controlled spaces |
| Using regular scissors for detailed paper cutting | Results in jagged edges and imprecise cuts | Use small “fussy cutting” scissors for intricate work |
| Storing wreaths flat or compressed | Causes permanent misshaping | Hang wreaths or store in large containers that maintain shape |
| Applying thick layers of paint | Creates drips and obscures details | Use multiple thin layers, allowing drying time between coats |
The Secret Language of Craft Colors
Your color choices reveal your personality traits. Orange lovers embrace adventure; white enthusiasts value simplicity; green fans connect with renewal.
Remarkably, your brain processes colors before shapes or text, creating emotional responses before conscious recognition.
When crafting, select colors deliberately to evoke specific feelings in your home. This awareness transforms simple decorating into mood engineering—your craft supplies become emotional tools beyond their physical purpose.
Conclusion
Your hands have worked magic! Those once-forgotten craft supplies now grace your home as unique springtime treasures that showcase your creative spirit. Beyond the beauty they add to your space, these handcrafted pieces tell stories that store-bought decorations never could.
Notice how differently you feel about these creations compared to purchased items—that connection stems from the creative energy you’ve infused into each piece. As seasons change, these versatile projects evolve too—swap elements to refresh them or completely change their purpose.
Your craft supply stash has a new purpose, your home radiates personality, and your creative muscles have strengthened. Most importantly, you’ve found that extraordinary decor doesn’t require extraordinary expense—just extraordinary imagination. What seasonal modification will your hands create next?