Struggling to get your lawnmower, tools, or heavy equipment into your shed?
You’re not alone. Most homeowners think building a shed ramp requires professional help or expensive materials.
But here’s what they don’t know – you can build a sturdy, long-lasting ramp in just one weekend with basic tools and lumber from your local hardware store.
A well-built ramp makes your shed 10 times more useful.
No more lifting heavy items or struggling with awkward angles. Plus, you’ll save hundreds of dollars compared to hiring a contractor. This step-by-step guide shows you exactly how to measure, cut, and assemble a ramp that will last for years.
Ready to make your shed more accessible? Let’s get started with the materials and tools you’ll need.
Who Needs a Shed Ramp?
If you own heavy lawn equipment or store bulky items in your shed, a ramp will save your back and make storage much easier. Homeowners with riding mowers, snowblowers, or wheelbarrows no longer need to lift or drag these items over the shed threshold.
- DIY enthusiasts and hobbyists who store power tools, machinery, or heavy storage bins
- People with mobility challenges, including wheelchair users or anyone with walkers
- Outdoor lovers who store bikes, kayaks, camping gear, or sports equipment
A properly built ramp provides safe and independent shed access for everyone. Beyond convenience, ramps reduce injury risk from lifting heavy objects and prevent costly shed floor damage caused by dragging metal equipment across wooden thresholds.
Whether you’re storing a 500-pound riding mower or simply want easier access to your garden supplies, a well-built ramp turns your shed into a truly functional storage space that works for everyone in your family.
How to Build a Ramp for a Shed: Step-By-Step Guide
Build a solid, functional shed ramp in just one weekend with these simple steps.
Tools Required:
| Tool | Purpose |
|---|---|
| Circular Saw | Cutting lumber to size |
| Drill/Driver | Installing screws and pre-drilling |
| 4-foot Level | Checking ramp alignment |
| Torpedo Level | Checking ground level |
| Speed Square | Marking angles and measurements |
| Shovel | Digging and ground preparation |
| Tamper/Compactor | Compacting soil and gravel |
| Oscillating Tool | Trimming excess wood |
| Measuring Tape | Taking accurate measurements |
| Marking Paint | Outlining the work area |
Materials Required:
| Material | Quantity | Purpose |
|---|---|---|
| 2×4 Pressure Treated Lumber | 6 pieces (8 ft) | Ramp joists and ledger board |
| 2×4 Decking Boards | 8 pieces (6 ft) | Ramp surface |
| White Rock/Gravel | 2-3 bags | Base foundation |
| 3″ Structural Screws | 1 box | Attaching joists to ledger |
| 2.5″ Deck Screws | 1 box | Securing decking boards |
| Thompson’s Water Seal | 1 bottle | Protecting cut wood ends |
Step 1: Prepare the Ground Base

Start by marking your work area using spray paint – 64 inches wide (door opening) and 48 inches out from the shed. Dig down any high spots to create a level surface where your ramp will sit.
- Use marking paint to outline the 64″ x 48″ ramp area.
- Dig and level the ground where the ramp joists will rest.
- Compact the soil firmly using a tamper or your foot.
Note to Remember: Keep all wood off direct ground contact to prevent rot and extend ramp life.
Step 2: Install Gravel Base and Cut Ledger Board

Add a layer of white rock or gravel to your prepared area and compact it down. This creates proper drainage and keeps moisture away from your lumber. Cut your ledger board to 64 inches to match your shed door opening.
- Spread and compact gravel across the entire ramp base area.
- Cut one 2×4 to 64 inches for the ledger board.
- Position the ledger board 1.5 inches below the shed floor level.
Note to Remember: The 1.5-inch offset prevents shed doors from hitting the finished ramp surface.
Step 3: Create Template and Cut Ramp Joists

Use a simple template method instead of calculating complex angles. Place your 48-inch board against the ledger board with a scrap 2×4 to mark both the top and bottom cut angles.
- Position the 48-inch board against the ledger board to mark the top angle.
- Use a scrap 2×4 on gravel to mark the bottom angle cut.
- Cut the first joist and use it as a template for four more identical pieces.
Note to Remember: This template method eliminates the need for angle calculations and ensures all cuts match perfectly.
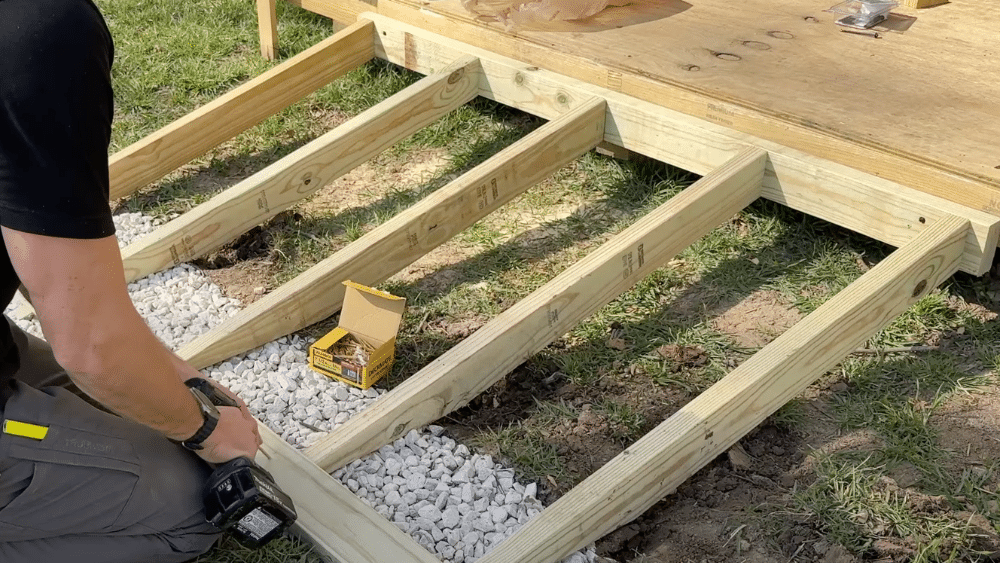
Step 4: Mark Spacing and Pre-Drill Ledger Board

Mark your ledger board at 15-inch centers, starting 2 inches from each end. This gives you five evenly spaced joists across the 64-inch width. Pre-drill holes to make final assembly easier.
- Mark ledger board at 2″, 17″, 32″, 47″, and 62″ from one end.
- Pre-drill three screw holes at each marked location.
- Test fit all joists to ensure proper spacing before final assembly.
Note to Remember: Pre-drilling prevents wood splitting and makes assembly much faster when you’re ready to attach everything.
Step 5: Attach Ledger Board to Shed
Temporarily secure the ledger board to your shed floor joists, then check level and alignment. Make any final ground adjustments before permanently attaching the structure.
- Secure ledger board 1.5 inches below shed floor with structural screws.
- Use a 4-foot level to check that the ramp frame sits properly.
- Adjust the gravel base as needed for even contact across all joists.
Note to Remember: Use structural screws that go through the ledger board into the shed’s floor joists for maximum strength.
Step 6: Install Decking and Finishing Touches

Cut your decking boards to 64 inches and space them evenly across the ramp frame. Start with one board offset 1 inch from the bottom, then work your way up to the top.
- Cut all decking boards to 64 inches before starting installation.
- Space boards evenly and secure with 2.5-inch deck screws.
- Apply water seal to all cut ends for weather protection.
Note to Remember: Angle your screws slightly when driving into the joists since 2x4s don’t provide much thickness for straight screws.
Video Tutorial
For a visual tutorial, refer to this video by Everyday Shed
Maintenance Tips for Wooden Shed Ramp
- Inspect monthly for loose screws and cracks – Check all fasteners and look for splits in the wood, especially after heavy use or storms. Tighten any loose screws immediately to prevent further damage.
- Reapply water sealant every 12-18 months – Clean the ramp surface and apply fresh Thompson’s water seal or similar product to protect against moisture, UV damage, and rot.
- Clear debris and snow regularly – Remove leaves, dirt, and snow buildup that can make the surface slippery and trap moisture against the wood. Use a stiff brush for stubborn debris.
- Check gravel base twice yearly – Add more gravel if settling occurs, and ensure proper drainage around the ramp. Poor drainage leads to wood rot and structural problems.
- Sand rough spots and replace damaged boards – Smooth any splintering wood with sandpaper and replace any boards that show signs of rot or significant damage before they compromise the entire structure.
5 Key Precautions When Building a Shed Ramp
Building a shed ramp involves power tools, heavy materials, and structural work. Following proper safety practices protects you and ensures a successful project.
1. Personal Protective Equipment
- Safety glasses – Required for all cutting and drilling operations.
- Work gloves – Protect hands from splinters and pressure-treated chemicals.
- Hearing protection – Use when operating circular saws and power tools.
2. Tool Safety and Operation
- Check blade depth – Set circular saw blade only 1/4 inch deeper than material thickness.
- Secure workpieces – Clamp or properly support all lumber before cutting.
- Power tool inspection – Check cords and guards before each use.
3. Chemical and Material Handling
- Hand washing – Always wash hands after handling pressure-treated lumber.
- Dust protection – Wear a dust mask when cutting treated wood.
- Ventilation – Apply sealers outdoors or in well-ventilated areas.
4. Structural and Weight Considerations
- Load testing – Start with light equipment before using heavy riding mowers.
- Regular inspection – Check all screws and connections monthly.
- Weight limits – Know your equipment weight and material load capacity.
5. Ground and Weather Safety
- Dry conditions – Avoid working with power tools in wet weather.
- Clean workspace – Remove wood scraps and tools from walking areas.
- Material storage – Stack lumber flat and secure from the wind.
Conclusion
Building your own shed ramp is a practical weekend project that makes your storage space far more functional. With basic tools, pressure-treated lumber, and the step-by-step process outlined above, you can create a sturdy ramp that handles everything from riding mowers to wheelbarrows.
The key to success lies in proper ground preparation, using the template method for consistent cuts, and following safety guidelines throughout the build.
Your investment of time and roughly $150 in materials will save you money compared to hiring contractors and prevent back injuries from lifting heavy equipment.
Most importantly, this ramp will serve your family for years with minimal maintenance. The gravel base and water sealing protect against moisture damage, while the solid construction handles substantial weight loads.
Ready to start your build? Gather your materials, set aside a weekend, and change your shed into the accessible storage space you need.