There’s something magical about converting a simple sheet of paper into a beautiful, functional fan.
I’ve been crafting paper fans for years, and I’m excited to share my passion with you today! Whether you’re looking for a creative way to beat the summer heat, add unique décor to your home, or create personalized gifts, paper fans are the perfect project.
In this guide, I’ll walk you through selecting materials (from basic supplies to eco-friendly options), mastering the essential accordion fold technique, creating sturdy structures, designing perfect handles, and adding your personal creative touch.
The best part? You don’t need fancy equipment or expensive materials to get started. With just paper, scissors, glue, and some imagination, you’ll be creating gorgeous fans that are both beautiful and practical.
Let’s get folding!
Materials You’ll Need: Your Fan Crafting Arsenal
The Essentials
- Paper: Choose your favorite color, pattern, or texture! Standard 8.5 x 11 inch paper works perfectly, but don’t be afraid to experiment with different sizes.
- Adhesive: Glue stick, craft glue, or double-sided tape all work well.
- Scissors: Sharp ones make for clean, precise cuts.
- Ruler: For measuring and creating straight fold lines.
Bonus Materials for Extra Flair
- Washi tape: Perfect for decorative edges and securing folds with style.
- Decorative elements: Ribbons, beads, sequins, or tassels to embellish your creation.
- Coloring tools: Markers, watercolors, or colored pencils for personalization.
- Specialty papers: Origami paper, scrapbooking sheets, or even fabric can elevate your fan.
Sustainable Options
- Repurpose old magazines, gift wrap, maps, or sheet music for eco-friendly designs.
- Old calendars with beautiful imagery make stunning statement fans.
- Lightweight cardboard from packaging can be transformed into sturdy, long-lasting fans.
Step-by-Step Guide to Fan Creation
1. Preparing Your Paper Canvas
The foundation of any great fan is the paper you select. Consider the purpose of your fan—decorative fans can use delicate papers, while functional cooling fans need sturdier material.
Size Considerations: While standard letter-size works well, experiment with different dimensions:
- Square paper (8×8 inches) creates compact, symmetrical fans
- Long, narrow strips (4×11 inches) make nimble hand fans
- Larger sheets (11×17 inches) create dramatic statement pieces
Paper Preparation: Cut your paper to the desired size and shape. For beginners, rectangular shapes are most forgiving. If you’re feeling adventurous, try rounded or scalloped edges for a fancy touch.
2. Mastering the Accordion Fold
The accordion fold is the heart of fan-making, creating those satisfying pleats that allow your fan to expand and collapse.
Creating Perfect Pleats:
- Start by folding a small section (about 1/2 to 3/4 inch) from one edge of your paper.
- Flip the paper over and make another fold of the same width.
- Continue alternating direction until the entire sheet is folded.
Pro Technique: For precision folding, mark light pencil guidelines before you begin. This ensures even spacing and a professional-looking result. The narrower your folds, the more dramatic your finished fan will appear when opened.
Common Challenges: If your paper resists folding, try scoring the fold lines lightly with the back of a knife or a bone folder. This creates a subtle indent that guides your folds for razor-sharp pleats.
3. Securing Your Fan Structure
Once folded, your fan needs to be secured at the bottom to maintain its shape while allowing it to open freely at the top.
Base Attachment Methods:
- For a simple finish, fold the bottom edge of your accordion-pleated paper and secure with glue or tape.
- For added stability, sandwich the bottom portion between two decorative paper strips.
- Use a paper clip to hold everything in place while the adhesives dry completely.
Decorative Base Ideas: The base offers a perfect opportunity for embellishment. Try wrapping it with colorful thread, adding small beads, or attaching a decorative button. These small touches convert a simple fan into a work of art.
4. Creating the Perfect Handle
A well-designed handle makes your fan both functional and attractive. Choose a handle style that complements your overall design.
Handle Options:
- Craft sticks: Easy to attach and comfortable to hold.
- Rolled paper: Create a tight cylinder from extra paper for a cohesive look.
- Natural materials: Cleaned twigs or bamboo skewers offer an organic visual.
- Upcycled items: Repurpose chopsticks, old pencils, or thin dowels.
Attachment Technique: Whatever handle material you choose, ensure it’s securely fastened to the base of your fan. Use strong adhesive and consider reinforcing with decorative washi tape or ribbon for both function and beauty.
5. Personalizing Your Creation
This is where your fan truly becomes unique! Decorating options are endless and allow you to express your creativity.
Design Approaches:
- Pre-decoration: Decorate paper before folding for an interesting effect when the fan opens and closes.
- Edge embellishments: Add decorative elements along the outer edge of your open fan.
- Surface design: Once assembled, add patterns, illustrations, or calligraphy to the fan’s surface.
Artistic Techniques:
- Try watercolor washes for subtle color blending
- Create raised designs with dimensional paint
- Incorporate pressed flowers or leaves between pleats
- Add metallic accents with gold leaf or metallic markers
Pro Tips for Fan Success
- Paper Selection: Thicker paper creates more structured fans but requires more effort to fold. For beginners, medium-weight paper offers the best balance.
- Fold Precision: Take your time with each fold—rushing leads to uneven pleats that affect the final appearance.
- Testing: Open and close your fan gently several times before final assembly to ensure smooth operation.
- Storage: Store finished fans flat or slightly open to prevent permanent creases that might affect their appearance.
Creative Variations to Try
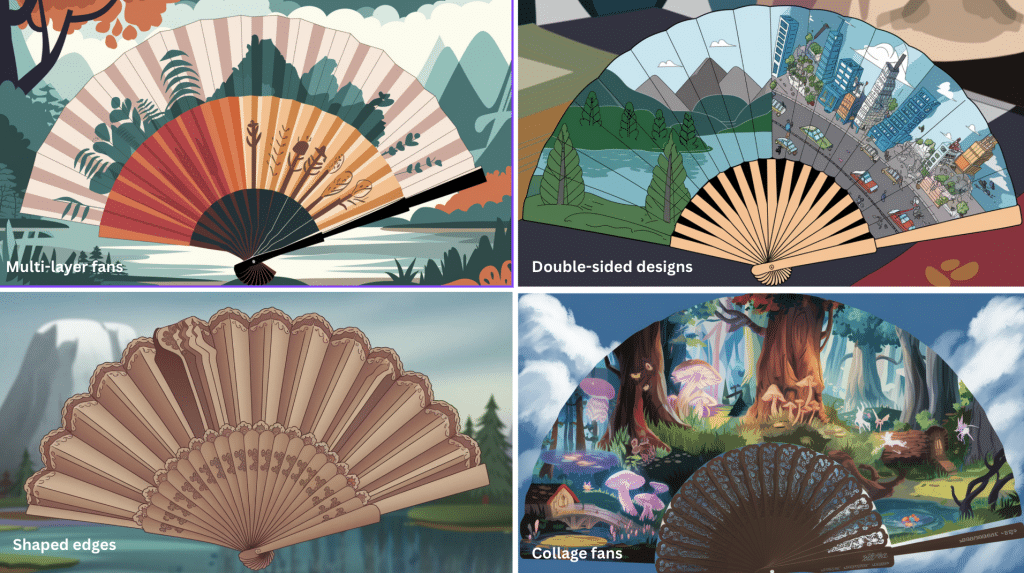
- Multi-layer fans: Combine papers of different sizes for a layered effect.
- Double-sided designs: Use different papers on each side for a reversible fan.
- Shaped edges: Cut decorative edges (scalloped, pointed, or wavy) after folding for unique silhouettes.
- Collage fans: Create a story or theme across the surface of your open fan.
Beyond Decoration: Practical Uses for Your Fans
Your handcrafted fans aren’t just beautiful—they’re versatile tools for both practical use and creative expression:
- Cool yourself on warm days with a functional cooling fan
- Use as unique party favors for weddings or celebrations
- Create seasonal displays that can be changed throughout the year
- Photograph them as colorful backdrops for product photography
- Arrange multiple fans in a wall display for striking home décor
With these techniques and ideas, you’re ready to create beautiful paper fans that combine form and function in delightful ways. Happy crafting!
Conclusion
Paper fan crafting bridges the gap between artistic expression and practical functionality. As you’ve seen throughout this guide, the process combines simple techniques with endless creative possibilities.
From selecting the perfect materials to mastering the accordion fold and adding your personal touch, each step contributes to a finished piece that’s uniquely yours.
Whether displayed as home décor, used for cooling on warm days, or gifted to friends, these handmade creations carry a special charm that mass-produced items simply can’t match.
The satisfaction of converting ordinary paper into something both beautiful and useful makes fan-making a truly rewarding craft.
Remember that perfection comes with practice—each fan you create will be better than the last. Your paper fan expedition has just begun, and the possibilities unfold just like your beautiful creations.