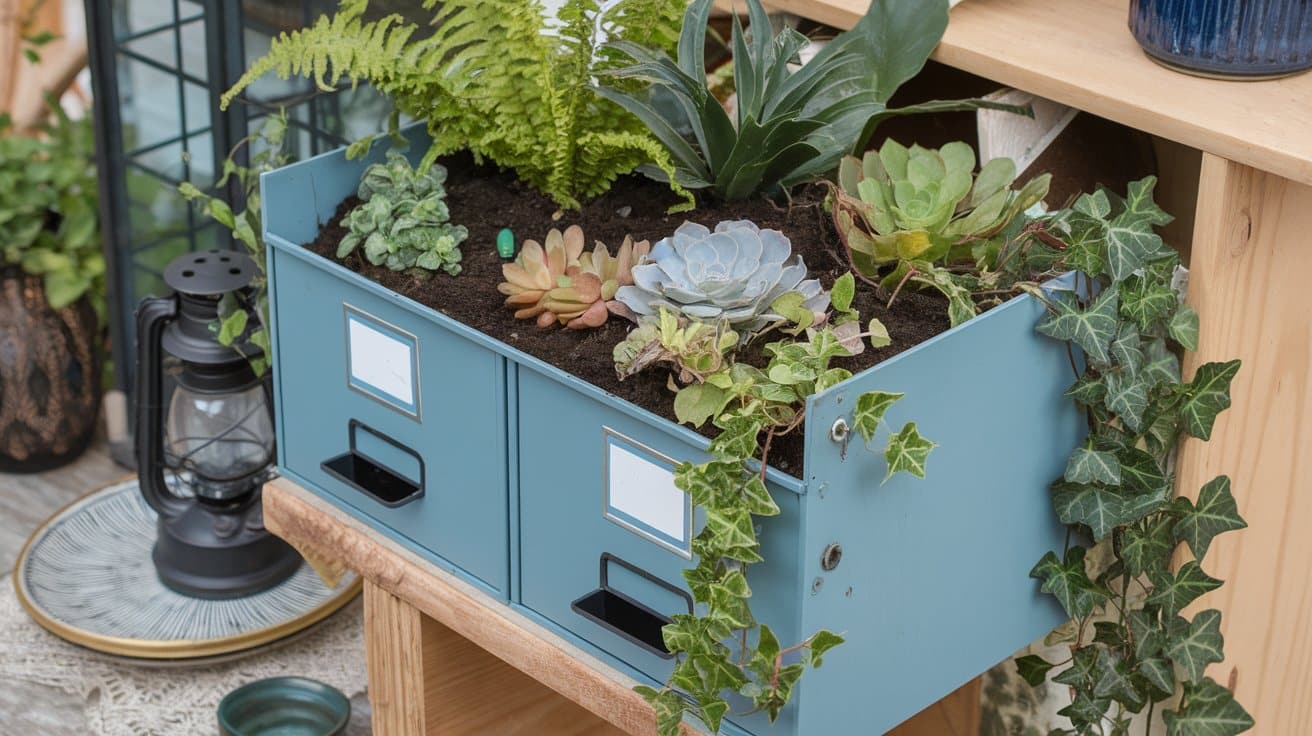
Looking for a unique way to display your plants without spending a fortune on expensive planters?
Old filing cabinets might seem like office junk, but they make fantastic planters. These sturdy metal boxes can handle weather, hold plenty of soil, and give your garden a cool industrial look that you won’t find anywhere else.
I’m going to show you how to turn any filing cabinet into a beautiful planter that’ll last for years.
You’ll learn the complete step-by-step process from finding the right cabinet to selecting plants that thrive in metal containers. This project costs less than $30 and takes just one weekend to complete.
By the end, you’ll have a one-of-a-kind planter that’s both functional and stylish for your garden or patio space.
Why Upcycle a File Cabinet?
Turning old filing cabinets into planters makes perfect sense for several reasons. First, you’ll save money – a good-sized planter can cost $50 to $200, while you can often find filing cabinets for $10 to $30 at thrift stores.
These metal boxes are built to last. Office furniture is made to handle daily use for years, so it can definitely handle soil and plants. The sturdy construction means your planter won’t crack, warp, or fall apart like cheaper alternatives.
You’ll also help the environment. Instead of buying new plastic planters that might break in a few seasons, you’ll give old furniture a second life. Every cabinet you save from the landfill is a win for the planet.
The industrial look is another big plus. Metal filing cabinets give your garden or patio a modern, urban vibe that stands out from typical ceramic or plastic pots.
Choosing the Right File Cabinet
Not all filing cabinets work well as planters. Here’s what to look for:
- Size matters: Two-drawer cabinets work best for most plants. Four-drawer models can get too tall and tippy when filled with soil.
- Check the condition: Small dents and scratches are fine – you can fix those. But avoid cabinets with rust holes or severe damage.
- Test the drawers: Make sure they slide in and out smoothly. You’ll be removing them anyway, but stuck drawers might mean the frame is warped.
- Consider the material: Steel cabinets last longer than aluminum ones. Look for heavy, solid construction.
The best places to find good cabinets: office supply stores having sales, government surplus stores, and online marketplaces where offices sell old furniture.
Planning Your Planter Design
Before you start drilling and painting, think about how you want your planter to look and function.
1. Vertical vs. Horizontal Orientation
Most people keep filing cabinets upright, but you have options. Vertical cabinets work great for tall plants like small trees or climbing vines. Each drawer becomes a separate planting space.
Horizontal cabinets (laid on their side) create a long, low planter perfect for herb gardens or trailing plants. This setup gives you more surface area for planting.
2. Single-Tier vs. Multi-Tier Planters
With drawers removed, you get one big planting space – perfect for larger plants or a mixed garden. Keep some drawers in place, and you create separate sections for different plants with different water needs.
Multi-tier setups work well when you want to grow herbs in the top drawer and flowers below, or when you need to separate aggressive spreaders from delicate plants.
3. Design Ideas and Inspiration
Consider painting each drawer a different color for a fun, modern look. Chalkboard paint lets you label what’s growing where. Stencils can add patterns or garden-themed designs.
Think about placement, too. Will this sit on a patio, in the garden, or against a wall? The location affects your color choices and plant selection.
Steps to Upcycle a File Cabinet Into a Planter
Follow these simple steps to transform any old filing cabinet into a beautiful, functional planter for your garden or patio.
Tools and Materials You’ll Need:
Before you start, gather these basic supplies:
| Tools | Materials |
|---|---|
| Drill with metal bits | Filing cabinet |
| Sandpaper or a wire brush | Metal primer and paint |
| Screwdriver | Landscape fabric or coffee filters |
| Measuring tape | Gravel or small stones |
| Level | Potting soil |
| Plants of your choice |
Most of these items you probably already have at home. The total cost for new materials should be under $30, not counting the plants.
Step 1: Select Your File Cabinet
The hunt for the perfect filing cabinet is half the fun. Start checking local thrift stores, Goodwill, and Salvation Army locations. These places often have office furniture for $10-25.
Online marketplaces like Facebook Marketplace and Craigslist are gold mines. Search for “office cleanout” or “moving sale” posts – you’ll find great deals from businesses getting rid of furniture.
Where to look: ReStores, Craigslist, thrift shops, office cleanouts
Step 2: Prepare the Cabinet
Remove all the drawers first. Most slide out easily, but some have clips or stops you need to push. Clean out any dust, papers, or debris from inside.
Sand down any rust spots with medium-grit sandpaper. Wipe the whole cabinet with a damp cloth to remove dust and grime. Let it dry completely before moving to the next step.
Step 3: Drill Drainage Holes
This step is crucial for plant health. Without drainage, water sits at the bottom and rots the roots. Use a drill with a metal bit to make holes about every 4-6 inches across the bottom.
Start with smaller holes (1/4 inch) and make them bigger if needed. If you’re keeping drawers, drill holes in the bottom of each drawer, too.
Why it matters: Healthy roots need good drainage
Step 4: Paint and Decorate
Clean the cabinet with degreaser first. Apply metal primer to prevent rust – this step is important even if the cabinet looks fine now. Let the primer dry for at least 2 hours.
Choose paint made for metal surfaces. Spray paint gives the smoothest finish, but brush-on paint works too. Apply thin, even coats rather than one thick layer.
For style: use stencils, chalkboard paint, or your favorite shade
Step 5: Position the Cabinet
Choose your spot carefully before filling with soil – a full planter is heavy and hard to move. Look for level ground that gets the right amount of sun for your planned plants.
Consider drainage for the area, too. You don’t want water pooling under your planter after rain. A slightly raised spot or adding gravel underneath helps with this.
Step 6: Line the Cabinet (Optional)
Landscape fabric helps keep soil from washing out of the drainage holes while still letting water through. Cut pieces to fit the bottom and sides of each planting area.
Coffee filters work just as well for smaller drainage holes. They’re cheaper and easier to cut to size. Just lay them over the holes before adding your drainage layer.
Step 7: Add a Drainage Layer
Pour about 2 inches of gravel, small stones, or broken pottery pieces into the bottom. This prevents water from sitting at the root level, which causes rot and plant death.
Don’t skip this step even if your drainage holes seem big enough. The gravel layer acts like insurance for your plants’ health.
Purpose: Prevents water from pooling at the roots
Step 8: Fill with Soil
Use good-quality potting soil, not garden dirt. Potting soil drains better and won’t compact as much in containers. Fill to about 2 inches below the rim.
Don’t pack the soil down hard. Plants need loose soil for their roots to spread and for air to reach them.
Step 9: Select and Arrange Your Plants
Think about plant heights and growth habits before you buy. Put taller plants in back, shorter ones in front. Consider how big each plant will get in a few months.
Match plants with similar water and sun needs in the same drawer or section. Herbs generally need less water than flowers, for example.
Step 10: Plant and Water
Dig holes slightly larger than each plant’s root ball. Gently loosen any tangled roots before planting. Water slowly until you see it draining from the bottom holes.
Don’t flood the soil right away. Give plants time to settle in their new home with just enough water to keep the soil damp.
Step 11: Add Finishing Touches
Mulch around plants with bark chips or decorative stones to help hold moisture and prevent weeds. Add plant labels if you’re growing herbs or vegetables.
Consider small decorative items like garden stakes or solar lights to complete the look.
Finishing ideas: mulch, plant labels, decorative stones, solar lights
Video Tutorial
Check out the video for more insights! Watch a step-by-step demonstration of making a filing cabinet into a stunning planter.
By – Justin and Jess DIY
Maintenance Guide for Filing Cabinet Planters
Your filing cabinet planter needs regular attention to keep plants healthy and the container looking good.
Watering Schedule: Metal containers dry out faster than ceramic or plastic pots, especially in hot weather. Check soil moisture daily by sticking your finger about an inch down. Water when the top inch feels dry, but don’t let plants sit in soggy soil.
Seasonal Plant Care: Replace annuals each season to keep your planter looking fresh. Perennials can stay year-round in mild climates, but you might need to move the whole planter to a protected spot during harsh winters.
| Season | Care Tasks |
|---|---|
| Spring | Replace old plants, add fresh soil, and check drainage |
| Summer | Water daily, deadhead flowers, and watch for pests |
| Fall | Plant cool-season crops, and reduce watering |
| Winter | Protect from freezing, minimal watering |
Cabinet Maintenance: Touch up paint scratches as soon as you notice them to prevent rust. Clean the outside with mild soap and water occasionally. Check that drainage holes haven’t gotten clogged with roots or debris.
Plant Health Tips: Fertilize monthly during the growing season with liquid plant food. Remove dead or diseased plants immediately to prevent problems from spreading. Trim back overgrown plants to keep the display looking neat.
Conclusion
This filing cabinet planter project proves that great garden style doesn’t require a big budget. With just a weekend and basic tools, you’ve created something truly special for your outdoor space.
Your new planter will serve you well for years with proper care. The sturdy metal construction can handle weather changes while giving your plants room to grow and thrive.
The best part? You’ve kept useful furniture out of the landfill while creating something beautiful. Every time you water your plants or harvest herbs, you’ll feel good about this smart choice.
Now it’s time to enjoy watching your plants grow in their new home. What will you plant in your converted filing cabinet?
Frequently Asked Questions
Can You Plant Vegetables in A Filing Cabinet?
Yes, filing cabinets make excellent vegetable planters. They’re mobile, compact, and can be made wheelchair accessible for easy gardening access.
What Kind of Wood Should You Use for A Planter Box?
Cedar and redwood work best for planters due to their weather resistance. Pine is cheaper but needs treatment. Reclaimed wood saves money.
How to Make a Wood Box Weatherproof?
Apply marine-grade varnish or exterior wood sealer in multiple coats. This protects against moisture and extends the planter’s lifespan significantly.


