Ever been shocked by professional patio installation quotes? Many homeowners face this surprise when planning outdoor spaces.
The good news is that building a backyard retreat with simple materials and effort is completely possible. With the right approach, creating an outdoor space becomes straightforward.
Comparing different methods reveals ways to simplify without compromising quality. With basic tools, smart material choices, and a weekend of work, anyone can build a sturdy, good-looking patio that stands the test of time.
The satisfaction of relaxing on a self-built patio is priceless. Ready to add value to a home with a DIY project? This guide shows you exactly how to create a beautiful patio step by step.
Step-By-Step Guide to Building an Affordable Patio
This is a complete DIY patio construction guide with required tools, materials, and six straightforward steps for creating a durable outdoor space at minimal cost.
Tools Needed:
| Tool | Purpose |
|---|---|
| Stakes | Marking the Patio Outline |
| String | Creating Boundary Lines |
| String Level | Ensuring a Level Outline |
| Rake | Leveling Ground and Materials |
| 8-Foot Board | Checking Levelness Across Surfaces |
| Tamper | Compacting Gravel for A Solid Base |
| Trowel | Smoothing Sand and Filling Gaps |
| Mallet | Securing Edging Stakes |
| Hose | Settling Gravel and Final Cleaning |
| Broom | Sweeping Sand Into Cracks Between Pavers |
Material Needed
| Material | Purpose |
|---|---|
| Crushed gravel | Creating drainage and the stable base layer (2 inches) |
| Sand | Providing a level cushion for pavers (1 inch) |
| Pavers | Forming the patio surface (various styles available) |
| ¾-inch PVC pipes | Serving as guides for consistent sand depth |
| Edging | Preventing pavers from shifting over time |
| Small stakes/nails | Securing the edging around the perimeter |
Step 1: Layout and Planning

Begin by placing stakes and running string to outline your patio area. Make sure the string is level with your existing concrete slab or structure using a string level. Plan to dig approximately 5 inches deep to accommodate 2 inches for gravel, 1 inch for sand, and 2 inches for the pavers. This depth ensures your pavers will be low enough to fit under house siding but not so low that they create a tripping hazard.
Budget Note
- Stakes and string: $10-15 total
- Utility line marking: Often free through local “Call Before You Dig” services
- Planning costs: $0 (just your time and attention)
Pro Tip: Call local services to mark utility lines before digging. Add an extra 6 inches to your planned perimeter to allow room for edging and easier installation.
Step 2: Digging and Ground Preparation
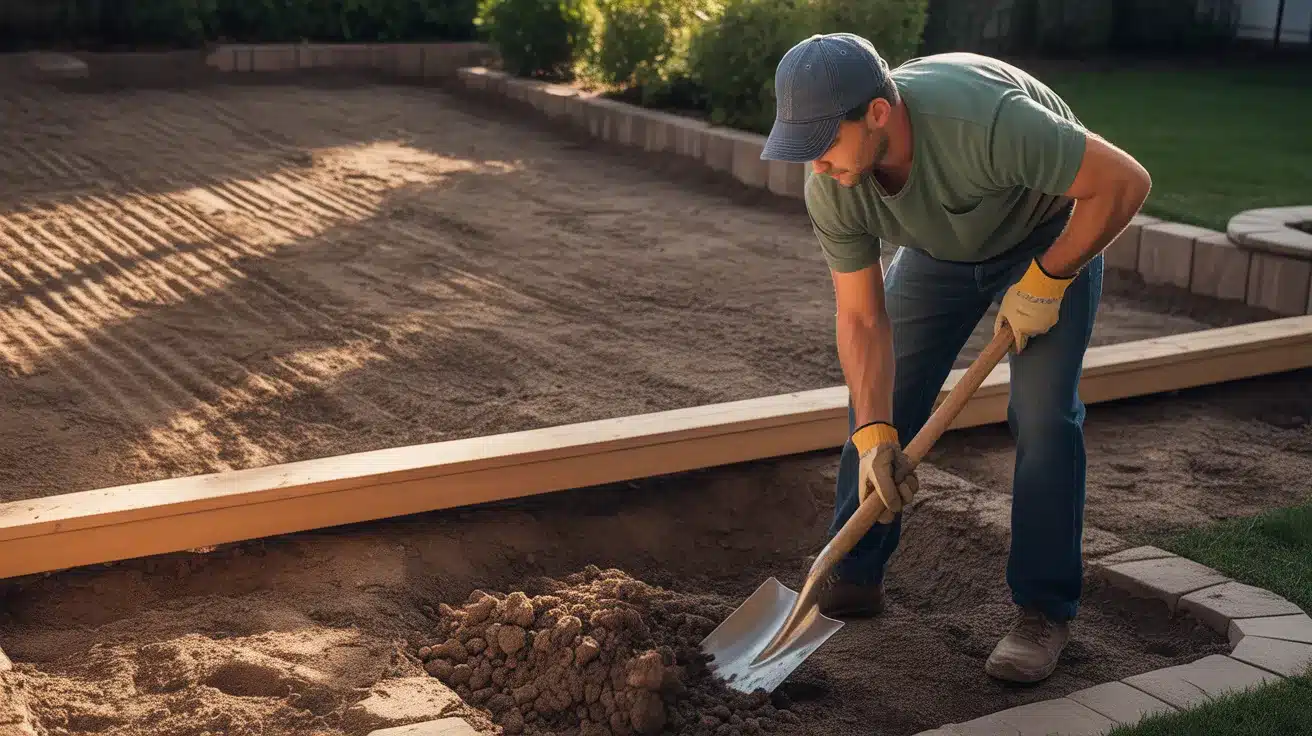
Dig out the marked area to your planned depth. This will require significant effort, so pace yourself. For areas where the yard is higher than existing concrete, adjust your digging accordingly. Once excavated, level the ground using a rake and check levelness with a long board or makeshift level. Make any necessary adjustments to ensure a flat, even surface as your foundation.
Budget Note
- Sod cutter rental: $70-90 per day
- Basic digging tools (if buying): $30-50
- Labor savings: $300-500 compared to hiring help for this step
Pro Tip: Rent a sod cutter for faster removal of grass in large areas. Slope the ground slightly (about 1 inch per 8 feet) away from any structures to help with water drainage.
Step 3: Adding and Leveling Gravel
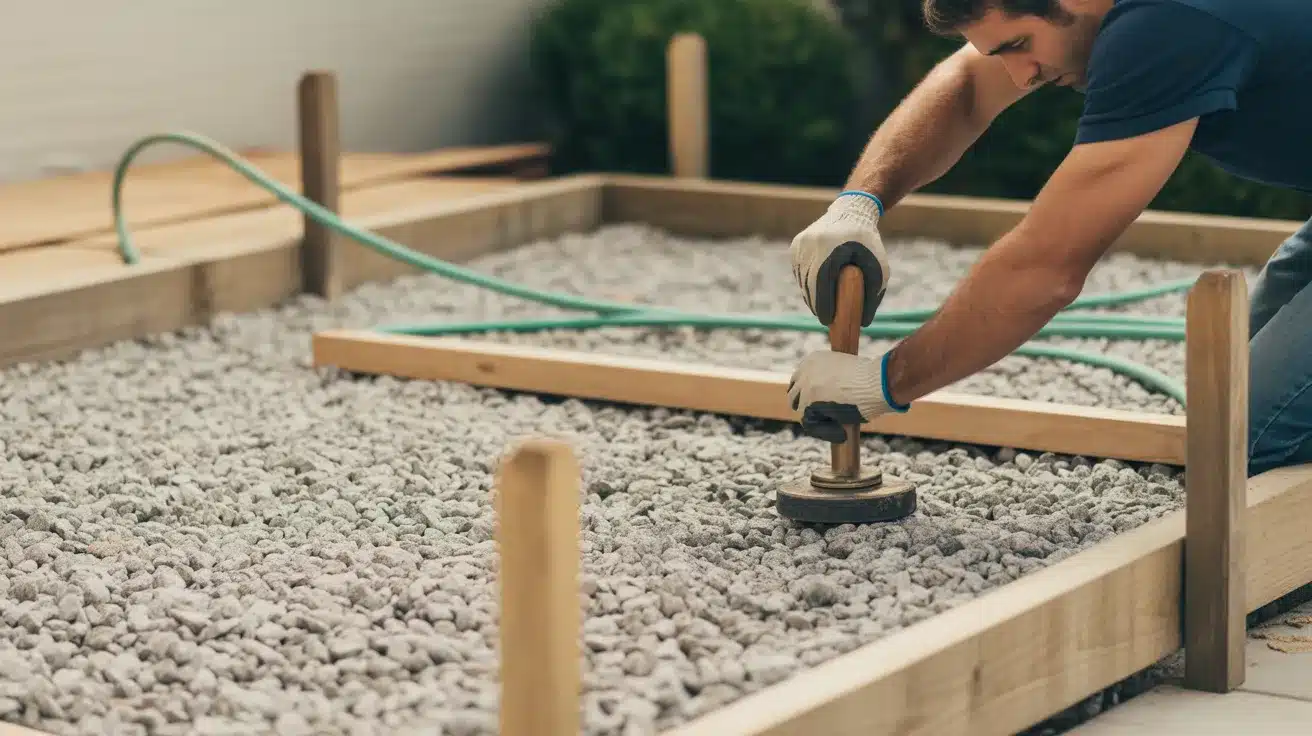
Install stakes about 3 inches below the concrete slab height to mark where your gravel should fill. Add crushed gravel across the excavated area, preferably purchased from a local landscaping company for better value than bagged gravel. Level the gravel using a long 8-foot board, then hose it down to help it settle. After the gravel dries, tamp it down firmly to create a solid, compact base for your patio.
Budget Note
- Bulk crushed gravel: $40-60 per ton (one ton covers about 100 sq ft at 2″ depth)
- Delivery fee: $50-100, depending on location
- Bagged gravel cost: $3-5 per bag (much costlier than bulk for large areas)
Pro Tip: Use ¾-inch crushed gravel (also called “road base”) instead of rounded pea gravel, as angular pieces lock together better for a more stable foundation.
Step 4: Adding and Leveling Sand
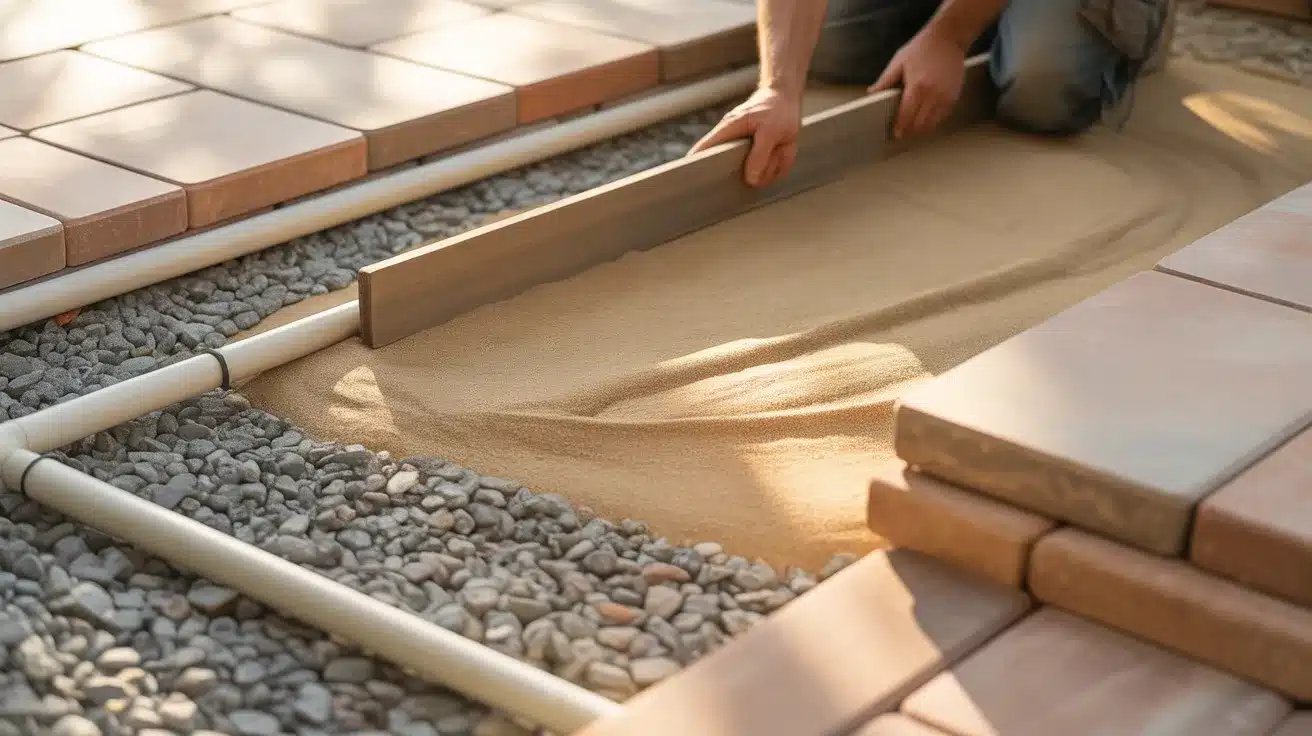
Before adding sand, organize your pavers nearby for easy access. Place ¾-inch PVC pipes across the gravel as guides for consistent sand depth. Spread sand between the pipes and use an 8-foot board with a side-to-side motion across the pipes to level the sand perfectly. After removing the pipes, fill the resulting divots with additional sand and smooth everything out with a trowel. Working in smaller sections with shorter pipe lengths helps avoid stepping on already leveled areas.
Budget Note
- Regular sand: $30-50 per ton
- Polymeric sand: $25-35 per 50-pound bag (covers about 100 sq ft)
- PVC pipe guides: $5-10 total
Pro Tip: Use polymeric sand which contains binding agents that harden when wet, creating a more stable bed and helping prevent weed growth between pavers later.
Step 5: Laying Pavers
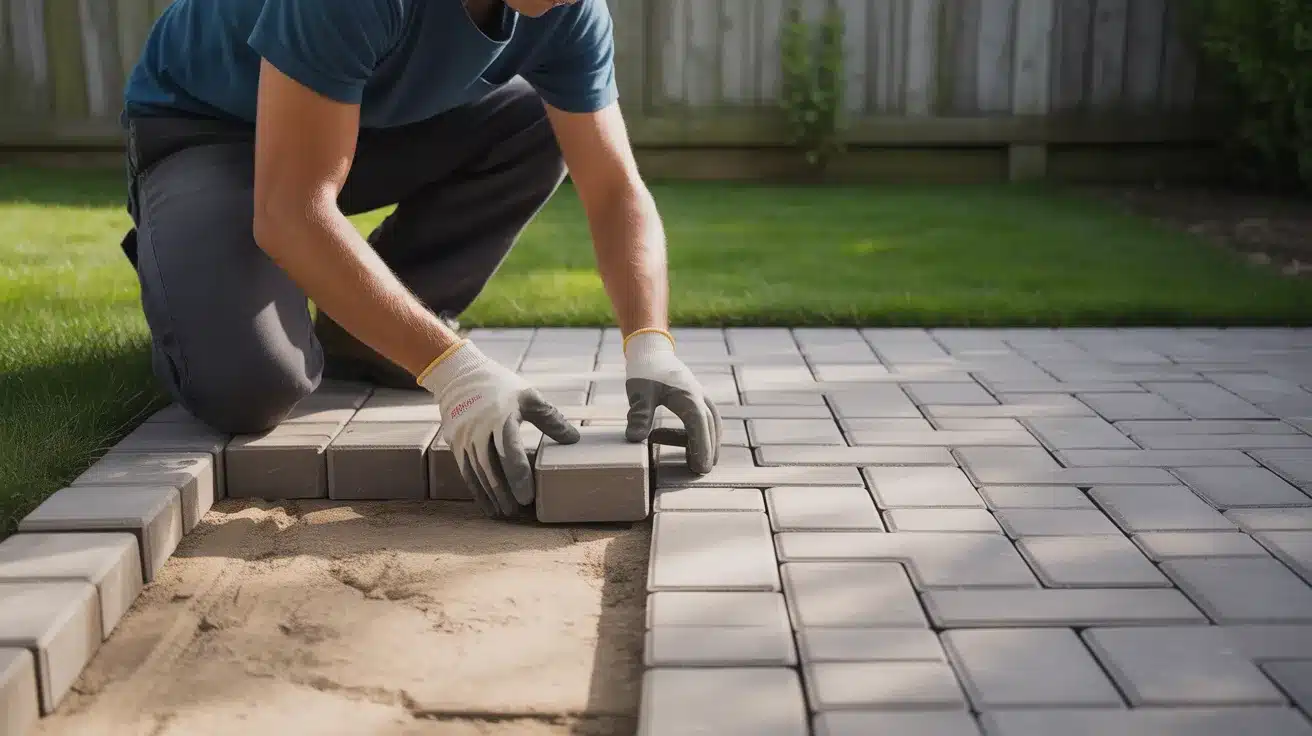
Gently place pavers onto the leveled sand, allowing them to settle naturally into position. Arrange them in your desired pattern, working carefully to avoid disturbing the meticulously leveled sand beneath. Take your time with this step, as proper placement now prevents issues later. The pavers should sit flush against each other, creating a smooth, even surface across your patio.
Budget Note
- Basic concrete pavers: $2-5 per square foot
- Natural stone pavers: $6-15 per square foot
- Rubber mallet: $10-15
- Savings vs. professional installation: $10-15 per square foot
Pro Tip: Start laying pavers from a corner or straight edge, working outward in a staggered pattern to maintain stability. Keep a rubber mallet handy to gently tap pavers into place without damaging them.
Step 6: Finishing Touches
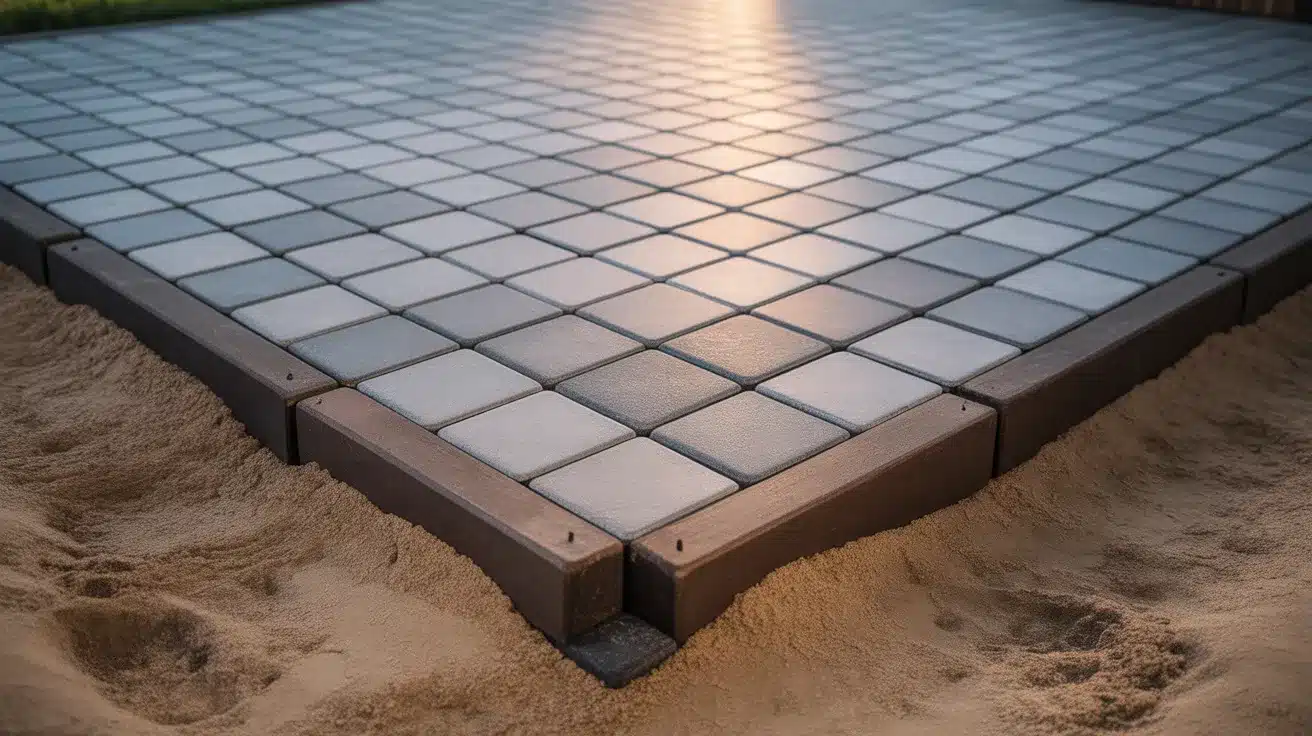
Install edging around the perimeter of the patio to prevent the pavers from shifting over time. Secure the edging with small stakes or nails every couple of feet using a mallet. Spread sand over the entire patio surface, using a broom to sweep it back and forth across the pavers. This process helps the pavers settle further and locks them firmly into place. Finally, sweep off excess sand and spray lightly with a hose to wash away any remaining loose material, revealing your completed patio.
Budget Note
- Plastic edging: $20-30 for 20 linear feet
- Metal edging: $40-60 for 20 linear feet
- Paver sealer: $30-50 per gallon (covers 100-200 sq ft)
- Total finishing materials: $100-150 for a 200 sq ft patio
Pro Tip: Apply a quality paver sealer after finishing to enhance color, prevent staining, and extend the life of your patio by reducing weed growth and sand erosion.
Video Tutorial
I want to give special thanks to DIY Dane for providing valuable insights in their video, which I referenced while creating this guide.
Top Mistakes to Avoid when Building a DIY Patio
Building a Patio Seems Straightforward, but Several Common Errors Can Compromise the Final Result. Avoid These Pitfalls for A Professional-Quality Outcome:
1. Skipping Proper Planning: Failing to Create a Detailed Plan with Accurate Measurements Leads to Material Waste and Poor Results. Always Measure Twice and Draw a Scale Diagram Before Starting.
2. Neglecting to Check for Utilities: Digging without Knowing What Lies Beneath Can Damage Water Lines, Gas Pipes, or Electrical Cables. Always Call Local Utility Services to Mark Underground Lines Before Breaking Ground.
3. Insufficient Base Preparation: A Common Error Is Rushing Through the Base Layers. Skimping on Excavation Depth or Gravel Thickness Results in An Unstable Patio that Shifts and Sinks Over Time.
4. Poor Drainage Planning: Failing to Slope the Patio Away from Structures (at Least 1 Inch per 8 Feet) Causes Water Pooling Problems and Potential Foundation Damage to Nearby Buildings.
5. Improper Compaction: Not Properly Tamping Each Layer Leads to Settling Issues-each soil base and gravel Gravel-requires Thorough Compaction for Lasting Stability.
6. Uneven Sand Screeding: Inconsistent sand depth creates an uneven paver surface with potential tripping hazards. The PVC pipe method ensures uniform sand depth throughout.
Conclusion
Building a patio requires attention to detail but delivers substantial rewards. the six-step process creates a durable, professional-quality space without specialized skills or expensive equipment.
Proper base preparation ensures years of stability with minimal maintenance. the careful layering of materials—from compacted soil to angular gravel and precisely leveled sand—forms the hidden structure supporting visible beauty.
Most patio projects can be completed in a single weekend with proper planning. A well-constructed patio not only creates a functional outdoor living space but also boosts property value.
By avoiding common pitfalls and following proven construction methods, even first-time DIYers achieve excellent results. The effort invested in careful preparation returns years of enjoyment in a customized outdoor retreat.
Frequently Asked Questions
Is Concrete or Pavers Cheaper?
Concrete is cheaper initially, costing about 30-50% less than pavers for installation. However, pavers may save money long-term since individual damaged pieces can be replaced easily.
What Is the Cheapest Way to Lay a Patio?
The cheapest way to lay a patio is to use gravel or crushed stone over landscape fabric. DIY concrete pavers or recycled materials also offer budget-friendly options.
How Much Would It Cost to Build a 20×20 Patio?
A 20×20 patio costs $400-1,200 (gravel), $2,400-6,000 (concrete), or $4,000-8,000 (pavers). DIY installation saves about 50% on these costs.