Do you look up at your chandelier and feel it’s dull, old, or out of place? You’re not alone. Many people live with light fixtures they don’t love because they think replacing them is the only option.
A chandelier makeover is a budget-friendly way to refresh your home’s look. With some cleaning supplies, paint, and new parts, you can transform that tired fixture into something special.
In this guide, you’ll learn six before-and-after examples showing how cleaning, painting, and adding new elements can completely change your chandelier.
We’ll cover common makeover methods, creative ideas to add personal style, and practical tips to avoid mistakes along the way. Whether you want modern, rustic, or fancy results, these steps will help you create a light fixture you’ll love.
Why You Should Consider a Chandelier Makeover?
Is your chandelier looking old and worn? This can make your whole room feel less nice. You don’t need to buy a new one! A makeover costs significantly less and allows you to retain what makes your old fixture special.
When I updated my chandelier, my dining room looked better immediately. The new look matched my other home items. I added my personal touch to a key room piece. And I spent significantly less money than I would have on a brand-new light.
From Drab to Fab: Chandelier Makeover Ideas You’ll Love
Revitalize your home’s centerpiece with these easy and creative chandelier makeover ideas that will elevate your space without breaking the bank.
1. From Dusty and Dull to Sparkling Grace

Your old chandelier appears dull when dust accumulates on the crystals over time. Clean each crystal with care and replace any broken pieces to restore its shine. A coat of metal spray paint on the arms creates a fresh, modern look while keeping its old-school charm.
Before: Dusty crystals, cloudy glass, overall tired look.
After: Clean, bright crystals with fresh metal finish
Tips: Mix warm water and vinegar on a soft cloth for cleaning. Replace any damaged parts. Try gold or silver spray paint to update the metal parts.
2. From Outdated to Timeless with a Modern Update

Your brass chandelier can feel heavy and out of date with your current home style. Change it with matte black paint for a clean, current feel. Clear glass bulbs help make the whole room look brighter and more open than old frosted ones.
Before: A heavy brass finish that does not match the rest of the home.
After: Sleek matte finish with brighter, clearer light
Tips: Good paint choices include matte black, brushed nickel, or oil-rubbed bronze. Use clear Edison-style bulbs for a more grown-up look.
3. From Plain to Whimsical with a Touch of Color

A plain chandelier can fail to stand out or match the colors of other rooms. Add glass beads in bright colors and paint the metal frame in light colors to make it pop. This turns a basic light into a fun focal point that pulls your room together.
Before: Boring fixture with no special features
After: Fun, colorful statement piece that ties the room together
Tips: Pick colors that work with your room’s plan. Balance bright parts with the rest of your items so they don’t clash.
4. From Classic to Glamorous with Crystal Accents

Your basic chandelier might have good bones, but it lacks the wow factor. Hang crystal strands and add glass pieces to the arms to catch and spread light. These small changes turn a simple light into a fancy, eye-catching piece.
Before: Basic structure without special details.
After: Shiny, light-catching fixture with lots of sparkle
Tips: Budget-friendly fake crystals work well too. Maintain a balance between the crystal size and your fixture size for the best visual effect.
5. From Simple to Opulent with a Vintage Revival

When your plain light doesn’t match your home’s older style, you can change that. Use a gold leaf finish and old-style hanging pieces for a rich, elegant look. The warm gold looks great paired with crystal drops, creating a cozy, high-end ambiance.
Before: Too simple for a home with classic style.
After: Rich-looking fixture with warm, fancy details
Tips: Try old-style finishes for that lived-in look. Add old-fashioned bulbs to create a nostalgic ambiance, evoking a sense of timelessness.
6. From Dated to Rustic with a Farmhouse Twist
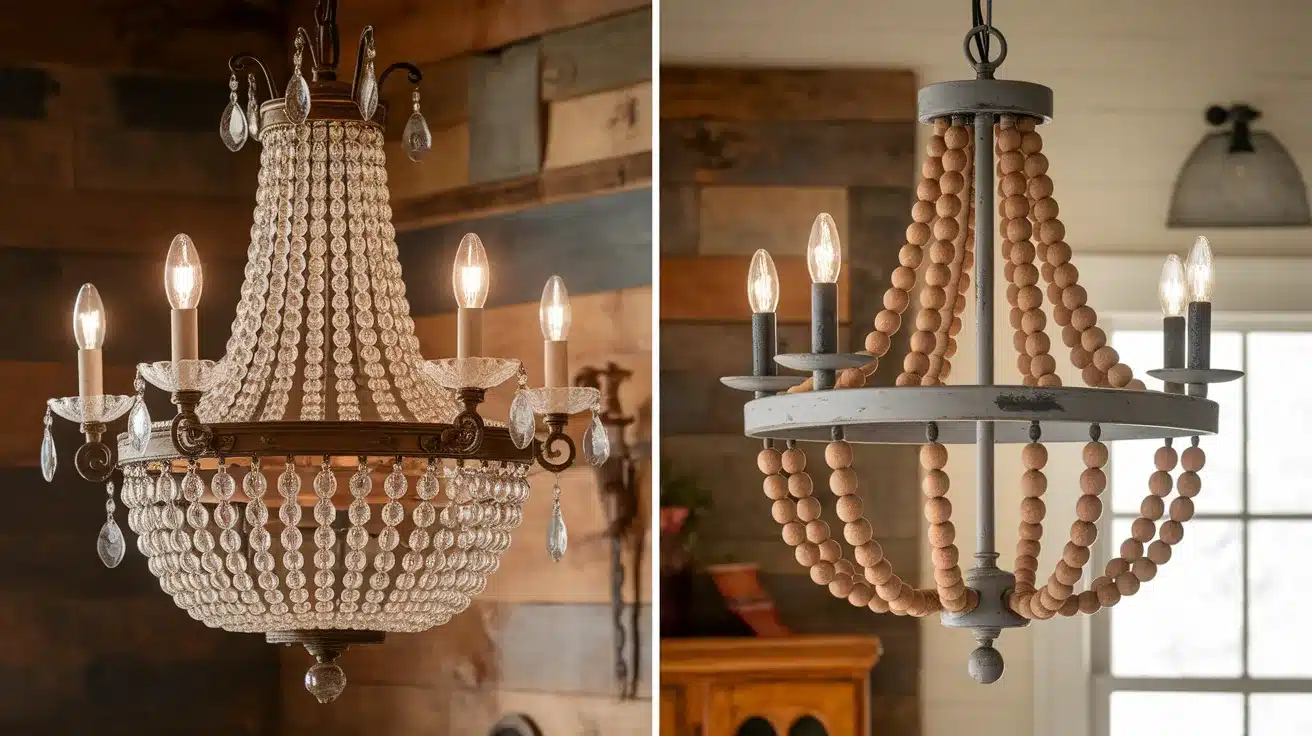
A fancy, fussy chandelier can clash with country-style homes. Replace fancy glass with wooden beads and use gray paint with worn spots. This creates a perfect blend of factory and farm aesthetics that fits right in.
Before: Too fancy and complex for simple home style.
After: A Simple, worn-looking fixture with natural elements
Tip: Wood or metal parts work better than glass for a country-style look. Make paint look worn on purpose to add age and depth
Common Pitfalls to Avoid in Your Chandelier Makeover
| Mistake | Why It Happens | Quick Fix |
|---|---|---|
| Skipping cleaning the crystals | Neglecting upkeep or rushing the process | Clean crystals thoroughly before starting |
| Choosing the wrong paint | Using incorrect paint for metal or lighting | Use paint for metal finishes specifically designed |
| Overloading the chandelier | Adding too many decorations | Keep accessories minimal for balance |
| Not considering the room’s lighting | Focusing only on looks, ignoring the lighting quality | Test bulbs for a desired lighting effect |
| Rushing the process | Wanting to finish quickly but skipping drying times | Be patient and allow proper drying time |
Personalizing Your Chandelier: Fun Ideas to Try

1. Add Texture with Decorative Elements
You can make your chandelier stand out by adding fabric strips or strands around its arms. This small touch brings a casual, homey feel to your space. Try strings of beads or thin rope wrapped in spots to create depth and visual interest in your light fixture.
Simple upgrades: Fabric bands, string beads, wrapped cord.
Style match: Works with casual, relaxed home styles
2. Change with the Seasons
Your chandelier can reflect the time of year with quick changes. Winter calls for light frost effects or tiny white details. Summer feels right with bright thin ribbons or small fresh blooms hung from the arms. These quick swaps keep your space feeling fresh all year.
Winter look: Light frost sprays, white accents, silver touches.
Summer style: Bright ribbons, small flowers, light colors
3. Add Warmth with Special Bulbs
The type of bulb makes a big difference in how your whole fixture looks. Old-style Edison bulbs with visible filaments give off a soft glow that feels warm and cozy. They bring an old-time feel that works in both new and old homes.
Light quality: Warm, with a soft, yellow tone.
Mood effect: Cozy, warm, calm feeling in the room
4. Soften Light with Fabric Add-ons
A cloth shade around your chandelier can alter how light is distributed in the room. Adding a drum-shaped cover to the middle part makes the light softer and less harsh. This works well in bedrooms or dining areas where you want gentle lighting.
Light change: Softer, more even, less glare.
Best rooms: Dining rooms, bedrooms, reading nooks
Common Chandelier Makeover Techniques
- Paint – A coat of spray paint completely changes your light fixture from outdated brass to sleek matte black or warm antique gold.
- Crystals/Beads – Swap plain arms or plastic drops for glass prisms, wooden beads, or remove them altogether for a clean, industrial-style look.
- Shades – Replace frosted glass tulips with clean drum shades, soft linen covers, or remove them for a bare bulb look.
- Bulbs – Trade standard candle bulbs for warm filament styles, round globes, or flame-tips to match your room’s mood.
- Embellishments – Wrap arms with rope, add paper flowers (away from bulbs), or hang small chains for a custom touch.
- Cleaning & Polishing – Sometimes all your fixture needs is a thorough dust and shine to look brand new again.
Wrapping Up
Your chandelier can shine again without needing to buy a new one. A makeover brings new life to an old fixture, adding a personal touch to your home.
Let’s review the main points: First, clean your chandelier thoroughly before making any changes. Second, choose the right paint if you’re changing colors. Third, don’t add too many items to your light. Fourth, inspect your new bulbs before you finish.
What’s next for your chandelier? Try one of the six styles we talked about: sparkling clean, modern matte, colorful and fun, crystal-filled, vintage-styled, or rustic farmhouse. Or add your twist with seasonal items, special bulbs, or fabric touches.
Ready to get started? Grab your supplies and take your time with each step. Your patience will pay off when you flip the switch and see your “new” light brighten your room.
Have you updated a light fixture before? Share your results or questions in the comments!
Frequently Asked Questions
How Much Time Does a Chandelier Makeover Typically Take?
Most simple makeovers take 3-4 hours, but allow a full weekend for projects that need paint drying time.
Can I Update a Chandelier without Taking It Down from the Ceiling?
Yes, small changes like adding beads or changing bulbs can be done while the fixture stays in place, but paint jobs need the chandelier removed.
Will Changing My Chandelier Affect My Home’s Wiring, or Need an Expert?
Most makeovers change only the look, not the wiring, so you won’t need an expert unless you plan to move or change the electrical parts.
How Do I Know if My Old Chandelier Is Worth Fixing Up?
Check if the basic structure is solid, the wiring works well, and if you like its general shape – these are good signs it’s worth a makeover.