Building a new bathroom or updating an old one can be overwhelming. In addition to choosing fixtures and planning layouts, many homeowners overlook bathroom code requirements.
Meeting local building codes might not seem as exciting as picking out tiles or vanities, but meeting these requirements right from the start can save time, money, and headaches later.
Building inspectors check these details carefully, and fixing code violations after completion can be costly.
In this guide, I’ll walk you through the key bathroom code requirements you need to know.
From proper fixture spacing and ventilation rules to electrical safety standards and accessibility guidelines, you’ll learn exactly what your bathroom needs to meet building codes and create a safe, functional space that adds value to your home.
What is the Residential Bathroom Code?
Residential bathroom code establishes rules to ensure safety, efficiency, and compliance with legal requirements.
These regulations, primarily based on the International Residential Code (IRC) and local building standards, cover essential aspects such as proper fixture spacing, ventilation systems, electrical safety, plumbing guidelines, and accessibility features.
Toilets, sinks, and showers must have specific clearances to allow ease of use, while exhaust fans or operable windows help control moisture levels and prevent mold growth.
Electrical standards require GFCI-protected outlets near water sources to reduce shock hazards.
Plumbing codes mandate proper drainage, secure water supply lines, and temperature-regulating valves to prevent scalding.
The Importance of Bathroom Code Requirements
Building codes do more than just set rules – they keep people safe. When planning a bathroom, following these requirements helps prevent accidents from faulty wiring, poor ventilation, or incorrect fixture placement.
The codes ensure your bathroom is well-suited for daily use, with enough space between fixtures and proper safety features.
1. Building Codes vs Design Guidelines
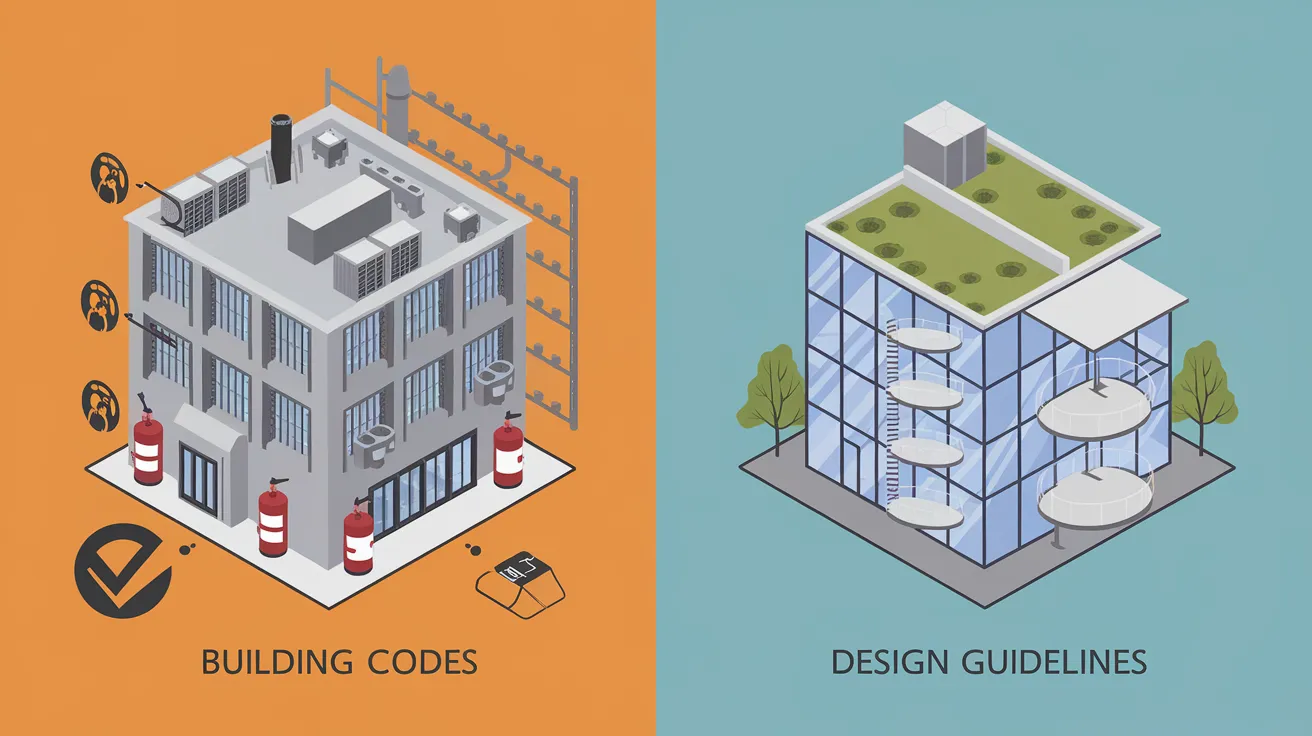
Local building codes set the minimum legal standards your bathroom must meet. These come from the International Residential Code (IRC), which most cities adopt as their base rules.
Consider these must-have safety features, such as GFCI outlets near water sources or proper ventilation to prevent mold.
2. Making Your Bathroom Better with NKBA Standards
The National Kitchen and Bath Association takes basic safety rules a step further. While not legally required, these guidelines focus on making bathrooms more comfortable and practical.
For example, where IRC requires 21 inches of clearance in front of a toilet, NKBA suggests 30 inches for better comfort.
3. Creating a Complete Bathroom Plan
A good bathroom design combines IRC requirements and NKBA recommendations. First, it must meet all safety codes, then add features that make the space more usable.
For instance, after meeting the basic shower size requirement of 30×30 inches, you might choose the NKBA-recommended 36×36 inches for added comfort.
4. The Cost of Ignoring Codes
Failure to follow building codes can lead to serious problems. In addition to risking fines from local inspectors, you might need to tear out and redo work that doesn’t meet standards.
This can quickly become expensive, especially after finishing the walls or installing fixtures. Getting it right the first time saves money and stress.
5. Planning for Safety and Accessibility
The highest level of bathroom design includes features for accessibility. This means thinking about who will use the space now and in the future.
Simple additions like blocking for future grab bars or wider doorways can make a big difference without much extra cost during initial construction.
Most Common Bathroom Code Issues and Solutions
1. Inadequate Air Flow Systems

Poor ventilation leads to mold growth and damaged walls. Building codes require a window with 3 square feet of space (half must open) or a fan rated at 50 CFM at minimum.
Adding an automatic humidity-sensing fan helps prevent moisture issues.
2. Unsafe Electrical Setup

Regular outlets near water sources create shock risks. Replace all bathroom outlets with GFCI-protected versions.
These safety outlets cost about $15 each and cut power instantly when they detect moisture or current problems. Local codes require them to be within 6 feet of water sources.
3. Fixtures Too Close Together

Many bathrooms fail inspection due to tight spacing between fixtures. Maintain at least 15 inches from a toilet’s center to any wall and 30 inches between fixtures.
Proper spacing ensures comfortable use and meets basic safety requirements.
4. Substandard Shower Lighting

Dark showers create safety hazards. Install moisture-rated lighting fixtures that provide at least 60 watts of illumination.
Place the lights to minimize shadows and ensure even lighting throughout the shower space.
5. Dangerous Counter Edges

Sharp vanity corners pose injury risks. Building codes recommend rounded or beveled edges on all countertops. During installation, specify edge treatments with at least 1/8 inch radius to meet safety standards.
6. Limited Toilet Space
Incorrect toilet placement makes bathrooms uncomfortable and unsafe. Keep 21 inches clear in front of toilets and 15 inches from the center to the walls. Consider compact toilets for tight spaces while maintaining required clearances.
7. Poor Water Management
Incorrect floor slopes lead to standing water. Shower floors must slope 1/4 inch per foot toward the drain. Test slope during installation using a level and fix any flat spots before final tile work.
8. Failed Moisture Barriers

Water damage often stems from poor waterproofing. Use proper membrane systems behind tiles in wet areas. Install pan liners correctly, extend the walls 6 inches up, and test thoroughly before tiling.
9. Problematic Shower Access

Inward-opening shower doors can trap users if they fall. Install doors that swing outward or use sliding designs. Ensure at least 24 inches of clear openings for safe entry and exit.
10. Missing Support Systems

The lack of wall backing for future grab bars creates retrofit problems. Install solid wood blocking between studs at ADA heights (33-36 inches) during construction.
This preparation costs little but adds significant future value.
Essential Space & Layout Guidelines for a Functional Bathroom
Proper space planning is the key to a well-designed bathroom. Most states require a minimum bathroom size of 30 square feet and a width of at least 5 feet. To ensure comfortable use, the ceiling must reach at least 80 inches above all fixtures.
These measurements create a foundation for a functional bathroom that meets basic safety standards.
Door and Entry Specifications
Your bathroom door must be at least 32 inches wide to meet current standards. This measurement ensures proper access for all users, including those with mobility aids.
The door’s swing path should not interfere with any fixtures or cabinet doors, which often means planning for an outward-swinging door in smaller bathrooms.
Fixture Placement Guidelines
Sink and Vanity Requirements
Proper sink placement requires at least 15 inches from the center to any side wall. For bathrooms with two sinks, maintain 36 inches between their centers to provide adequate elbow room.
Standard vanity heights range from 32 to 34 inches and can be adjusted based on user needs. A 4-inch minimum space between the sink edge and the wall allows for proper cleaning and maintenance.
Toilet Location Standards
Toilets need specific clearances for safe and comfortable use. To ensure comfortable access, the center of the bathroom should be at least 15 inches from any wall or fixture, and the space in front should extend at least 21 inches.
For enhanced accessibility, consider toilets with seat heights between 17 and 19 inches.
Shower and Bathtub Regulations
A standard shower must measure at least 30 by 30 inches, though 36 by 36 inches offers better usability. Shower doors require a minimum 24-inch opening clearance for safe entry and exit.
Modern plumbing codes mandate temperature-control devices to prevent scalding.
Professional Guidance vs Self-Installation
1. Building Inspector Consultation
Consulting a building inspector early helps prevent costly mistakes. Schedule pre-construction meetings to review plans and identify potential issues. Most jurisdictions require inspections at specific stages:
| Construction Phase | Inspection Type |
|---|---|
| Rough-in | Plumbing, electrical, framing |
| Waterproofing | Shower pan, membrane installation |
| Final | Fixture installation, ventilation |
2. Professional Design Benefits
NKBA-certified designers bring valuable expertise to bathroom projects. They understand both code requirements and functional design principles.
Their experience helps avoid common mistakes and often saves money by preventing costly corrections. Professional designers also maintain relationships with reliable contractors and suppliers.
3. DIY Considerations
While some tasks can be completed by hand, others require professional help. Simple upgrades like fixture replacement or painting are suitable for DIY.
However, changes to plumbing, electrical systems, or structural elements require proper permits and often professional installation to meet code requirements.
The Bottom Line
Building a code-compliant bathroom involves more than following rules—creating a safe, functional space that will serve you well for years.
The key lies in understanding how basic requirements work together with design best practices. When planning your bathroom project, start with proper spacing, ventilation, and safety features.
Then, add elements that improve comfort and usability. Remember that investing in quality materials and correct installation now prevents costly fixes later.
If you’re unsure about bathroom codes, consult a professional. Local building inspectors and certified designers can guide you through requirements specific to your area.
Their expertise helps ensure your bathroom meets legal standards and provides lasting value for your home.